Making a Survey Available
As with tests, Blackboard separated the processes of creating and deploying a survey into two distinct steps. You create the Survey first using the Survey Manager, and then you decide as a totally separate step where you will post the link to your survey in your course. To make things even more confusing, Blackboard also allows the reverse process: you can find the place in your course where you want the survey and then create it there, but we'll be explaining the former process in this help sheet, since that process is a bit more logical.
For instructions on how first to create a survey, see the help sheet Creating a Survey. In order to make a survey you've already created available to your students:
- Log in to Blackboard
(opens in new window), and click on the course in which you created the survey, listed among the "Courses you are teaching" in the My Courses
section of the opening page. Within that course, go to the Control Panel by clicking on the
 icon near the bottom of the left-hand navigation menu. icon near the bottom of the left-hand navigation menu.
- Click on the link for the particular Content Area where you want to post your survey. In this example, we will show how to
add a survey to the Course Materials section of your course, but the survey can be added to any content section:

Please note that you could decide to create a separate folder for surveys within that Course Materials (or other) content area by following
these instructions
(page opens in new window). You can also create a separate content area for surveys by following
these instructions
(page opens in new window).
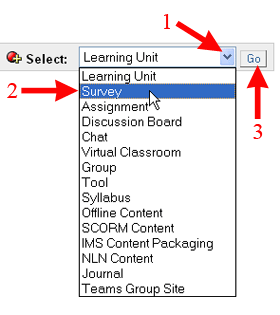
- Within the area of your course that you've chosen, look at the far right-hand side of the screen. Click on the down arrow next to the Select window, click on Survey among the drop-down list of items you can add, and click the Go button to deploy the survey within that section of the course:

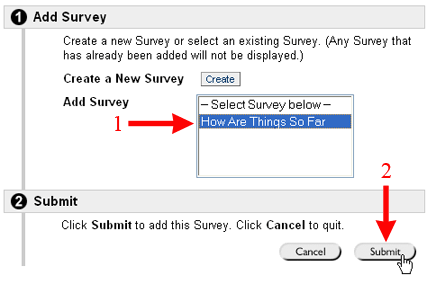
- On the Add Survey page, in the Add Survey window, you'll see a list showing the survey (or surveys) that you've created but not yet deployed in your course. Click on the survey that you want to add to the chosen content area, and click the Submit button to send your request to the server:

- Blackboard will confirm that your survey has been added successfully. Click on the
 button to clear the confirmation page. button to clear the confirmation page.
- At this point, you'll need to select the options for how the survey is displayed to students. Click on the Modify the Survey options link to specify the Availability, Feedback, and Presentation options for the survey. Below, we'll display some recommended options for each section, along with a more detailed description of why we recommend those options:
| Section |
Suggested Options |
| 1. Survey Information |
 |
| 2. Survey Availability |
 |
| 3. Survey Feedback |
 |
| 4. Survey Presentation |
 |
| Section |
Prompt(s) |
Suggested Setting |
Explanation |
| 1. Survey Information |
Open Survey in new window |
No |
Although you can select "Yes" or "No" here, we recommend that you have the survey open in the main Blackboard window, to avoid confusing students with more than one browser window. |
| 2. Survey Availability |
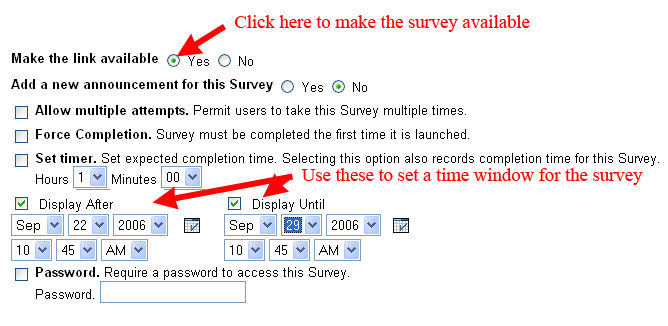
Make the link available |
Yes |
It's important that you select Yes here; otherwise, you'll need to return to these settings at a
later date and select Yes then. In our experience, faculty members who don't select "Yes" at this point often
forget about this setting, and then students actually never see the link for the test and can't take it. If you don't want students
to be able to see the test right away, you can use the "Display After" setting to determine when the link will actually be
available to students. |
| |
Add a new announcement for this Survey |
No |
Unless you're are ready for students to take the survey right away, we recommend that you not add an
announcement at this point. You can use the Announcements feature in Blackboard to add an announcement later, or you can
just let your students know when the survey will be available, and where you've posted it. |
| |
Allow multiple attempts |
Unchecked |
Since this is a survey rather than a practice test, you obviously want the students to take the survey only once, to get an accurate reflection of their views at the time it is administered. |
| |
Force Completion |
Unchecked |
"Force Completion" means that a student can't start a survey, save his/her answers, and then return to the
survey at a later time. Although the return rate might be improved if you force students to finish the survey the first time they open the window, we recommend that you leave this setting unchecked. Students
can do various things to lock themselves out of a survey or test in Blackboard. If you check
"Force Completion," then your students will truly be locked out of the survey if they make a mistake while taking it (for example, resizing the browser window). The server
won't allow them to return to the survey to complete their work, forcing them to get in touch with you, explain what happened, and ask you
to clear their attempt. In short, leave
"Force Completion" unchecked. |
| |
Set timer |
Unchecked |
You can set a timer as a way to force students to complete a survey in one sitting, although I'm not sure how you'd determine in advance how much time a student should take on the survey. It's also not clear why you'd want students to feel that "the clock is ticking" while they are taking the survey. Blackboard doesn't automatically submit the survey when the time period elapses; it just records in the Gradebook the time that elapsed between when the student opened the survey and when
s/he submitted all the answers. |
| |
Display After and Display Until |
Checked |
You can use the "Display After" and "Display Until" settings to establish a certain window
of time when your survey is available to students. You need to click in those boxes to indicate to Blackboard that you want to limit
the availability of the survey, in addition to setting the date and time for both (or either) fields. We recommend that you use both these settings so that your students have the sense of a deadline for completing the survey. If you use the
"Display Until" setting alone, your survey will become available as soon as you submit the Survey Options to the server, and it will
(in effect) disappear from view once the "Display Until" limit is reached. |
| |
Password |
Unchecked, except for special circumstances |
In general, only students who are enrolled in your course can see your course content, and students can take
the surveys you make available through Blackboard only when you decide to make those surveys available. If you want
additional control over when students can take a survey (for example, you have multiple sections combined into a single Blackboard course), you can set a password for the survey, but that means that you'll have to
find a way to communicate the password to your students. You can also change the password by setting the password once,
then returning to the area where you posted the survey (Course Documents, in our example here) and modifying the survey options once again to
set a new password. |
| 3. Survey Feedback |
Feedback Mode: Status Only or Detailed Results |
Either option |
Blackboard provides the choice of whether you want the server to confirm that the students have completed the survey or to remind the student of the questions asked and answers given. |
| 4. Survey Presentation |
Presentation Mode: All at Once or One at a Time |
All at Once (most instances) |
We recommend that you present your survey questions
all at once, unless you have a very long survey with questions that will take students a long time to complete. When questions
are presented all at once, the students see the survey as a single Web page, and they scroll down on that page to answer all the questions, then
submit the survey as a whole. When questions are presented one at a time, the student has to submit each question, and Blackboard also
asks the student to confirm the submission each time, which can quickly become annoying. Also, when students have to move from one question
to the next (on different pages), they are more likely to use the browser navigation buttons rather than the survey navigation controls, which
can cause errors and lock the students out of the survey. The main problem with presenting the survey all at once is that if the survey is a very long
one, there is no apparent activity (from an Internet Service Provider's point of view), since there has been no exchange of data between
the student's computer and the Blackboard server. Some Internet Service Providers will close out the connection if they think it has
been idle for too long, which will basically wipe out the student's attempt. To prevent this from happening - and to safeguard against other possible problems - we
recommend that you urge your students either to use the  button for individual questions or to scroll down to the end
of the survey at various points and click on the button for individual questions or to scroll down to the end
of the survey at various points and click on the  button
to save the answers they have entered already. Also, we recommend that you make the survey shorter, so that students are likely to complete it. button
to save the answers they have entered already. Also, we recommend that you make the survey shorter, so that students are likely to complete it. |
| |
Randomize Questions |
Unchecked |
Since it's hard to imagine why students would "cheat" on a survey, it's similarly hard to find a good reason to randomize the order in which survey questions are presented to students. |
- When you have finished selecting the options for your test, click the
 button to send your choices to the server. button to send your choices to the server.
- Blackboard will confirm that the survey options were "modified successfully." Click on the
 button twice to return to the section where you added the survey. You'll see the new survey as one of the items in that area, with the survey icon next to the item number: button twice to return to the section where you added the survey. You'll see the new survey as one of the items in that area, with the survey icon next to the item number:

(Please note that your survey might not be the third item in your content area, as it is in the figure above.)
- Click on the
 button to return to the Control Panel for your course. button to return to the Control Panel for your course.
Last revised November 10, 2006. Please send questions or comments to itec@bucknell.edu.
|


