Creating a Survey
O wad some Power the giftie gie us
To see oursels as others see us!
It wad frae monie a blunder free us,
An' foolish notion. . . .
Robert Burns, "To a Louse"
Although we can sometimes get a sense of how a class is going from the pace of discussions or from the level of involvement that students show in class sessions, it's also very useful to invite anonymous feedback from students at various key points in the
semester. Such feedback can give you the gift (or "giftie," as Robert Burns puts it) of learning what students think of the course, how well they think they're understanding the course materials, what suggestions for change they might make, etc. - basically, any kind of feedback that can help you achieve more fully your learning objectives for your course.
The key term in the paragraph just above is anonymous - and it's important to assure your students that Blackboard surveys are indeed anonymous. Although you can see from your gradebook if a student has completed the survey, you can't see how a particular student responded to the survey. In reporting survey results, Blackboard aggregates the responses, allowing you to see how many students answered a survey question in a particular way, but not which students produced such an answer. The survey results are still highly useful, though, as a way to receive honest feedback from students. To create a survey in Blackboard:
- Log in to Blackboard
(opens in new window), and click on your course among the list of "Courses you are teaching" in the My Courses
section of the opening page. Within that course, go to the Control Panel by clicking on the
 icon near the bottom of the left-hand navigation menu. icon near the bottom of the left-hand navigation menu.
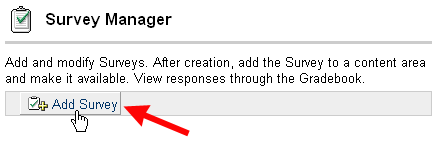
- In the Assessment area of the Control Panel (on the right-hand side of your browser window, in the middle section), click on the
Survey Manager link:

- Click the Add Survey button:
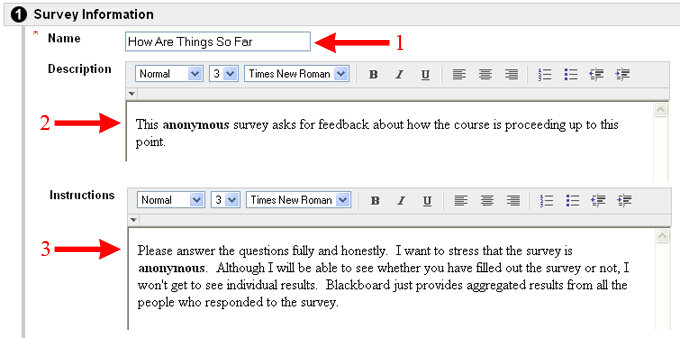
- On the resulting "Survey Information" page, type in a name for the survey. You can also add a brief description and instructions for your students:
When you are finished, scroll down to the bottom of the page, and click the
 button to send your changes to the server. button to send your changes to the server.
Please note that if you want to add special formatting to the text (as in anonymous, in the description
and instructions fields above), you need to be using Internet Explorer to see the WYSIWYG text editor box displayed in the figure above. The best way to add special formatting is to type the text first without that formatting, then select the text you want to change
by highlighting the text with your mouse, then click on the appropriate button in the formatting toolbar (for example, B or I) to have the text appear with that special formatting.
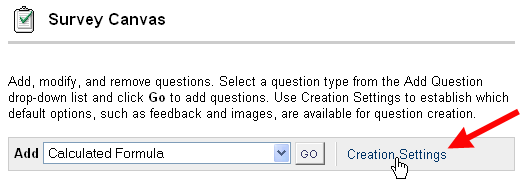
- Blackboard will take you to a Survey Canvas page, which will allow you to add questions to your survey.
Before you add the first question to the survey, though, we strongly recommend that you click on the "Creation Settings" button to set general properties for the survey and for its questions:
- The Survey Creation Settings page has three sections. In the table below, we provide advice about what options to select for your survey:
| Section |
Prompt(s) |
Suggested Setting |
Explanation |
| 1. Images, Files, and External Links |
Add images, files, and external links to questions.
Add images, files, and external links to answers.
|
Unchecked (both options) |
Leave these unchecked, unless you want to be able to include images, files, or links in your questions, or unless you want your students to be able to respond with images, files, or links. |
| 2. Question Metadata |
Add categories, topics, levels of difficulty, and keywords to questions. |
Unchecked (most users)
Checked (advanced users) |
Most users will want to click in the box to clear the check mark. If you are an advanced user who creates question pools (banks of
questions that you can use in multiple surveys) or if you re-use questions and want to be able to search for them, then you can keep
the check mark in the box to allow you to add metadata (categories, topics, levels of difficulty and key words) to the questions as you create your survey. The metadata
will allow you to search for questions to use in subsequent surveys based on the information you have provided when creating the question - for example, search for all questions having the key word "discussion".
|
| 3. Display |
Specify random ordering of answers.
Specify the horizontal or vertical display of answers.
Specify numbering options for answers.
|
Unchecked for random ordering; checked for the other two options (depending on your preferences) |
Blackboard allows you to randomize the order of answer choices, so that each student basically receives a different version of the survey - in other words, option A for question 1 (for one student) might be the same as option D for a different student. Since it's highly unlikely that a student would want to cheat on a survey by copying another student's answers, and since surveys often use Likert-style questions with a fixed order, you'll want to de-select this option (by clicking in the box to remove the check mark). In terms of how answers are displayed, the default version is either vertical or horizontal, depending on the question type. If you want to be able to select the most appropriate alignment of answer choices, you can click in that box to provide that option to you. For answer numbering, the default value is to have no numbers next to answers (for multiple choice questions),
but just radio buttons. If you want to choose how your answer options are "numbered" (no numbering, Arabic nubmers, Roman numerals, uppercase or lowercase letters), you can select this box. |
Here is a screen shot of the recommended options for a survey:
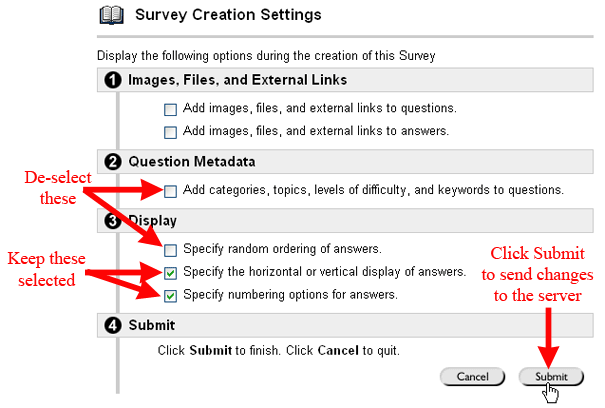
- Once you've chosen the settings you want, click on the button to send your changes to the server. (See the figure just above.)
- Blackboard will confirm the choices you have just made. Click on the
 button to return to the Survey Canvas. button to return to the Survey Canvas.
- To add the first question to your survey, click on the down arrow next to the Add window, and select the type of question you want to add to the survey. We'll start with an "Opinion Scale/Likert" question in our sample survey:
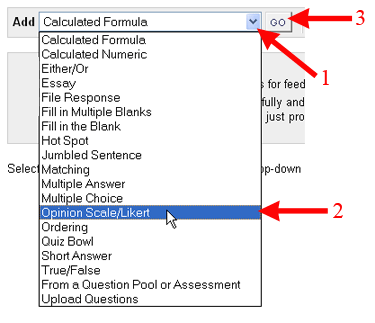
Once you've selected the question type, click on the Go button (see the figure just above) to add a question of that type to your survey.
- Add your question prompt to the Question Text field, and then scroll down to the Options section
of the page. The options available to you will depend on the selections you made when you clicked on "Creation Settings".
(See Step 6, above.)
In the figure below, we have chosen a typical horizontal orientation of answer choices, plus upper-case letters for the answer choices:
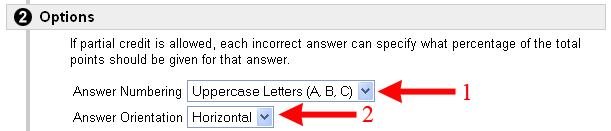
Please note that Blackboard will re-load your Add Question page once you select a numbering scheme, so that the potential answers will be listed based on the scheme you chose (Arabic numerals, Roman numerals, upper-case leters, lower-case letters, etc.).
- By default, Blackboard thinks that a Likert-style question has six possible responses: Strongly Agree, Agree, Neither Agree nor Disagree, Disagree, Strongly Disagree, and Not Applicable. If you want fewer than six choices, you can click on the
 button to the right-hand side of whatever answer choice you want to eliminate. You can also modify the text for the answers (if necessary). When you are happy with the question and
answer text, click on the button to send your changes to the server. button to the right-hand side of whatever answer choice you want to eliminate. You can also modify the text for the answers (if necessary). When you are happy with the question and
answer text, click on the button to send your changes to the server.
- Blackboard will return you to the Survey Canvas page, and it will show you the first question you just created. To continue adding questions of the same type as the previous one, click on one of the Add Question Here links; presumably, you'll want to click on the link at the bottom of the page, so that your new question will come after the first one.
- Unfortunately (with Likert-style questions), Blackboard doesn't retain the settings from the previous question, so you'll need once again to add the question text, specify the display options, remove unwanted choices or reword possible choices (if necessary), and then click on the Submit button to send your new question to the server.
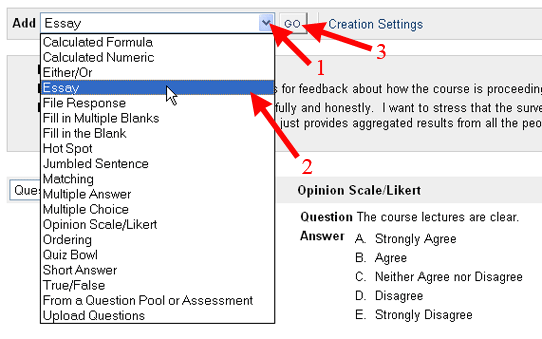
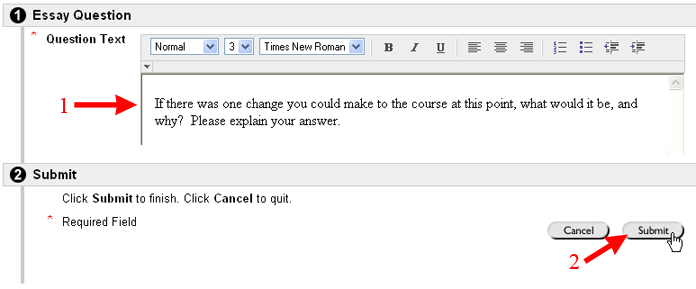
- To add a different type of question, select the desired question type from the pull-down menu and click the GO button. In the figure below, we show how to add an "Essay" question, which is the type you'll want to use if you are asking any "open-ended" or "Please explain" kinds of questions:
- For an "essay" question, you need to type only the question text. Then click on the Submit button to send your
changes to the server
- Continue adding questions (either by choosing a different question type and clicking on the "GO" button, or adding a question of the same type as the previous question by clicking on one of the "Add Question Here" links) until you've reached the final question of your survey. Once you have entered all the questions for
your survey, scroll to the bottom of the page and click the button
to finalize your test and return to the "Survey Manager" window.
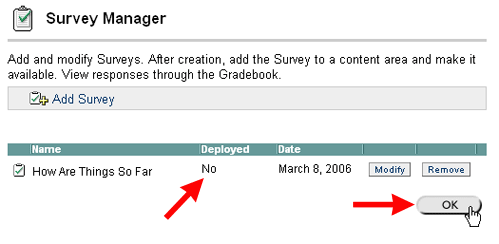
- The newly created survey is displayed in that Survey Manager window. Note that the test has not yet been deployed
in your course, so there is a No in the "Deployed" column. Click on the
OK button to return to the Control Panel for your course:
- See the Making a Survey Available help sheet for further instructions on how to
deploy the survey within your course to make it available to your students.
Last revised November 8, 2006. Please send questions or comments to itec@bucknell.edu.
|