Adding a Folder to a Content Area
As we explain in the related help sheet, Adding a Content Item to Your Course,
we recommend that you organize the Course Materials section (or other relevant sections) of your Blackboard course into
folders, so that you can group related documents together and so that you can make it easier for students to find the relevant
document(s) when needed. To add a folder to a content area:
- You can access your Blackboard course by logging in to
myBucknell (opens in new window) and by clicking on the relevant course listing in the My Blackboard "gadget" on that page or by logging in directly to
Blackboard
(opens in new window).
- If you are on the main My Blackboard page in Blackboard, you can access your course by finding it in the Custom My Courses module in the middle column on that page and then clicking on the link for the course:

- Starting with Blackboard 9, the Control Panel became part of the interface (rather than a separate area), and you don't need to use the Control Panel to add content to a course. Instead, you first need to toggle the Edit Mode switch at the top-right corner of the page to the On position (if it's not "On" already), to allow you to edit your course:

- We'll assume in this help sheet that you want to create the folder in the Course Materials section of your course. Click on the Course Materials button in the course navigation menu to get to that area in your course.
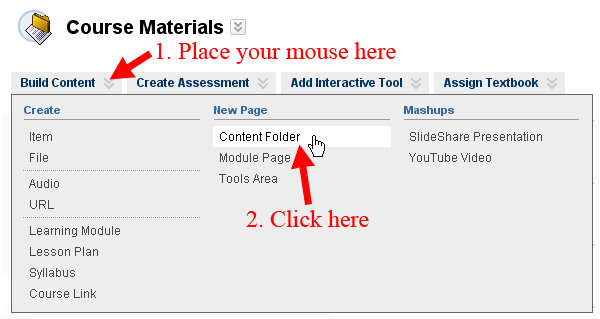
- To add a folder, move your mouse over the double down-arrow on the right edge of the Build Content button, and click on the Create Folder link:

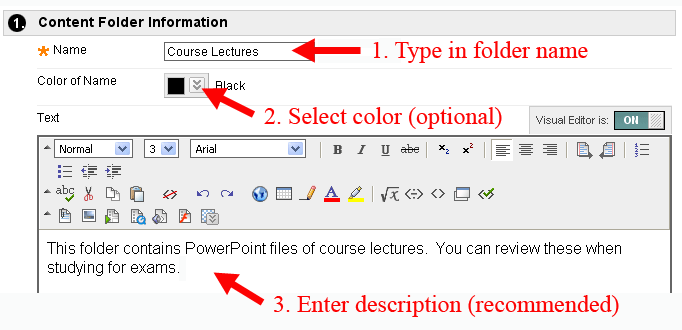
- On the Create Content Folder page, type a name for the folder in the "Name" box.
If you would like to color-code your folders to make them easier to identify, you can choose a color other than the default (black)
by clicking the double down-arrow next to the current black color square and selecting the color you want from the
Color Palette window that opens up.
We recommend that you type a brief description of the folder in the Text box, so your students will have a sense of the files contained
within it:

If you want to add special formatting to your description text,
we recommend that you type the text first without any formatting, then
click and drag with your mouse to select the specific words that will need special formatting. Once those words are highlighted, click
on the appropriate tool in the Formatting Toolbar (B or I, for example) to apply the chosen
formatting to the selected text.
- Scroll down to the Options section of the page. By default, the "Yes" radio button will be checked for "Permit Users to View this Content," and you'll want to retain that default setting. If you want to limit when students can see the folder (and therefore all the items contained in it as well),
you can use the Display After and Display Until settings to control that time frame. Since this is a folder and not a content
item, you don't really need to track how often students click on the folder, so you can leave the "Track Number of Views" option in its default "No" setting:

- Click the
 button to send your changes to the server. button to send your changes to the server.
- In the green status bar just above the Course Materials title (if that's where you added your folder), Blackboard will confirm that the folder was successfully created, and you should see the folder within the content area.
Please note that if you want to add documents within a folder, you need to click on the link for the folder
first, so that you are actually adding the items within the folder (from Blackboard's perspective). See the related
help sheet Adding a Content Item to Your Course for those instructions.
Last revised July 26, 2010. Please send questions or comments to
itec@bucknell.edu.
|


