Adding Multiple Documents at a Time Using the Document Unpackager
Usually, it is better to upload documents into your Blackboard course one file at a time, since Blackboard allows you to provide descriptive information about each document and to set the options so that you can see (for example) whether students are actually viewing a particular document in your course. When you have a group of similar files to upload, however, it can be tedious to do that one file at a time. To make possible "bulk" uploads of files into a Blackboard course, we have installed a "building block" (that is, a program to extend Blackboard's functionality) called the Document Unpackager. The Document Unpackager allows you to upload a compressed (*.ZIP) archive file into your course. That ZIP archive can contain documents and even folders that themselves contain document. The building block will unzip the archive, create folders in Blackboard, and create an item for each of the documents as well. The title for each document will be the same as the file name, and the link to each document will also be the file name, with the appropriate file extension (as in mydocument.doc). The process involves two steps, which we will explain in two separate help sheets:
- Creating the Zip Archive
- Uploading the Package Into Blackboard
Creating the Zip Archive
Please note that these instructions are for Windows PCs with Winzip installed. If you are using a Macintosh, you can follow these instructions instead.
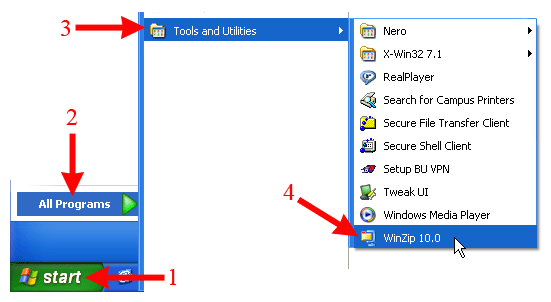
- Click on the Start button in the bottom-left corner of your screen, slide the mouse up to "All Programs" and then to "Tools and Utilities". The last program in that group is Winzip (version 10.0 or 11.0). Click on Winzip to launch that program:

(Please note that your display will look a bit different from the picture above. We've deleted the other program groups that you would see, focusing just on the ones you need to launch Winzip.)
- Within Winzip, you'll need to create a new "archive" or *.zip file, which you can do by clicking on the "New" button at the top-left corner of the screen:

- You can think of a zip archive as a kind of magic compressible suitcase: a 26-inch suitcase that shrinks to the size of a carry-on bag, only to return to its original size when you are ready to view the files. You put a bunch of files in the "suitcase," and Winzip compresses the files to form a smaller "package". Then, you "extract" the files to return them to their original size. The "suitcase" is the *.zip file.
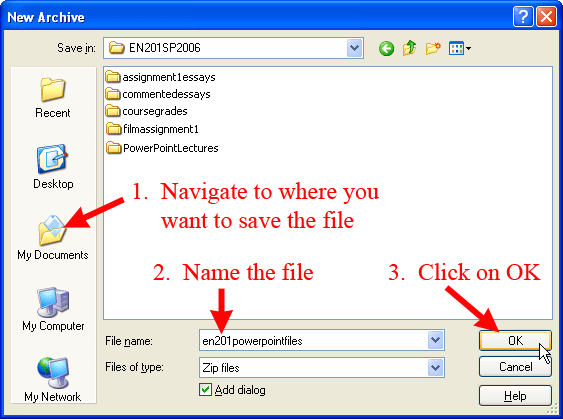
When you click on that New button to create a new archive (that is, a new *.zip file), you need to give the archive a name, and you need to tell WinZip where you'll want it to save the file. Navigate to where you want the *.zip file to be saved, type in a name for the file, and click on the OK button to begin creating the package:

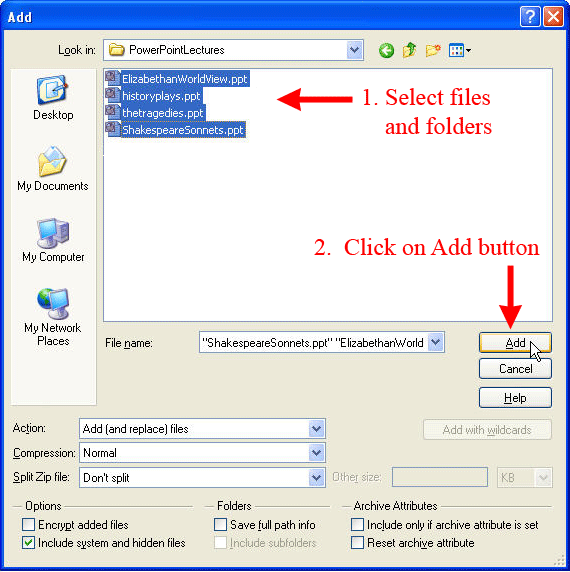
- At this point, you need to select all the files that will make up the archive. You can hold down the "Ctrl" key while clicking on each file with the mouse in order to select multiple files. The "Document Unpackager" building block lets you upload files and folders, so you could actually include a folder full of files as part of the "package":

When you are finished selecting files, click on the Add button (as shown in the figure above) to add those files to the package.
- Adding the files is actually all you need to do. Once they are all listed in the main window, the files have actually been compressed, and the archive has been created. You can click on the File menu and choose "Exit" to exit out of WinZip. At this point, you can move on to the next stage of the process, which is to upload the Zip archive into your Blackboard course, following
these instructions.
Last revised February 26, 2008. Please send questions or comments to
itec@bucknell.edu.
|


