Adding Multiple Documents at a Time Using the Document Unpackager
Usually, it is better to upload documents into your Blackboard course one file at a time, since Blackboard allows you to provide descriptive information about each document and to set the options so that you can see (for example) whether students are actually viewing a particular document in your course. When you have a group of similar files to upload, however, it can be tedious to do that one file at a time. To make possible "bulk" uploads of files into a Blackboard course, we have installed a "building block" (that is, a program to extend Blackboard's functionality) called the Document Unpackager. The Document Unpackager allows you to upload a compressed (*.ZIP) archive file into your course. That ZIP archive can contain documents and even folders that themselves contain document. The building block will unzip the archive, create folders in Blackboard, and create an item for each of the documents as well. The title for each document will be the same as the file name, and the link to each document will also be the file name, with the appropriate file extension (as in mydocument.doc). The process involves two steps, which we will explain in two separate help sheets:
- Creating the Zip Archive
- Uploading the Package Into Blackboard
Uploading the Package Into Blackboard
- Log in to Blackboard
(opens in new window), and click on your course among the list of "Courses you are teaching" in the My Courses
section of the opening page. Within that course, go to the Control Panel by clicking on the
 icon near the bottom of the left-hand navigation menu. icon near the bottom of the left-hand navigation menu.
- Navigate to the part of your course where you want to upload the documents. In this example, we'll assume that you want to put the files into the Course Materials section, so click on the Course Materials link in the Content Areas box in the top-left quadrant of the page:

- We'll assume that you have already created a folder in the Course Materials section following
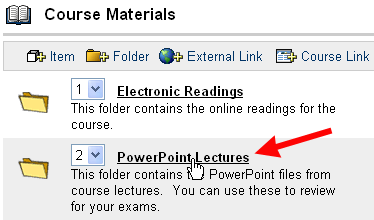
these instructions (page opens in new window). If have indeed created a folder in this area, click on the link for the folder (otherwise, skip to the next step):

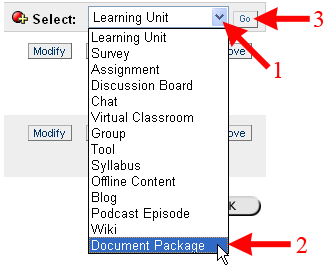
- Click on the down arrow in the top-right corner of the screen to select the type of content you want to add; in this instance, select Document Package, then click on the Go button to send your request to the server:

- You will need to indicate the default settings for the documents that you upload. The settings selected here will be the initial ones for all the documents in your package; you can change them later for particular items by modifying the item, after it has been uploaded. We tend to recommend that you track the number of views, so that you can see later on whether students are actually viewing your course documents:
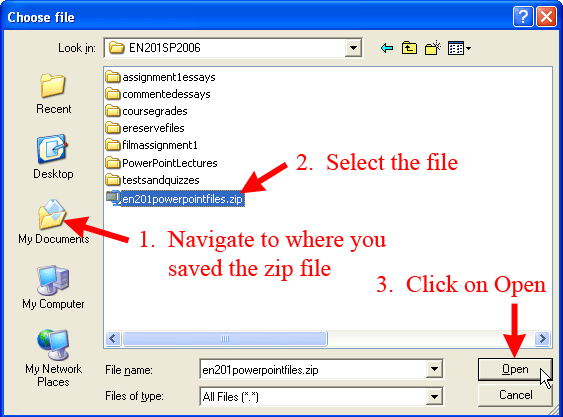
- You'll need to point Blackboard to the Zip file you created previously following
these PC instructions (page opens in new window) or
these Macintosh instructions (page opens in new window). To do so, click on the Browse button, and find the place on your hard drive where you saved the *.zip archive file:

- Once you've selected the file, click on the
 button to send your request to the server. button to send your request to the server.
- Blackboard will unzip all the files and add them to your Blackboard course, giving you the confirmation message "The document unpackaging process has completed successfully." Click on the
 button to return to the area of your course where the documents have been added. button to return to the area of your course where the documents have been added.
The Document Unpackager uses the file name (without any doc, ppt, xls . . . "dot extension") for the name of the item you added, and it uses the full file name (with the dot extension) for the "Name of link to file" - that is, for the link that the students will click on to view the file. There won't be any descriptions for each item, so if you want to add any descriptive text about an item, you'll need to click on the Modify button next to the item to make any changes.
Last revised February 25, 2008. Please send questions or comments to
itec@bucknell.edu.
|


