Downloading Completed Assignments
This help sheet assumes that you have created an Assignment in your Blackboard course as described in the related document,
Creating an Assignment (link opens in new window).
As we mentioned in that other document, one of the advantages of the "Assigment Manager" over the old Digital Drop Box is the ability to download completed student assignments all at the same time. The Blackboard server packages all the submitted assignment files and the comments the students added when submitting their files into a single, compressed, *.zip file, which you can download to your hard drive and then unzip. You dowload those submitted assignments by accessing the Assignment in the Grade Center for your course:
- You can access your Blackboard course by logging in to
myBucknell (opens in new window) and by clicking on the relevant course listing in the My Blackboard "gadget" on that page or by logging in directly to
Blackboard
(opens in new window).
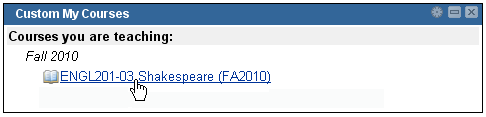
- If you are on the main My Blackboard page in Blackboard, you can access your course by finding it in the Custom My Courses module in the middle column on that page and then clicking on the link for the course:
- To edit your course in Blackboard, you need to make sure that the Edit Mode switch at the top-right corner of the page is in the On position, which it should be by default:

If the Edit Mode is in the off position, you need to click on that switch to turn editing mode back on.
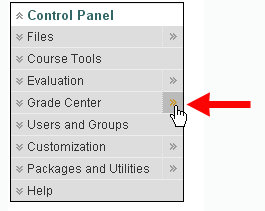
- In the new Blackboard 9.1 Control Panel (on the left-hand side of the page, under the Course Navigation Menu), click on the two rightward-facing arrows on the right edge of the Grade Center link, which will take you straight to the Grade Center for your course:
- You will see the typical Grade Center spreadsheet, with your students listed in the left column, and with
all of your currently created assessments (assignments, quizzes, etc.) listed in the top row. If your assignment was truly created as an Assignment (and not just as an item in the Assignment section of your course), there will be an entry for the Assignment that was automatically added to the Grade Center.
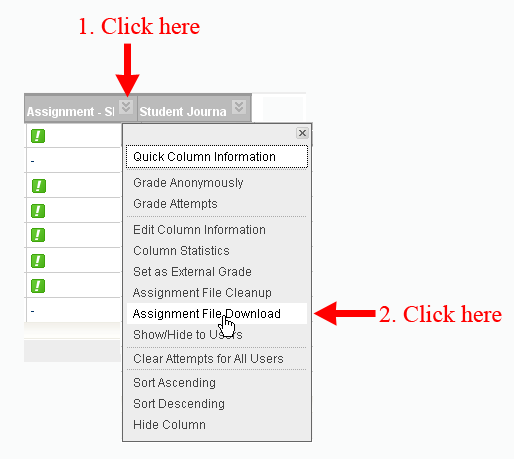
In the column for the specific Assignment, there will be a green exclamation point in the appropriate row of each student who has submitted his/her
assignment, indicating that the assignment has been submitted and needs grading on your part. Click on the double down-arrow next to the name of the assignment at the top of the column to reveal the "contextual menu", then click on Assignment File Download:
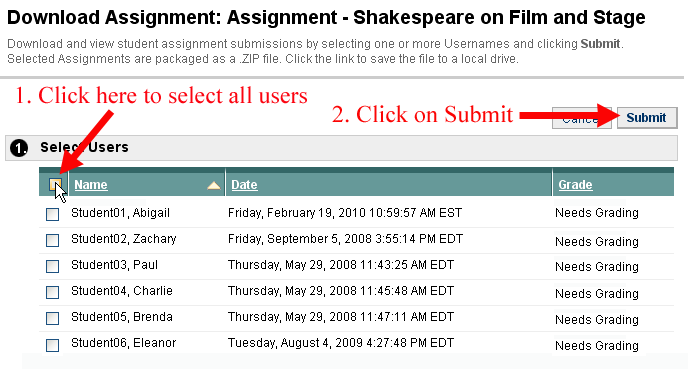
- You will be taken to a Download Assignment page, with a list of students in your course. Those who submitted assignments will have a check box next to their names. You'll most likely want to select all the students who have submitted work by clicking on the small checkbox in the title row, just above the selection box for the first student. Once a green check appears in all the boxes, you can click on the Submit button at the bottom or top right of the page to send your request to the server:
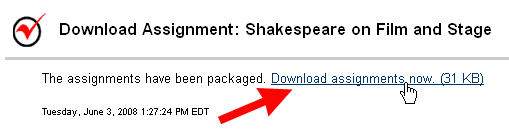
- A confirmation page will appear, with a link that will allow you to download the Zip file created. Click on that link:
- If you are using Internet Explorer, a dialog box will appear, asking whether you want to open or to save the file to disk.
If you are using a university computer that has WinZip installed, or if your operating system is Windows XP (which has its own
unzipping utility), click on the
 button to open the
package within your default unzipping utility. In Firefox, the dialog box will look a bit different, but you will be
presented with the same choice of opening the file with the default unzipping application or saving the file to disk. On a Mac, the file will be downloaded to your default location, usually the desktop, and you can use StuffIt to unpackage the file that you just downloaded. (We'll provide WinZip instructions below, since that is part of the standard
Windows installation on campus.) button to open the
package within your default unzipping utility. In Firefox, the dialog box will look a bit different, but you will be
presented with the same choice of opening the file with the default unzipping application or saving the file to disk. On a Mac, the file will be downloaded to your default location, usually the desktop, and you can use StuffIt to unpackage the file that you just downloaded. (We'll provide WinZip instructions below, since that is part of the standard
Windows installation on campus.)
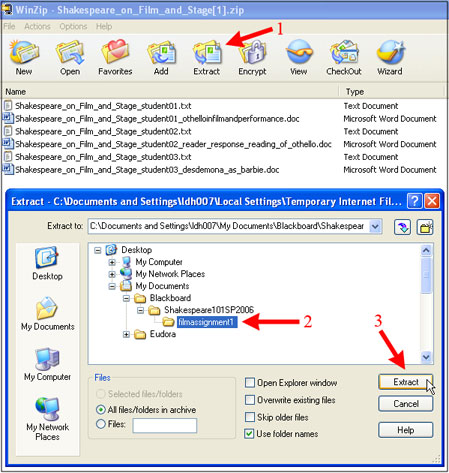
- Within WinZip, you'll notice that there will usually be two files for each
student assignment submitted: a text document that represents the comments the student entered when submitting the file to you (if student did indeed add text comments), and
the assignment file itself. Each document will have the assignment name and the student's user name as part of the title. Click on the Extract button to unzip the files, navigate within the folder structure on your hard drive to
where you want to save the group of files, and click on the Extract button within the dialog box
to save the files to the selected location. Preferably, you should save the files to a folder
within your My Documents folder, dedicated to materials for that particular course:
The dialog box will disappear. You can then exit out of WinZip, since the files have been extracted to the location you chose.
- Within Blackboard, use the "Bread-Crumb Trail" at the top of the page to return to the Grade Center for your course:

You are
now ready to grade the submitted assignments and enter grades into the Gradebook, as explained in
these instructions.
Last revised
September 3, 2010. Please send questions or comments to itec@bucknell.edu.
|