Creating an Assignment
Starting with version 6, Blackboard introduced a feature called the "Assignment Manager" that represents a
significant improvement over and now totally replaces the Digital Drop Box as a way for students to submit course work to the instructor. When faculty members create an Assignment in Blackboard (assuming you create it as an Assignment and not just as an item in the
Assignment section of the course), that Assignment is automatically added to the Grade Center for the course. Students view and submit their
Assignment by clicking on a link within the section of the course where you posted the Assignment. Faculty members can download completed
Assignments as a single package (technically a *.zip file), which can be
unzipped and saved on your hard drive. (In the past, with the Digital Drop Box, you had to download the submitted assignments one at a time,
and you had to pray that two students didn't use the same name for the file, which would cause one submission to overwrite the other
one.) Although we will explain how to add an Assignment within the "Assignment"
section of your course, instructors can add an Assignment within any course content area, and students can submit the assignment by navigating to the same section of your course.
- You can access your Blackboard course by logging in to
myBucknell (opens in new window) and by clicking on the relevant course listing in the My Blackboard "gadget" on that page or by logging in directly to
Blackboard
(opens in new window).
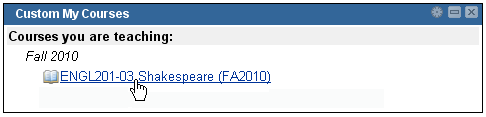
- If you are on the main My Blackboard page in Blackboard, you can access your course by finding it in the Custom My Courses module in the middle column on that page and then clicking on the link for the course:
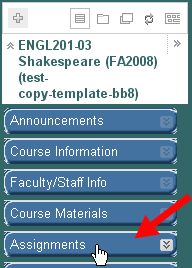
- To edit your course in Blackboard, you need to make sure that the Edit Mode switch at the top-right corner of the page is in the On position, which it should be by default:

If the Edit Mode is in the off position, you need to click on that switch to turn editing mode back on.
- Click on the Content Area link in which you want to create an Assignment. Although we have chosen the "Assignments" area
in the figure below, you can choose the area that makes the most sense based on how you've structured your Blackboard course:
- Blackboard groups related items together in a series of menus (accessed by putting your mouse over buttons just under the section title). To add an assignment to the content area you have chosen, put your mouse over Create Assessment, and click on "Assignment":
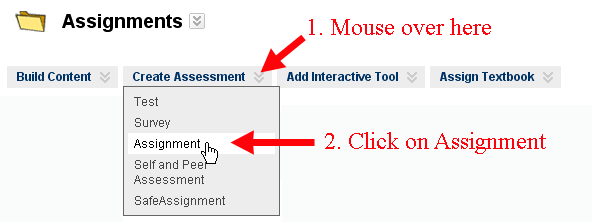
Note: it's important that you add the content as an Assignment in the way we've
depicted just above, rather than just as an "Item" in the Assignment area of your course. Only assignments added as Assignments have the
special functionality we've described.
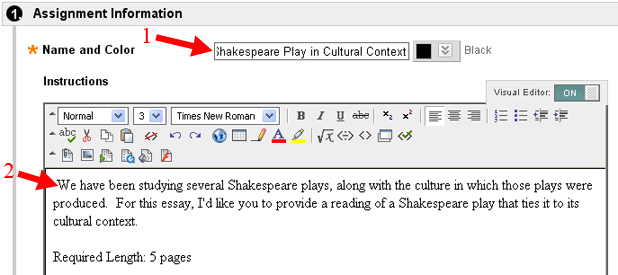
- Enter the name of the assignment and any instructions for your students about the work they are supposed to submit:
- In Section 2 on the page (Assignment Files), you can attach a document related to the assignment for your students to read. However, since students don't often see the attached document, we recommend instead that you add related documents (if you have them) to the same content area, rather than attaching them to the assignment itself.
- In Section 3, Grading, enter the maximum number of points possible for the assignment. If you are weighting your grades using point totals (rather than percentages), you can enter whatever maximum will work for your overall system. In general, we recommend entering 100 for points possible, since a 100-point scale is the easiest for students to understand. A student who sees 85 out of 100 will immediately understand what that means, whereas a score of 34 out of 40 requires a calculation to determine what grade that represents.
- In the Availbility section, you'll want to keep the default setting of Make the Assignment Available.
With Blackboard 9, you can now allow multiple drafts to be submitted for the same assignment (for example, a "draft" and "final" version). Blackboard 9 allows you to comment separately on each submission while having students respond to just one assignment link. In the example below, we'll assume that you are expecting only one attempt to be submitted.
If you want to limit the availability of the assignment to a certain date range, you can check the Display After and Display Until check boxes, and set a date and time for each. The assignment won't appear until after the date and time of the Display After setting, and it will disappear from view once the Display Until date/time has been reached.
In the figure below, we won't set those date limits, because we'll assume that we want students to be able to see the assignment immediately, and we'll want them to be able to return to the assignment later on as a way to see their results:

- Blackboard also allows you to set a "Due Date" for the assignment, which is informational only. (It doesn't prevent students from submitting the assignment after that date.) You can enter a date in that section or just scroll down and skip that section.
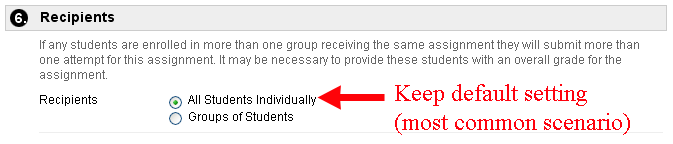
- With version 9.1, Blackboard added the possibility of group assignments, with one member of the group sumbitting the assignment for the group as a whole, and grades for the assignment visible to all members of the group. The more common setting is the individual assignment, so you can keep this setting at its default value ("All Students Individually"):
- When you are finished entering your choices, scroll down to the bottom of the page (if necessary), and click the
 button to send your changes to the server. button to send your changes to the server.
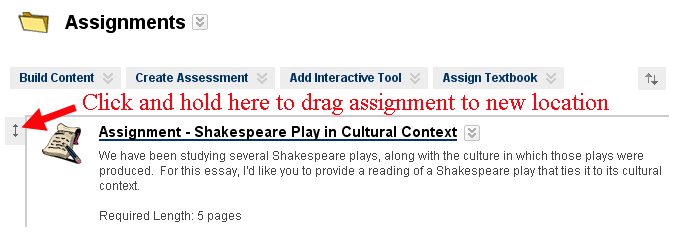
- Blackboard will indicate with the green status bar at the top of the page that the new assignment as been successfully created. The assignment will be displayed in the section where you added it, at the bottom of the section. If you want to move the assignment so it appears higher up in that content area, you can move your mouse over the double vertical arrow to the left of the assignment name, click and hold on that icon, and drag the assignment to its new location in the list:
See the related tutorial on Downloading Completed Assignments to learn how to download
submitted assignments to your hard drive.
Last revised
March 29, 2011. Please send questions or comments to itec@bucknell.edu.
|