
Adding a Content Item to Your Course
As we explain in the related help sheet, Adding a Syllabus to Your Course,
Blackboard was originally advertised as a way for faculty members to "put their courses online" without knowing any HTML.
One crucial element of "putting your course(s) online" is uploading course-related documents into a central, Web-based
repository (in other words, into your Blackboard course), so that your students have access to those documents wherever and whenever they have
Internet access. Blackboard accepts files of multiple types and basically serves as a container for those files, providing access to them
and allowing you to provide brief descriptions for the files, so the students have a sense of what they will see when they click on the
appropriate file link. To upload such a document into your course:
- You can access your Blackboard course by logging in to
myBucknell (opens in new window) and by clicking on the relevant course listing in the My Blackboard "gadget" on that page or by logging in directly to
Blackboard
(opens in new window).
- If you are on the main My Blackboard page in Blackboard, you can access your course by finding it in the Custom My Courses module in the middle column on that page and then clicking on the link for the course:

- Starting with Blackboard 9, the Control Panel became part of the interface (rather than a separate area), and you don't need to use the Control Panel to add content to a course. Instead, you first need to toggle the Edit Mode switch at the top-right corner of the page to the On position (if it's not "On" already), to allow you to edit your course:

- As part of our default course template, Blackboard's left navigation menu has "Announcements" as the first button,
"Course Information" as the second button, and "Course Materials" as the fourth button. The
Course Information section usually contains general information about your course, including (in particular) your syllabus. The Course Materials
section will contain the various documents that you hand out after the first week of classes. For this help sheet, we'll assume that
you haven't changed the default menu structure for your course and that you'll be uploading your new content item into the
Course Materials section.
Click on the Course Materials button to navigate to that section of your course.
- At this point, you'll need to decide how you want to organize the materials that you upload into your Blackboard course.
If you anticipate uploading only a small number of items, or if your item is important enough that you want it within the main
"Course Materials" folder (and not in any sub-folder), skip down to Step 6 below.
In general, we recommend that you organize your items in
folders, to make it easier for students to find the relevant items for your course. To learn how to add a folder to a content area, please see the help sheet
Adding a Folder to a Content Area (opens in new window)
.
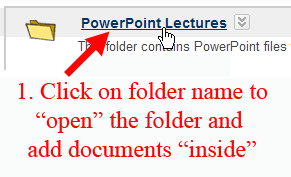
If you have organized your content into folders, click on the link of the folder to which you want to add your item, so that you are (from Blackboard's perspective) "opening" the folder:
- If you are at the place where you want to add the document (either within the sub-folder or at the parent, Course Materials level), put your mouse over the double down-arrow just at the right edge of the Build Content button, and click on "Item" in the "Create" column:
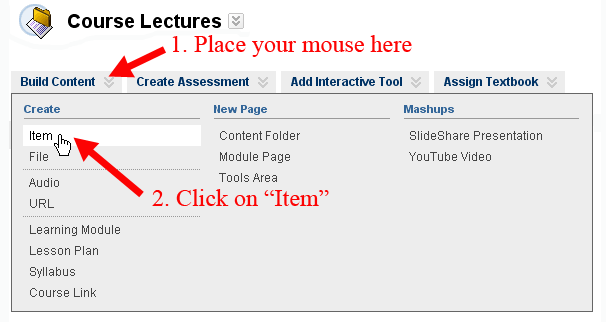
Please note that your display may look slightly different from the figure just above; for example, you might have a different folder name ("Course Lectures"
in the figure above), or you might not be placing your item within a sub-folder.
- You will be taken to a Create Item page. Type a name for the item in the Name box.
If you like to use different colors for particular items to indicate their type, you can choose a color other than the default (black)
by clicking on the double down arrow next to the black color square and selecting the color you want from the
Color Palette window that opens up.
We recommend that you type a brief description of the item in the Text box, so your students will have a sense of what
they will be seeing:
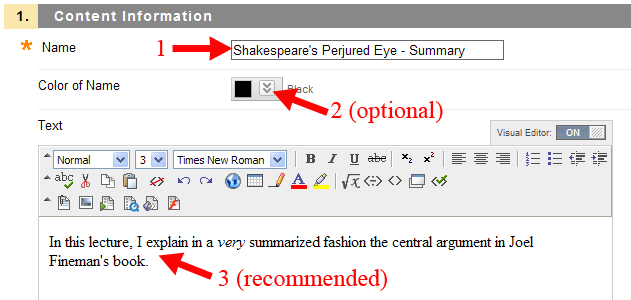
If you want to add special formatting to your text
(as with the word very in the text box, above), we recommend that you type the text first without any formatting, then
click and drag with your mouse to select the specific words that will need special formatting. Once those words are highlighted, click
on the appropriate tool in the Formatting Toolbar (B or I, for example) to apply the chosen
formatting to the selected text.
- Scroll down to the Attachments section of the page. Blackboard 9.1 introduced a new content storage area called the Course Files section, and it's possible that you have already uploaded content there, and you want to link to it from this part of your course. We'll assume for these instructions, however, that you are following a traditional Blackboard method of adding the content to the course content area where students will find the file(s). To upload the file into this content area (or content folder), click the Browse My Computer button in that Attachments section:

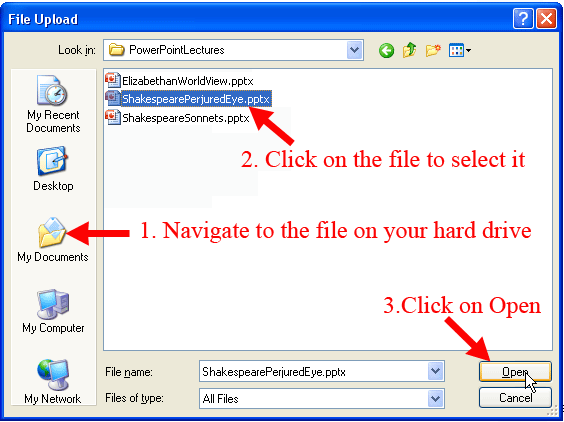
Navigate to the appropriate folder on your hard drive to find the file that you want to
upload into your Blackboard course, click on the name of the file to select it, and then click on the Open button:
- Just below that "Browse My Computer" button is an "Attached Files" area. You'll notice that the file you just selected will be listed in that area, with the file name listed under both "File Name" and "Link Title". If you are satisfied with using the name of the file as the link that students will click on to see the file, you can just scroll down to the next section (Options). Otherwise, you can double-click in the "Link Title" box to change the name of the link that students will see on the page:

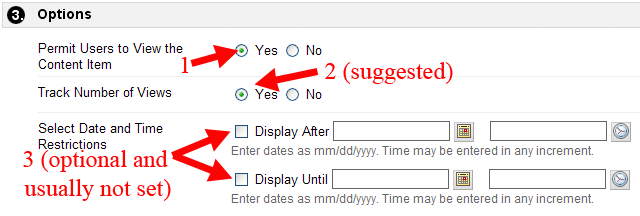
- In the Options section, we strongly recommend that you retain the default Yes setting for "Permit Users to View the Content Item." If you want to limit when students can see the item,
you can use the Display After and Display Until settings to control time frame when the item is visible to students. We also recommend that you select the "Yes" button to track the number of views,
if you want to get statistics at a later point about how often students have accessed this content item. In the figure below, we
choose the basic recommended settings of making the item visible, tracking the number of times students view the item, but not
restricting the item's availability to students:
- Click the
 button to send your changes to the server. button to send your changes to the server.
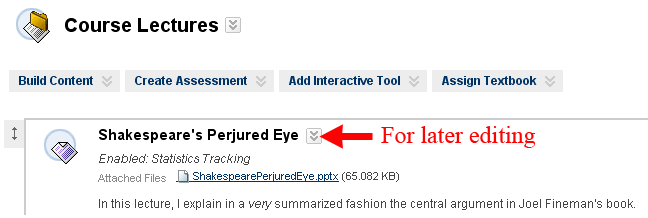
- In the green status bar at the top of the page, Blackboard will indicate that the item has been created. You should see the item you just added on the page, with the
text from the "Link Title" window now underlined, indicating it is a hyperlink. You should also see your brief
description of the link.
If you need to make changes to the item later, you can click on the double down-arrow (marked in the figure below) to reveal a drop-down menu, allowing you to edit the item again (among other possible changes):
Last revised August 4, 2010. Please send questions or comments to
itec@bucknell.edu.
|


