
Downloading Safe Assignments
This help sheet assumes that you have created a "Safe Assignment" following
these instructions
(page opens in new tab or window). In other words, you've created an assignment in Blackboard, so that all student submissions will be checked against a database of other submitted papers and online sources, to determine the "originality" of the submitted work. It's possible that you have also seen the help sheet on
Viewing Originality Reports (page opens in new tab or window), which explains how to see those reports produced by the SafeAssign server. If you came from that page, you are already at the View Self Assignment page in Blackboard, and you can skip down to Step 4 below. Otherwise, in order to download the student assignments submitted to Blackboard:
- Log in to Blackboard
(opens in new window), and click on your course among the list of "Courses you are teaching" in the My Courses
section of the opening page. Within that course, go to the Control Panel by clicking on the
 icon near the bottom of the left-hand navigation menu. icon near the bottom of the left-hand navigation menu.
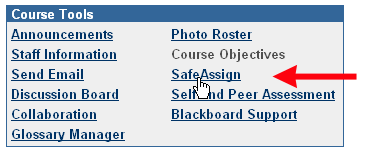
- Within the Course Tools box on the left-hand side of the Control Panel, you'll see a link for SafeAssign. Click on that link:
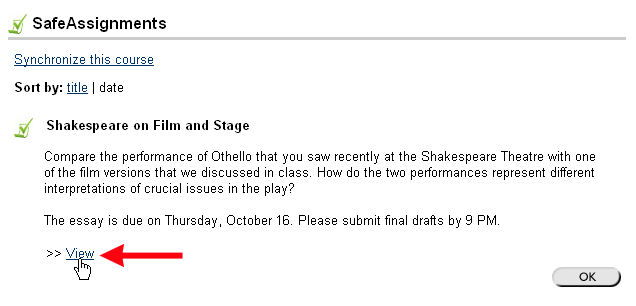
- You will see a list of the "Safe Assignments" in your course. Click on the View link for the particular assigment whose submissions you want to download:
- You will be taken to a View Safe Assignment page, with a spreadsheet-like summary of all the assignments submitted to you, along with the matching percentages for each essay. See
Viewing Originality Reports (page opens in new tab or window) for information about how to interpret those matching percentages and originality reports. Just above the spreadsheet, you'll see a Download button. Click on that button to download all the submitted essays as a single compressed ZIP file:

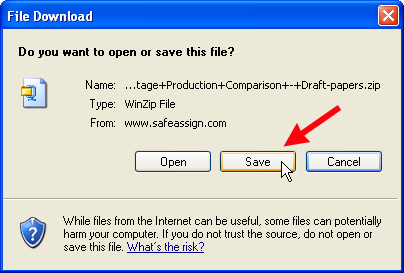
- Depending on your operating system and the browser you are using, you may see a dialog box, asking you if you want to save or to open the file. We recommend clicking on the Save button to save the ZIP file to your hard drive:
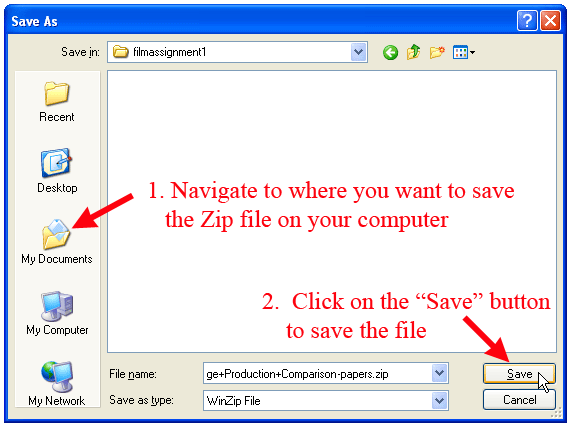
- On Macs, the file will be saved to the default loccation, which is usually the desktop. For PCs, Windows will present you with a dialog box, asking you where you want to save the file. Find the most appropriate folder on your hard drive (depending on how you organize your files), and click on the Save button to save the Zip file there:
- Using Windows Explorer or My Computer, you'll need to return to where you saved the Zip file on your hard drive, then double-click on the name of the file to open up the Zip file within WinZip, our default file compression program.
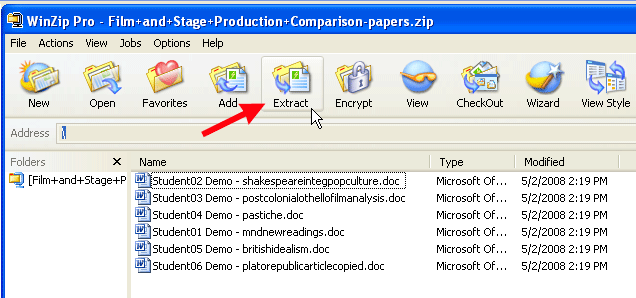
- You'll see a list of the files that are part of the Zip package: basically, all the assignments that the students submitted. Click on the "Extract" button to "unzip" the package, saving all the individual files to your hard drive:
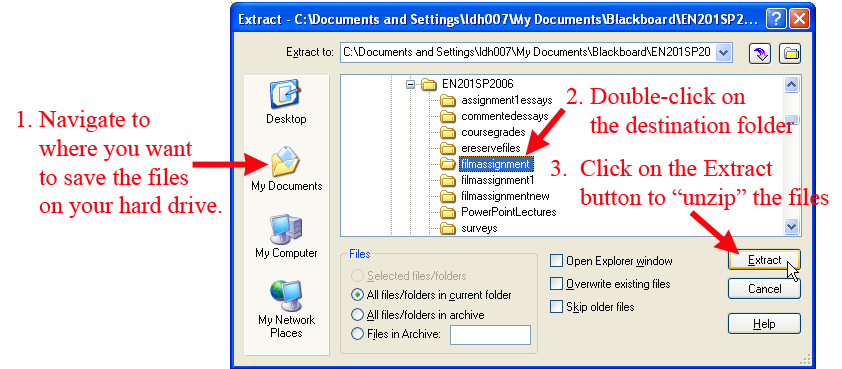
- WinZip will ask you where you want to save the unpackaged files - in other words, where you want to save the student assignment submissions. It's likely that the first location Winzip suggests is not where the actual Zip file was saved, so you need to navigate once again to the appropriate folder on your hard drive, double-click on that "destination" folder to select it, and click on the Extract button in the dialog box to finish unzipping the files:
- If there aren't very many files in the package, you may not notice that the cursor changes to an hourglass to indicate that Winzip is extracting the files, then quickly changes back to the typical white arrow. If you blinked, though, you may have missed that change. You can now exit out of Winzip, since the student assignments have now been saved to your hard drive.
- Once you've downloaded the assignments to your hard drive and unpackaged the Zip file, you are ready to open the files one by one to print them (if you grade papers on paper) or to add comments to them (if you grade essays electronically). When you've finished grading the essays, you can enter the grades into the Grade Center following
these instructions.
Last revised
May 22, 2008. Please send questions or comments to itec@bucknell.edu.
|


