Adding a New Column to the Blackboard Grade Center
When you
create a quiz or test
(opens in new window),
create an assignment
(opens in new window),
or
create a Safe Assignment
(opens in new window)
in Blackboard, an entry for that test or assignment is automatically added to the Blackboard Grade Center, creating a new column in the Grade Center spreadsheet. However, for course assessment items handled outside of Blackboard - for example, midterm exams done on paper, essays handed in by students (and not submitted via Blackboard's assignment manager or SafeAssign process), class participation grades (if you have such a grade), etc. - you need to create a Grade Center column for those items manually, so that you can then enter grades into the column. To add a new column to the Grade Center for your course:
- Log in to Blackboard
(opens in new window), and click on your course among the list of "Courses you are teaching" in the My Courses
section of the opening page. Within that course, go to the Control Panel by clicking on the
 icon near the bottom of the left-hand navigation menu. icon near the bottom of the left-hand navigation menu.
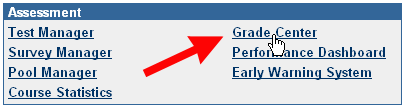
- In the "Assessment" area of the Control Panel, on the right-hand side of the page, click on the Grade Center link:
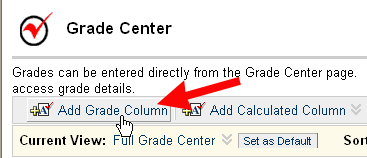
- You will see the Grade Center spreadsheet, with the list of students in your course occupying the first column, and with Username, Weighted Total and Total representing three additional columns. There may be other columns in the Gradebook as well, if you've created assignments or tests in Blackboard. To add a new column to the Grade Center, click on the Add Grade Column button near at the far left of the button bar, just above the spreadsheet:
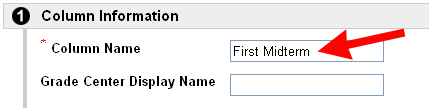
- Blackboard will take you to an Add Grade Column page. In the Column Information section, type in a name for the item in the Column Name box. You can just leave the Grade Center Display Name blank, unless you want some kind of abbreviated version at the top of the spreadsheet:
- For the Primary Display field, the default value is "Score", which tells the students the number of points they received out of the total points possible. You can click on the down arrow to select another option. We tend to recommend score as the primary display, though, since it is the most precise.
- The Grade Center added a category called "Secondary Display" that will allow you to have an additional way to view the grade, in parentheses (for example, as a percentage). In the "My Grades" view, though, the students see only the Primary Display value.
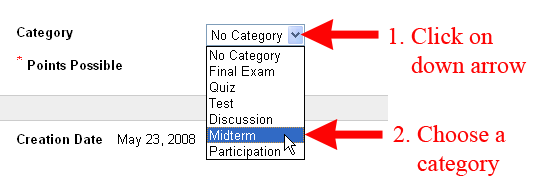
- For the Category field, we created some sample categories for you, one of which might be appropriate to the grade item you are entering. To choose a category from the choices provided, click on the blue down-arrow, and then click on the category that applies:
If none of those categories applies, then you'll need to establish new categories following
these instructions
(page opens in new tab or window). After creating the new category, you'll need to return to this item in the Grade Center to change its category. Specifying categories is needed only if you decide to weight grades by category (for example, all "essays" combine to equal 30% of the overall grade; all "midterms" are worth 25% of the grade, etc.) Otherwise, the category isn't that important.
- The Points Possible field is very important (and required), since it sets the scale for the particular item. Unless you weight your grades by establishing proportional point totals, we strongly recommend that you choose a scale of 100 points. When you choose such a scale, it becomes very clear to students what 85 points out of 100 means, whereas 25 points out of 30 (for example) would require the students to do a calculation for each grade:

- You can choose a Due Date for the item if you wish, although that only conveys information, rather than determing when the item can actually be submitted (assuming it is being submitted).
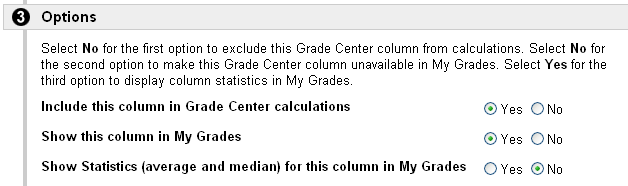
- In the Options section, you'll most likely want to keep the default settings of Yes for "Include this column in Grade Center calculations" and "Show this column in My Grades". You'll most likely want Show Statistics as "No". You'd want to select "No" for the "Include this column in Grade Center calculations" if the item isn't supposed to count as part of the students' final grade. You would want to select "No" for the "Show this column in My Grades" if for some reason you wanted to hide the grades you are giving to students for this item. Below, we show the most common options for this section:
- When you've finished setting the options for the item, click on the
 button to send your changes to the server. button to send your changes to the server.
- Blackboard will return you to the Grade Center. At the top of the page will be an orange box telling you that you have successfully added the column to the Grade Center. You should also see the new column on the far right of the Grade Center spreadsheet. You can follow
these instructions if you want to change the display order of columns.
Last revised
May 28, 2008
. Please send questions or comments to itec@bucknell.edu.
|