Creating an Assignment
Starting with version 6, Blackboard introduced a feature called the "Assignment Manager" that represents a
significant improvement over the Digital Drop Box as a way for students to submit course work to the instructor. Now,
when faculty members create an Assignment in Blackboard (assuming you create it as an Assignment and not just as an item in the
Assignment section of the course), that Assignment is automatically added to the Gradebook for the course. Students view and submit their
Assignment by clicking on a link within the section of the course where you posted the Assignment. Faculty members can download completed
Assignments as a single package (technically a *.zip file), which can be
unzipped and saved on your hard drive. (In the past, with the Digital Drop Box, you had to download the submitted assignments one at a time,
and you had to pray that two students didn't use the same name for the file, which would cause one submission to overwrite the other
one.) Although we will explain how to add an Assignment within the "Assignment"
section of your course, instructors can add an Assignment within any course content area, and they can also upload files related to
the Assignment as part of the Assignment itself.
- Log in to Blackboard
(opens in new window), and click on your course among the list of "Courses you are teaching" in the My Courses
section of the opening page. Within that course, go to the Control Panel by clicking on the
 icon near the bottom of the left-hand navigation menu. icon near the bottom of the left-hand navigation menu.
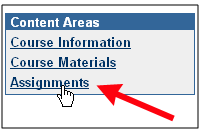
- Click on the Content Area link in which you want to create an Assignment. Although we have chosen the "Assignments" area
in the figure below, you can choose the area that makes the most sense based on how you've structured your Blackboard course:
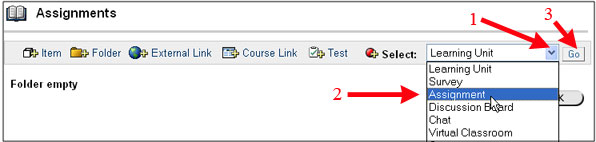
- Click on the drop-down arrow near the Select icon at the far right of the screen (marked
as number 1 in the image below), and select Assignment from the list. Then click the Go button to send your request
to the server. (Note: if you clicked on the OK button by mistake and were returned to the Control Panel, start again at Step 2 above
to return to the appropriate section of your course.)
Note: it's important that you add the content as an Assignment in the way we've
depicted just above, rather than just as an "Item" in the Assignment area of your course. Only assignments added as Assignments have the
special functionality we've described.
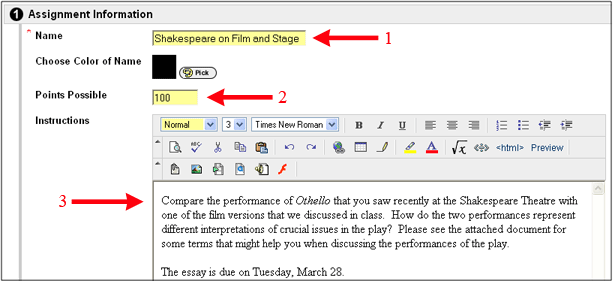
- Enter the name of the assignment, points possible, and any instructions for the assignment:
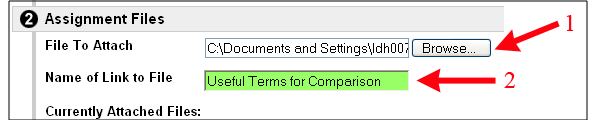
- In the example depicted above, we've suggested that we are attaching a document for the students to read, related to
the specific assignment we are giving. If you want to attach a related file in this way, rather than putting it into one
of the content areas of your course, you can scroll down to Section 2 of the "Add Assignment" page, click on the
Browse button, navigate to the file on your hard drive, and double-click on the file name to select it. You would
then add a name for the link that the students will see, which they will click on to view the attached file:
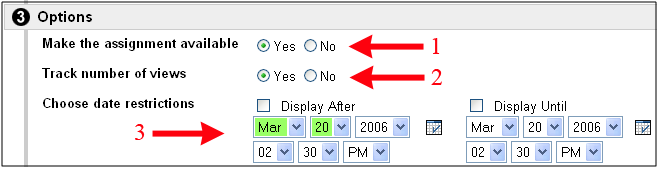
- In the Options section, you can indicate whether and when you want to make the assignment visible and available, as well as
whether you want to track what students have viewed the assignment. We strongly recommend that you make the assignment available
as you create it. If you don't want your students to see the assignment until a certain date, you can use the date restrictions to
indicate when students will actually see the assignment in your course - and when they will no longer be able to see the assignment,
if you do desire. By default, the "Display After" date and time will be the date/time you launched the page to create the
assignment:
- When you are finished entering your choices, scroll down to the bottom of the page (if necessary), and click the
 button to send your changes to the server. button to send your changes to the server.
- Click the
 button to clear the confirmation page,
returning you to the content area where you added the assignment. The assignment will be displayed, similar to the way
students will ultimately see it when they view that area of your course: button to clear the confirmation page,
returning you to the content area where you added the assignment. The assignment will be displayed, similar to the way
students will ultimately see it when they view that area of your course:
 |
- Changing the order of items
- Making changes and seeing statistics
- Link students will see
- Click on "OK" to return to the Control Panel
|
If this isn't the first item you've added to the Assignments area of your course (or to whatever area you chose for the
Assignment), you can change the order in which the Assignment appears by clicking on the down arrow next to the number
(marked "a" in the figure above) and choosing a different number. If you selected "Yes" on the option of tracking
views, you can click on the "Manage" button (marked "b" in the figure above) to find a link for Statistics Tracking
on the item. You can also use the Modify or Remove buttons to make changes to or delete the Assignment you created.
The students will click on the "View/Complete Assignment" link (marked "c" in the figure above) to
view the details of the assignment, to find any related file(s) you attached, and eventually to submit their completed version to you.
- Click the button once again (marked by the number 1 in
the figure above) to return to the Control Panel for your course.
See the related tutorial on Downloading Completed Assignments to learn how to download
submitted assignments to your hard drive.
Last revised March 21, 2006. Please send questions or comments to itec@bucknell.edu.
|