
Exporting a Learning Objects Wiki Space
With version 9.1, Blackboard created its own wiki tool that is closely integrated into the full Blackboard learning management system. Like other wiki software, the new Bb 9.1 wiki tool allows students to create a Web site or an online document (or series of linked documents) collaboratively, with all participants having editing rights to the wiki space. The wiki tool also allows students and instructors to see the full revision history of a wiki page and to compare different versions of the page; the wiki tool also allows instructors to view the extent of particular students' contributions.
We are encouraging faculty members to use the built-in wiki tool and to transition away from the wiki tool we've used in the past - written by Learning Objects as a "Blackboard building block" (in other words, a piece of software designed to work within Blackboard but not created by Blackboard itself). To ensure that you don't lose any wiki content created in the past, these instructions describe how to export existing wiki content as a series of linked HTML pages that can be uploaded onto a Web server.
- You can access your Blackboard course by logging in to
myBucknell (opens in new window) and by clicking on the relevant course listing in the My Blackboard "gadget" on that page or by logging in directly to
Blackboard
(opens in new window).
- If you are on the main My Blackboard page in Blackboard, you can access your course by finding it in the Custom My Courses module in the middle column on that page and then clicking on the link for the course:

- You'll first need to make sure that the Edit Mode switch at the top-right corner of the page is in the On position, which it should be by default. If the Edit Mode switch is in the "Off" position, you need to click on it to turn editing mode on:

- In the Course Navigation menu, click on the button for the area of the course where you created the wiki, and click on the link to View the wiki space:

- At the top of the page, to the right of the wiki title, will be a link to Export the wiki. Click on that link:

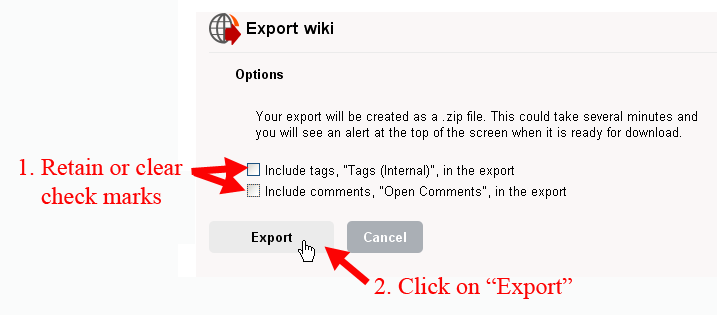
- You will be taken to an Export Wiki page with various options. The Learning Objects wiki tool allows you to create meta-data "tags" that can be used to form "tag clouds" to link to your pages. If you've used that feature, you can keep the check mark in the "Include tags" box. Similarly, if you've allowed comments to the wiki space (by viewers), you can keep the check mark in the "Include comments" checkbox. Otherwise, you can deselect one or both of those boxes, then click on the Export button:
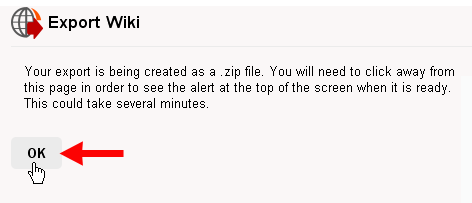
- The wiki tool will respond with a message, letting you know that the export package (that is, *.zip) file is being created. You might want to wait a bit for the process to be completed (depending on how many files there are that make up the wiki), then click on the OK button:
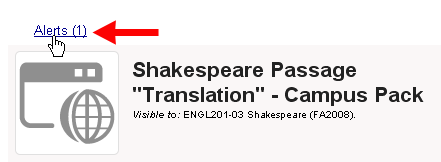
- You will be taken back to the opening page for the wiki. If the export was successful, you will see an "Alert" at the top of the page, just above the title for the wiki. Click on that Alert link:
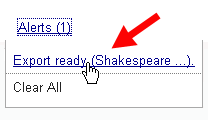
- On the menu that drops down (after you click on the Alerts link), you will see that your export is ready. Clck on the "Export ready" link:
- The export package will be listed as a *.zip file. Click on the name of the file to download it to your hard drive:

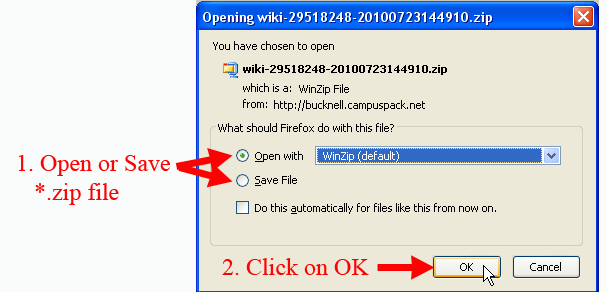
- Depending on the browser you are using (and your operating system), you may be given a choice to open the *.zip file (using WinZip for Windows XP computers) or save the file to your hard drive. We recommend that you can save the *.zip file to your hard drive, so that you have a backup copy of all the pages in the wiki site:
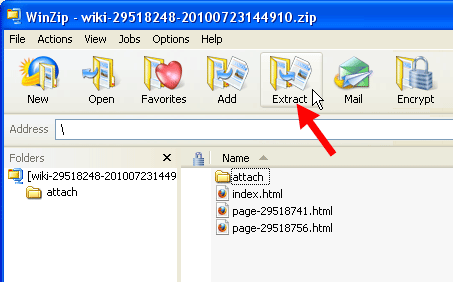
- If you are using a Windows computer and chose to open the *.zip file using WinZip, you will see a list of the files that were part of the *.zip package (and that were pages, images, etc. that comprised the wiki site). You can click on the Extract button to unzip the package and save the individual files to your hard drive:
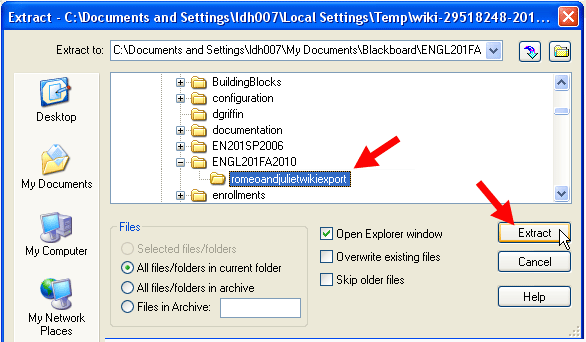
- Navigate to the place on your hard drive where you want to save the files, and click on the Extract button:
- WinZip will "unpackage" the zip file and extract the individual files to the location you selected. It will then open up a Windows Explorer window to show you the extracted files in their new location. You can click on the
 in the upper right-hand corner of the window to close out the list of files, and you can click on that same close button to quit out of WinZip. in the upper right-hand corner of the window to close out the list of files, and you can click on that same close button to quit out of WinZip.
Last revised
February 28, 2011. Please send questions or comments to itec@bucknell.edu.
|


