Making a Course Available to Students
As part of our "Snapshot" process, we create blank Blackboard course shells for all courses
being offered during a semester, based on the course listings in Banner. Those courses are initially created as "unavailable"; in
other words, a student won't actually be able to get to a course in Blackboard unless the faculty member changes
a particular setting to make that course available to students. To activate your Blackboard course for the semester (that is, to make it
available to students):
- You can access your Blackboard course by logging in to
myBucknell (opens in new window) and by clicking on the relevant course listing in the My Blackboard "gadget" on that page or by logging in directly to
Blackboard
(opens in new window).
- If you are on the main My Blackboard page in Blackboard, you can access your course by finding it in the Custom My Courses module in the middle column on that page and then clicking on the link for the course:

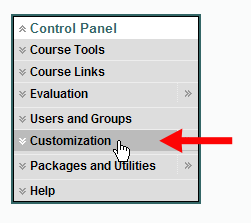
- Within that course, scroll down (if necessary) to the new Bb 9 Control Panel, and click on Customization to expand that section:

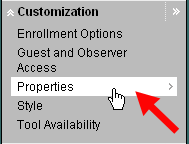
- Within the expanded Customization section, click on the Properties link:

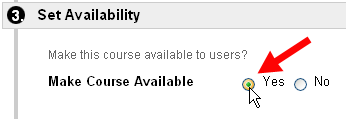
- Scroll down to Section 3 on that "Properties" page - Set Availability - and click on the radio button next to "Yes" (for Make Course Available):

- Once you've set the availability to Yes, scroll down to the bottom of the page, and click on the
 button to send your change to the server. button to send your change to the server.
- In the green status bar at the top of the page, Blackboard will indicate that the properties for your course "have been updated."
Last revised
August 4, 2010
. Please send questions or comments to itec@bucknell.edu.
|


