
Adding a Wiki to Your Course
A wiki is a collaborative writing space that allows multiple people to create and to edit a developing document or Web site. The online encyclopedia Wikipedia is the best-known example of a wiki, but a wiki project doesn't have to involve the creatiion of an online reference site. A wiki can be a single page or series of linked pages authored by multiple people, used for multiple purposes. For example, past wiki projects at Bucknell have included collaborative student translations of Spanish texts, a collaboratively created course syllabus, and a class compendium of information about organic compounds, among many other examples. For several years, we have used a wiki tool created by another company (Learning Objects) to work within Blackboard. With version 9.1, Blackboard has created its own wiki tool that is closely integrated into the full Blackboard learning management system. Like other wiki software, the new Bb 9.1 wiki tool allows you to see the full revision history of a wiki page, you can compare different versions of the page, and you can view the extent of particular students' contributions.
To add a wiki to your course using Blackboard's built-in wiki tool:
- You can access your Blackboard course by logging in to
myBucknell (opens in new window) and by clicking on the relevant course listing in the My Blackboard "gadget" on that page or by logging in directly to
Blackboard
(opens in new window).
- If you are on the main My Blackboard page in Blackboard, you can access your course by finding it in the Custom My Courses module in the middle column on that page and then clicking on the link for the course:

- The process of adding a wiki to your course can be divided into two separate steps:
Adding a Link to the Wiki Tool from the Course Navigation Menu
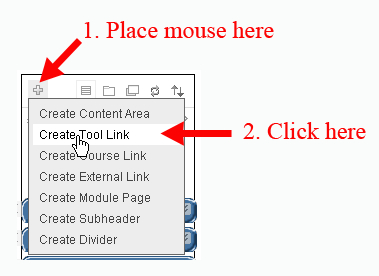
- You can place the link to the wiki tool into any content area of your Blackboard course. However, we recommend that you create a special "Tool Link" for the wiki as part of the course navigation menu, to provide your students with one-click access to the wiki space. To create that tool link, put your mouse over the + sign in the top-left corner of the Course Navigation menu. On the menu that drops down, click on Create Tool Link:
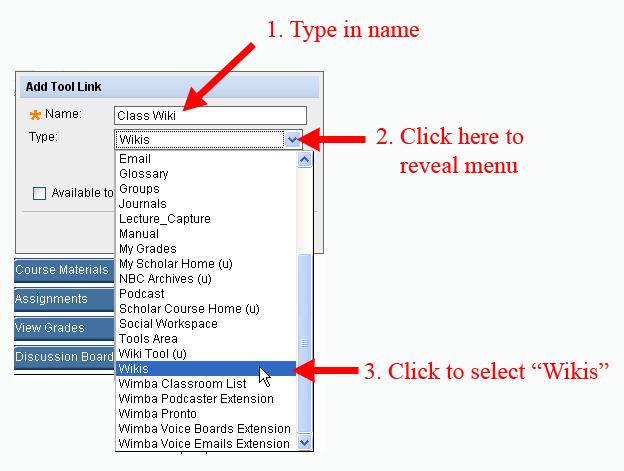
- Type a name for the new Course Navigation button in the Name field, then click on the down-arrow for Type and select "Wikis" (not the Wiki Tool):
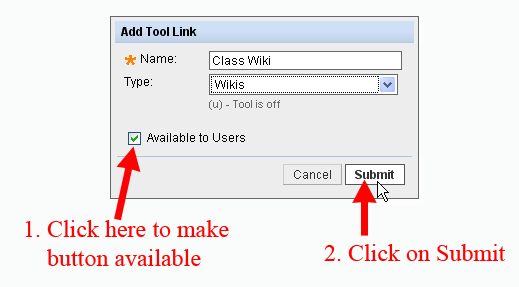
- Make sure that you click in the box to make the new tool link "Available to Users", and click on the Submit button to send your changes to the server:
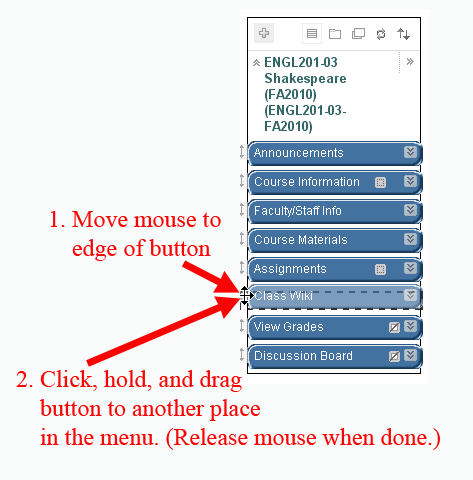
- You should now see a new button at the bottom of your course navigation menu. If you want, you can drag that button higher in the Course Navigation Menu if you want to change its location. You need to move the mouse to the edge of the button so that it becomes a four-way arrow, click and hold on the left mouse button, drag the button to where you want it to be in the menu, and relase the button:
Adding the Wiki to the New Tool Area
- We are assuming that you followed the instructions just above to add a new button to the course navigation menu. You'll first need to make sure that the Edit Mode switch at the top-right corner of the page is in the On position, which it should be by default. If the Edit Mode switch is in the "Off" position, you need to click on it to turn editing mode on:

- Click on the button (in the course navigation menu) that you added to link to the wiki tool. You'll be taken to a Wikis page.
- On that page, click on the Create Wiki button:

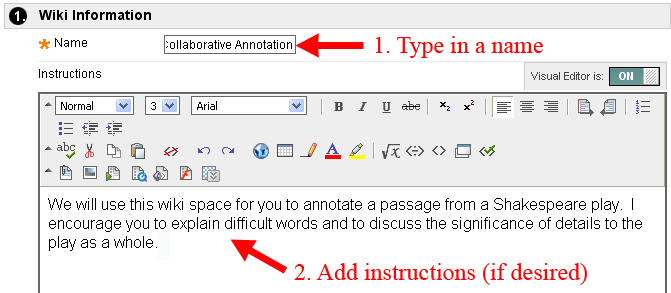
- In the Wiki Information section, add a title for the wiki, and (if you'd like) include instructions to the students about how you hope they will use the wiki space:
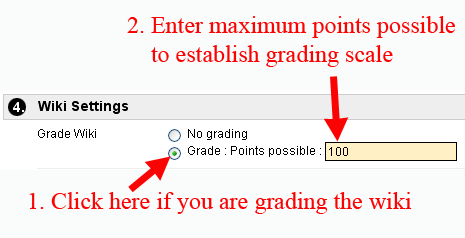
- Most of the other default settings should be fine, so you can scroll down on the page to Section 4, Wiki Settings. If you are assigning a grade to the students for their contributions to the wiki, you can click in the radio button for "Grade", and enter the maximum points possible for the assignment. That maximum point total establishes the grading scale, and we generally recommend that you enter 100 here, since it's immediately apparent to students what 85 out of 100 means as a grade (for example). You would choose a different maximum total if you are weighting grades based on point totals or proportionally within particular grading categories:
For more information on weighting grades in Blackboard, see
Weighting Grades in Blackboard (opens in new window).
- You will return to the Wikis page, and the new wiki you just created will be listed as a "Course" wiki open to student editing. To see the link to the wiki from a student perspective, you can move your mouse to the top-right corner of the page and click on the Edit Mode swtich to turn editing mode off:
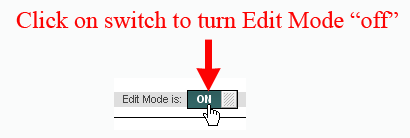
Don't forget to click on that Edit Mode switch again to turn editing back on.
- Depending on how much you need to set up the wiki for the students, you may want to click on the link for the new wiki to begin creating the first (i.e., home) page for the site:

Because the page hasn't been created yet, you will be taken to a page editing interface (Create Wiki Page), where you can add a name for the page and the initial content.
Last revised July 16, 2010. Please send questions or comments to
itec@bucknell.edu.
|


