Changing Categories for Grade Center Items in Blackboard
If you want to weight grades by category in Blackboard, the most efficient process to follow would be:
- Create all the categories you will need following
these instructions (page opens in new window);
- Add items to the Grade Center(assigning the appropriate categories) following
these instructions (page opens in new window); and
- Create weights by category following
these instructions (page opens in new window).
Most Blackboard users actually tend to add items to the Grade Center first (Step 2), begin weighting their grades by category (Step 3), realize that they don't have all the categories that they need, and then create the required categories that don't yet exist in Blackboard (Step 1). If you've followed that less efficient but more realistic pathway, you'll now need to do Step 4: Change the categories that you (or Blackboard) assigned to some of your items, so that the Gradebook items will be weighted correctly. To change the category of an item (or items) in the Blackboard Gradebook:
- Log in to Blackboard
(opens in new window), and click on your course among the list of "Courses you are teaching" in the My Courses
section of the opening page. Within that course, go to the Control Panel by clicking on the
 icon near the bottom of the left-hand navigation menu. icon near the bottom of the left-hand navigation menu.
- In the "Assessment" area of the Control Panel, on the right-hand side of the page, click on the Grade Center link:

- You will see the typical Grade Center spreadsheet page, with the list of students in your course occupying the first two columns, and with Total and Weighted Total representing two additional columns, along with columns for whatever other items you have (or Blackboard has) added to your Grade Center. The
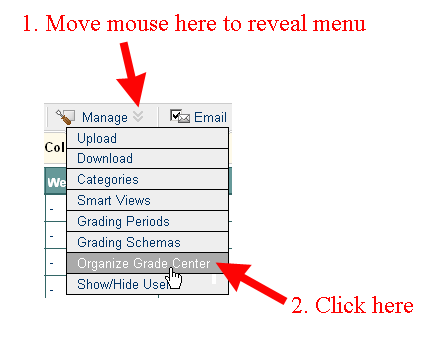
most efficient way to check and to modify those category assignments is to use the "Organize Grade Center" page. To get there, move your mouse over the double-arrow next to the Manage button (among the buttons just above the spreadsheet view) to drop down a "contextual menu," and click on the Organize Grade Center link:

- In the bottom half of that "Organize Grade Center" page, in the Shown in Selected Views only section, will be a list of the items you have added to the Grade Center, along with a lot of information about them, including the category to which you assigned them when they were created. If you look at the sample category list just below, you'll see that we have items assigned to various catergories: "Midterm", "SafeAssignment", "Blog Project", and "Tests":

- If (for example) you have both "SafeAssignments" and "Assignments" in your course, you'll probably want them part of the same overall category when you are weighting your grades. To reassign multiple items to a new category, click in the check box to the left of each item's name whose category you want to change. For example, to reassign the "SafeAssignments" to the "Essay" category, we would click in the check box next to the two items that currently are listed as SafeAssignments:

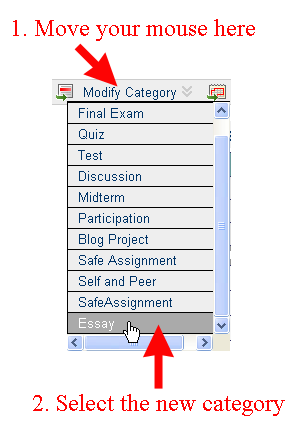
- You'll then need to scroll to the top of the page, and move your mouse over the Modify Category button to reveal its "contextual menu". Click on the category to which the items should now be assigned. (In our example, it's "Essay", since that category has an assigned weight.)

Although you won't immediately notice a change, if you look back at the display of items ("Shown in Selected Views only"), you'll see the new category listed next to the items you just modified.
- Repeat Steps 5 and 6 above until all of your items are assigned to the categories to which you plan to assign (or to which you have assigned) weights.
- When you are finished re-assigning categories, scroll down to the bottom of the page, and click on the
 button to send your changes to the server. button to send your changes to the server.
Last revised
October 24, 2008
. Please send questions or comments to itec@bucknell.edu.
|


