Adding a Journal/Blog to Your Course
Blackboard's Discussion Board feature allows for chronologically arranged, threaded discussions by students in your course. The postings are grouped together by initial topics (also known as "threads") and replies, which are listed in nested, indented fashion grouped with each initial posting in the thread. A class "journal" or "blog" can serve a similar purpose: to provide a "pre-writing" space for students, where students can explore ideas, discuss the materials of your course, and (if you choose this option) receive feedback from their peers. While a discussion board forum is by nature public - everyone can see and respond to everyone else's postings - a journal/blog can be either private or public. In other words, you decide whether you want students to be able to see and/or to comment upon one another's journal entries. In addition, if you create a separate journal for each student in your course, that space can feel to the students like a personal writing space, whereas the discussion board feels more like a shared public forum. To add a journal (or journals) to your course:
- Log in to Blackboard
(opens in new window), and click on your course among the list of "Courses you are teaching" in the My Courses
section of the opening page. Within that course, go to the Control Panel by clicking on the
 icon near the bottom of the left-hand navigation menu. icon near the bottom of the left-hand navigation menu.
- The process of adding the blog(s)/journal(s) to your course can be divided into two separate steps:
Adding a Special Content Area to Your Course
You can place the link to the journal space into any content area of your Blackboard course. However, we recommend that you create a special content area for the journal and include that content area as part of the course navigation menu. Since there are many reasons why you'd want to create a new content area within Blackboard, we have created a separate help sheet that will explain that part of the process:
Adding a Content Area to Your Blackboard Course (opens in new window).
Adding the Blog(s)/Journal(s) to Your Content Area
If you are not already in the Control Panel for your course, click on the Control Panel icon on the left-hand side of the page to return to the Control Panel. To add the journal(s) to your course:
- Within the Control Panel, click on the content area where you want to create the blog/journal space(s) for your students. In our example, we will use the special "Student Journals" area that we just created:

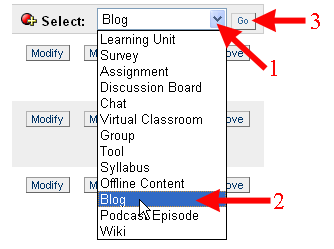
- Click on the drop-down arrow on the far right side of the screen, next to the Select window, and click on Blog within the list of things you can add to your content area. Then click on the Go button to add a blog to your content area:

- At this point, you'll need to decide how you want to configure the blog(s) for your course. The main issues to decide are:
- Do you want a single blog for the entire class, or a blog for each student?
- Do you want other students to be able to see one another's blog/journal entries, or do you want only you and the blog/journal author to be able to read those entries? In other words, is this a "private" or a public journal?
- If the blog/journal is "private," do you want to be able to leave comments on the students' journal entries? If the blog/journal is public, do you want students to be able to leave comments on one another's entries, as often happens with public blogs?
For a large class, with many students, it's easier to create just one blog space for the course, which can either be a public or a private journal for the students. For smaller classes, however, we recommend that make a blog/journal for each student, so that the space feels like a personal writing space.
To create the first (or the only) blog/journal, type a name for the blog in the Blog Name box. You can also type a description for the blog, if necessary:

- Just below the description field is a series of options. The two options that are most important (and the only ones that you really need to attend to are whether you want to make the blog available (which should be Yes), and whether the blog is a group blog for all students in the course to see and contribute to, or a private journal in which all students can see only their own entries, but instructors can see all entries. If this is intended as a private journal, you want to make sure as well that blog members can view your entries to the journal, in case you want to use the blog space to communicate with students privately. We list just below the typical choices for a private journal:

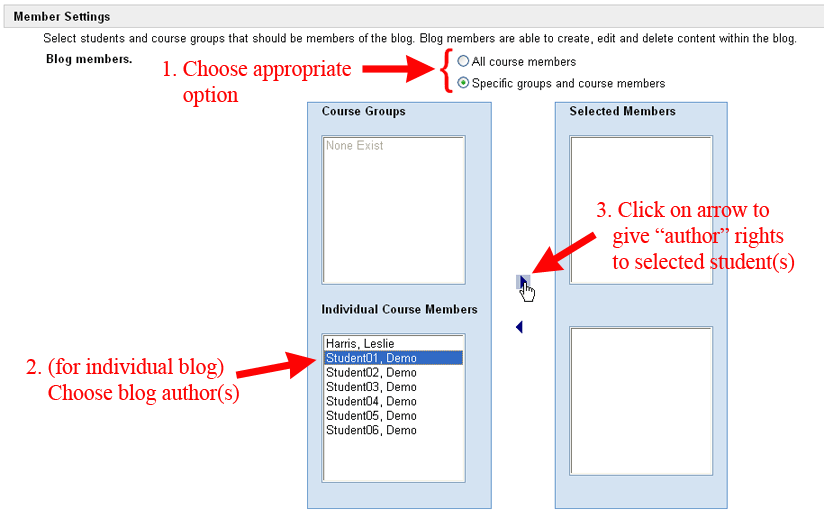
- Scroll down to the Member Settings section, and choose who has "author" status for the blog/journal - in other words, who has the right to contribute entries to the particular blog/journal you are creating. If this is a single, public journal/blog for the whole class, you can keep the default setting of "All course members." If this is a group of private blog/journal, you can select the radio button for "Specific groups and course members." You can then assign author rights for a group you have already created using the top half of this section, or you can assign rights to individual students using the bottom half of this section. For an individual student journal, you would choose a student's name and then click on the triangle pointing towards the right to make that student a member of the authors group:

- Just below the member boxes are several options related to student control over the blog space
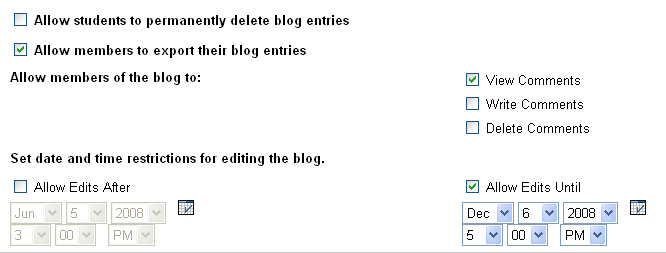
Scroll down to the Options section of the page. The most significant options are the first four, with the following suggested settings:
| Prompt(s) |
Suggested Setting |
Explanation |
| Allow students to permanently delete blog entries |
No (most likely) |
On typical public blog spaces, blog owners have full control over their spaces: they can add entries, edit them even after posting, and even delete them. However, since this is a course assignment, we assume that you'll want to prevent students from deleting their blog entries, so you'll probably leave that box unchecked.
|
| Allow members to export their blog entries |
Yes |
Since you are just giving students a choice here, you might as well click in the box to allow them to export their blog entries. An exported blog is just an index page with hyperlinks to each individual entry, but it allows students to save what they wrote, if they want a record of it. |
| Allow members of the blog to: |
View Comments; perhaps Write Comments as well |
You'll most likely want students to be able to view comments, especially if you plan to leave comments on these student journals (or to allow students or group members to comment on one another's entries). You can allow members to write comments if this will be a public blog and you are encouraging/expecting comments.
|
| Set date and time restrictions for editing the blog |
Set an "Allow Edits Until" time? |
Generally, you'll want students to be able to post in the blog as soon as you create it, so it's unlikely that you'll need to use the "Allow Edits After" setting. However, if you are grading the blog, you might want to set an "Allow Edits Until" date, so that students cannot post to the blog (or modify blog entries) after the deadline you have set.
|
Below are the settings for a typical private blog, but your settings may be different:

- You'll most likely not want to allow non-members to view the blog, or you would have set permissions differently, so you can ignore that section and scroll down to the Create Grade Book Entry section.
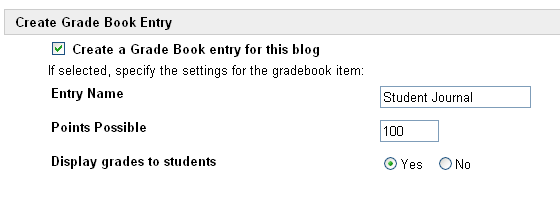
- In that Create Grade Book Entry section, you can have Blackboard automatically add a column to the Grade Center for the journal, so that you can enter a summary grade for the students' work on their journals. This assumes, of course, that you plan to grade journal entries - which we recommend, of course, since students tend to do only the work for which they will receive a grade. To create a column in the Gradebook for the student journal (if desired), click on the box for "Create a Grade Book entry for this journal," choose a name for the column, type in the total number of points possible for the journal, and indicate if the grade should be displayed to the students (in their My Grades display). We recommend that you use a 100-point scale, since it is easy for students to interpret a grade of (for example) 85 out of 100, rather than 25 out of 30 possible points. However, if you use your point total as a weighting scheme, you could choose a different total:

- Once you've finished choosing the most appropriate options, you can scroll down to the bottom of the page and click on the
 button to send your changes to the server. button to send your changes to the server.
- Blackboard will respond that the blog was created. Click on the
 button to return to the "Student Journals" section (or to the section of the course where you added the journal). button to return to the "Student Journals" section (or to the section of the course where you added the journal).
- If you are creating individual journals for each of your students, repeat steps 2 through 9 above for each student in your course, except for Step 8. You only want one new Gradebook column for all of the student journals (if you are in fact grading the journal entries).
- Once you are finished creating the journal(s), click on the
 button again to return to the Control Panel for your course. button again to return to the Control Panel for your course.
Last revised June 6, 2008. Please send questions or comments to
itec@bucknell.edu.
|


