Adding a Content Area to Your Blackboard Course
The default template for Blackboard courses has the following buttons as part of the course navigation menu:
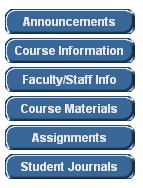
Announcements, Course Information, Faculty/Staff Info, Course Materials, and Assignments. Those are the most broadly applicable components of a Blackboard course, but it's possible that you will want to add an additional content area to your course. To add a new content area:
- Log in to Blackboard
(opens in new window), and click on your course among the list of "Courses you are teaching" in the My Courses
section of the opening page. Within that course, go to the Control Panel by clicking on the
 icon near the bottom of the left-hand navigation menu. icon near the bottom of the left-hand navigation menu.
- Within the Course Options section of the Control Panel (in the bottom-left quadrant of your browser window), click on the
Manage Course Menu link:

- In our example, we will add an area of the course that we will call "Student Journals". To add that (or any other) new content area to the course, click on the Add Content Area button:

- In the first section on that screen - Set Area Properties - you can click on the down arrow
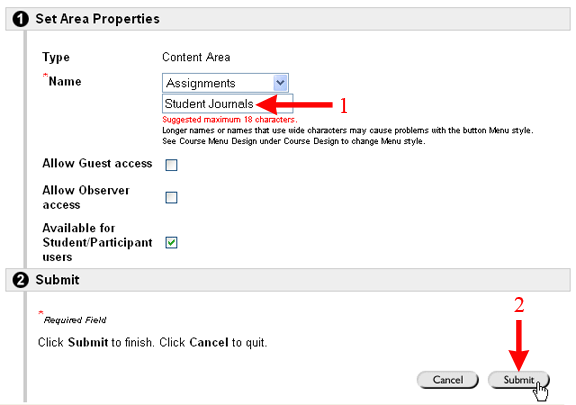
next to the Name field to select one of the names that Blackboard has included as possible course areas. However, since "Student Journals" isn't included among that list, you can just click and drag with your mouse to highlight "Assignments" in the text window in the Name
area, just below the drop-down list, and type in Student Journals instead:

- Scroll down on the page (if necessary), and click on the
 button to send your changes to the server. (See Step 2 in the figure just above.) button to send your changes to the server. (See Step 2 in the figure just above.)
- Blackboard will confirm the success of the change. Click on the
 button to return to the Manage Course Menu page. button to return to the Manage Course Menu page.
- Blackboard adds the new content area to the bottom of the list. If you want your area to be the last button for your course, you can skip to the next step. However, if you want to change the order of items on your course menu, you can click on the down arrow for the number of the content area you just created and choose a different number. Blackboard will reload the page with the menu items numbered in their new order, renumbering all the items that now fall below your new content area.
- At the top of the page is what Blackboard calls the "bread-crumb trail." Click on the link for your course
(as shown in the figure below) to return to the student view of your course in Blackboard:

- You should see the new course area as part of your course menu. If not, click on the
 button at the bottom of the menu frame (on the left side of your screen) to refresh the course menu:

Last revised November 8, 2006. Please send questions or comments
to itec@bucknell.edu.
|


