Moving Readings from ERes to Blackboard
We have phased out our Docutek ERes system, since that functionality can be provided more effectively in Blackboard. Using one system (Blackboard) rather than two is also much easier for students, since they'll be able to find their online course materials in one place only (their Blackboard course), a place that is password-protected and limited to students enrolled in a particular course. The process of moving documents from ERes to Blackboard is not difficult, although it involves two distinct steps, which we will detail in separate Web pages:
Downloading the PDF Files from ERes
We've actually done most of this work for you. You should have received an email message from us, with an attached spreadsheet that lists your various materials that were in the ERes system. The fields (columns) in the spreadsheet include the course name, term and year that the course was created in ERes, the title of the reading, the author, and the path to find the file (among others). Don't worry if you no longer have a copy of that email message or can't find it. The spreadsheet or spreadsheets are also included on the EResDocuments folder to which we are about to direct you.
We won't be maintaining these EResDocuments files indefinitely, so if you think you'll want to re-use many of your readings, the simplest solution is to copy the entire folder of materials to the hard drive of your computer, assuming that you have sufficient space on that hard drive. The instructions below are for a PC running Windows XP. To copy the materials on a Macintosh, please follow these
alternate instructions.
- The typical path to find your PDF files is: R:\ISR\Projects\EResToBlackboard\username\docid#\filename.pdf
If you are very familiar with opening up folders in Windows, you can just double-click on "My Computer" and navigate to the first part of that path (R:\ISR\Projects\EResDocuments\username\), with the "username" part referring to your own Bucknell user ID. Once you have that folder open on your computer, you can then skip down to Step 7 below to continue the process. Below are the step-by-step instructions to get to that folder:
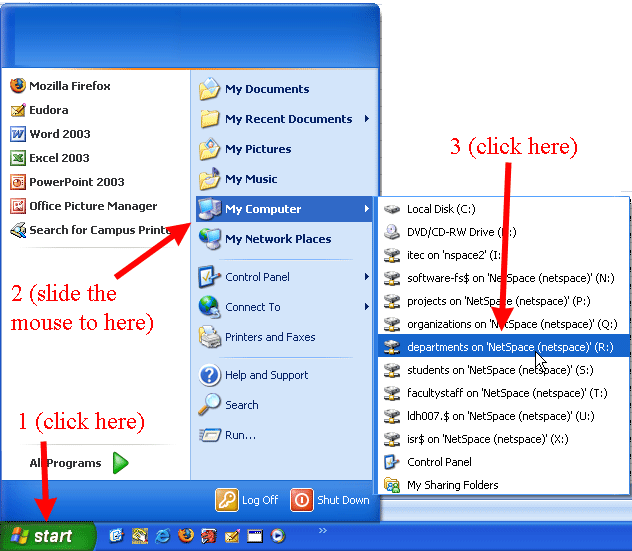
Click on the Start button in the bottom left corner of your screen, move the mouse up to "My Computer", and click on "departments on 'NetSpace (netspace)' (R:)":
- Scroll down to find the "isr" folder among the list of folders (
 ), and double-click on it to reveal its contents. ), and double-click on it to reveal its contents.
- Find the "projects" folder (
 ), and double-click on that folder to reveal its contents. ), and double-click on that folder to reveal its contents.
- Find the "EResDocuments" (
 ) folder, and double-click on that folder. ) folder, and double-click on that folder.
- You'll see a list of folders for each user who had materials on ERes. Scroll among the folders to find your username, and double-click on that folder to reveal its contents.
- You'll see another list of folders whose names are numbers - the "docid" (document ID) number from ERes. Unfortunately, this is the structure that Docutek ERes system created when the PDF files were entered into the system - in other words, each reading was placed in its own folder, with the folder named according to the document ID. This folder (with your username as its title) is the "source folder", from which you'll copy the files that you need.
- You'll now need to create the "destination folder": in other words, the folder to which you will copy all the readings. To do that, click on the
 button and on button and on  to open up your My Documents folder. to open up your My Documents folder.
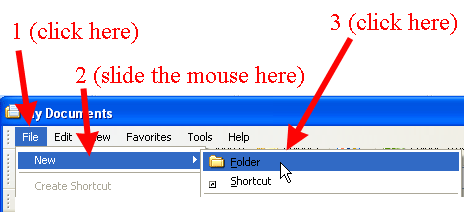
- For simplicity sake, we recommend that you create an "eres" folder at this level. To create a new folder, click on the File menu, slide the mouse to New, and click on Folder:
- Windows will create a folder called "New Folder", with the name highlighted. While the name is still highlighted in blue, type in eres (or whatever you want the name to be), and hit the Enter key when you are done. You'll now see that new folder at the bottom of the "My Documents" window, with its new name.
- Double-click on the new (eres) folder to open it.
- You should now have two folders open on your computer (among other possible programs). The "eres" folder (or whatever you called it) will be the "active" folder, and the R:\ISR\Projects\EResDocuments\username\ folder will be one of the other programs in memory, listed in the "Windows Taskbar at the bottom of your screen. Click on the icon in the Taskbar for the R:\ISR\Projects\EResDocuments\username\ folder:

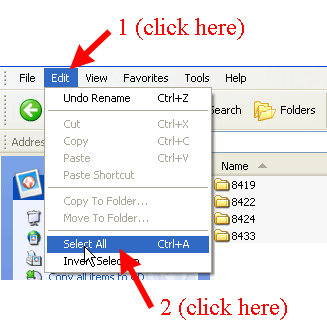
- With the R:\ISR\Projects\EResDocuments\username\ as the active window, click on the Edit menu, and then click on Select All:
- While those folders are highlighted, click one on of the folders while holding the mouse button down, and drag the folders from the R:\ISR\Projects\EResDocuments\username\ window to the new (blank) "eres" folder that you created. Once the images of the folders appear in that new folder, let go of the left mouse button:
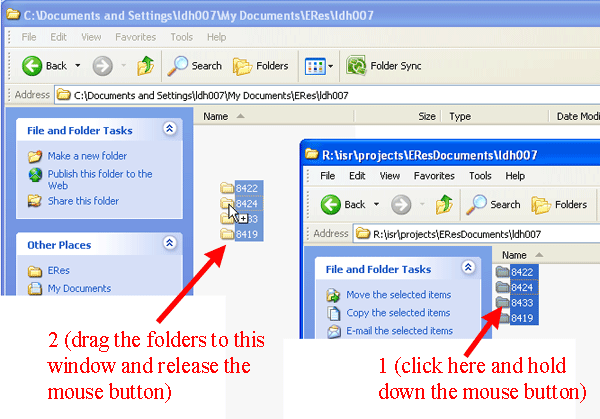
Please note that your windows might not be in the same relative positions as shown in the figure above. Just make sure you are copying the folders from the "R:\ISR\Projects\EResDocuments\username\" folder on the server to the blank "eres" folder on your hard drive. If you need to move one of those windows so you can see both at the same time, you can click on the blue title bar at the top of the window, hold the mouse button down, and drag the window across your screen.
Since you are dragging files between two different drives (the server and your hard disk drive), Windows will copy the files from one location to the other. (It may take several minutes to copy all the folders, depending on how many files and folders you had in ERes.) Eventually, the "eres" folder (on your hard drive) will be the active folder, and all the ERes reading folders (from the server) will have been copied into it. You can close out the R:\ISR\Projects\EResDocuments\username\ folder window by clicking on the red close button ( ) in the top-right corner of the window, since you no longer need that window open. ) in the top-right corner of the window, since you no longer need that window open.
- You have now finished the first part of the process. You can move onto the next step: Uploading PDF Readings into Your Blackboard Course.
Last revised February 23, 2011. Please send questions or comments to
itec@bucknell.edu.
|

