Creating Groups for Individual Sections
It's very likely that you've come to this page from
Creating Smart Views for Grading Individual Sections (page opens in new window or tab). This first part of the process involves creating a group for each of the individual sections that make up part of a multi-section or cross-listed course. Creating such a group will make it easier to enter and view grades for that group, and it could also foster "one section only" communication and collaboration, if you use the group for other features besides just creating a "Smart View" in the Grade Center.
We have described the process of creating groups on a related help sheet:
Creating Groups in Your course (page opens in new window or tab). If you are familiar with that process, you could follow those instructions. However, we have also installed an "Advanced Group Management" building block to make it easier to create groups and to assign users to those groups, so these instructions will describe how to use that method to create section-specific groups in your course.
Creating the Groups
- Log in to Blackboard
(opens in new window), and click on your course among the list of "Courses you are teaching" in the My Courses
section of the opening page. Within that course, go to the Control Panel by clicking on the
 icon near the bottom of the left-hand navigation menu. icon near the bottom of the left-hand navigation menu.
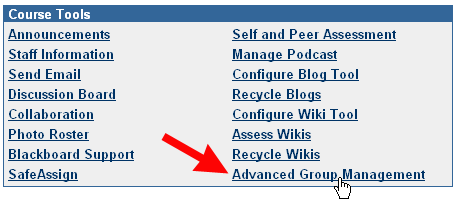
- Within the Course Tools section of the Control Panel (in the left-middle section of the Control Panel), click on the Advanced Group Management link:

- You'll need to add a group for each section, so click on the
 button. button.
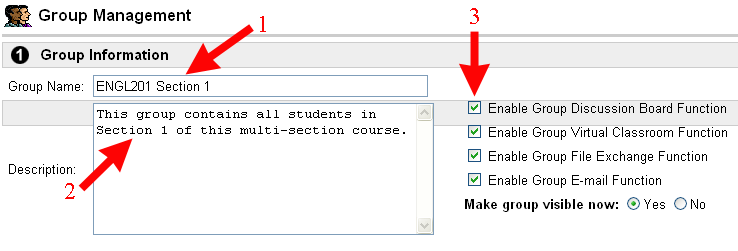
- Type a name for the group in the Group Name field and, if desired, type in a description of the group in the appropriatge text box.
- Next to that text box will be a list of the features that you can allow for the group. Select all the features that you want to make available to the group by clicking in the appropriate check boxes, then click on the Submit button to send your changes to the server:

You'll want to retain the default setting of "Yes" for Make group visible now.
- When you are finished, click on the
 button at the right side of the page to send the changes to the server. button at the right side of the page to send the changes to the server.
- Blackboard will respond with a confirmation that the "Group has been successfully added." Click on the
 button to return to the Group Management page, on which you'll see the group you created along with a list of the tools that you provided to the group. button to return to the Group Management page, on which you'll see the group you created along with a list of the tools that you provided to the group.
- Repeat steps 3 through 7 above to create all the groups for your course.
Adding Students into Groups
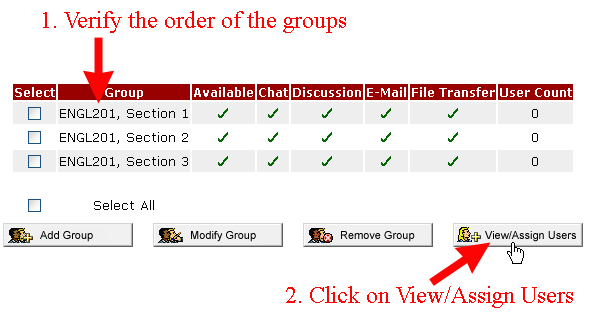
- Once you have created the groups for your course, you'll need to add specific students to each group. The advantage of the Advanced Group Management Tool is that it allows you to add the students for all the groups using just one screen, with a series of checkboxes. Make sure that your groups are listed in the correct order, and then click on the "View/Assign Users" button:

- The groups will be listed with abbreviated titles, and all the students will have an X next to their name, since you haven't added any students to groups yet. On the far right side of the page, click on the
 button to allow you to add users to the groups. button to allow you to add users to the groups.
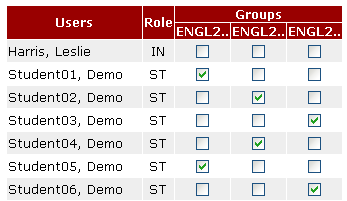
- You will see a list of the users for your course, along with their status. Each group will have its own column, and you can go through each section and select the students who belong in that group. The group names are highly shortened in the display, which is why you needed to make sure the groups were in the correct order before you got to this screen:

- When you are finished selecting students for each section, click on the
 button at the bottom of the page (at the far right) to send your selections to the server. button at the bottom of the page (at the far right) to send your selections to the server.
- Blackboard will respond that "The User Assignments were completed successfully." Click on the
 button to return to the Group Management page. button to return to the Group Management page.
- In the final column of the display will be a "User Count" column, which will be a good way to check if you have assigned the correct number of students to each section. If you are satisfied that you have assigned the students correctly, click on the
 button to return to the Control Panel for the course. Otherwise, you can click on the check box next to the section that you want to modify (in the "Select" column), and complete Steps 3 through 5 above to assign any additional students to that group. You can also just repeat Steps 1 through 5 above if you want to see all the students and all the groups. button to return to the Control Panel for the course. Otherwise, you can click on the check box next to the section that you want to modify (in the "Select" column), and complete Steps 3 through 5 above to assign any additional students to that group. You can also just repeat Steps 1 through 5 above if you want to see all the students and all the groups.
Please note that if you want the students in the "section-only" groups to have their own discussion board forum, you need not only to enable that tool, but also to add a forum for each group. We have instructions on how to do that
here (page opens in new window or tab).
Once you have created the groups, you are ready for the next stage, which is Creating Smart Views Based on Groups.
Last revised September 25, 2008. Please send questions or comments to itec@bucknell.edu.
|


