Using the Self and Peer Assessment Feature
With version 8 (installed during Summer 2008), Blackboard introduced a new feature called "Self and Peer Assessment" that is (unfortunately) confusing and problematic, although potentially very useful. The feature allows you to create a scoring rubric that students can use to evaluate the work of and provide feedback to their peers. You create a series of criteria students use when evaluating their fellow students' work and a point total for each criterion. When you are creating the Self and Peer Assessment item, you also choose how many submissions each student will evaluate. There is a "Submission" period when students upload or submit their assignment that will be assessed by their peers, and then an "Evaluation" period when students actually do the peer assessments. If you are thinking of using this feature, we should warn you of its limitations:
- You cannot assign specific students to peer review groups. You can only indicate how many submissions each student will review, and then Blackboard randomly assigns the reviewers for each submission.
- You cannot modify the Submission Dates or Evaluation Dates once the deadlines have passed. If the student fails to submit the assignment by the end of the submission deadline, there is no way for reviewers to provide their peer assessments for that assignment within the Self and Peer Assessment module. If students are having problems doing the assessment or if a student fails to submit his/her peer assessment in time, you cannot change the evaluation due date once that date is past.
Adding a "Self and Peer Assessment" to your course is actually a two-step process:
Adding the Assessment Question(s)
A "Peer Assessment" from Blackboard's point of view is not quite the same as a typical "peer editing" process, which makes Blackboard's feature a bit confusing. With a "Peer Assessment," students submit an answer to a question (or questions), and then student reviewers assess the quality of the student answer(s), based on a rubric provided by the instructor. In this example, we'll assume that the "Self and Peer Assessment" feature is being used to assess student video projects for a science course. To add the assessment question (in other words, what students will submit for their peers to review):
- Log in to Blackboard
(opens in new window or tab), and click on your course among the list of "Courses you are teaching" in the My Courses
section of the opening page. Within that course, go to the Control Panel by clicking on the
 icon near the bottom of the left-hand navigation menu. icon near the bottom of the left-hand navigation menu.
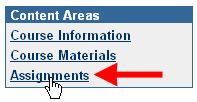
- In the Content Areas section of the Control Panel(top-left quadrant), click on the link for the area of the course where you want to post the assignment that will be rated by peers. We're assuming in this example that students will find the "Self and Peer Assessment" in the Assignments area of the course, so we'll click on that content area in the Control Panel:
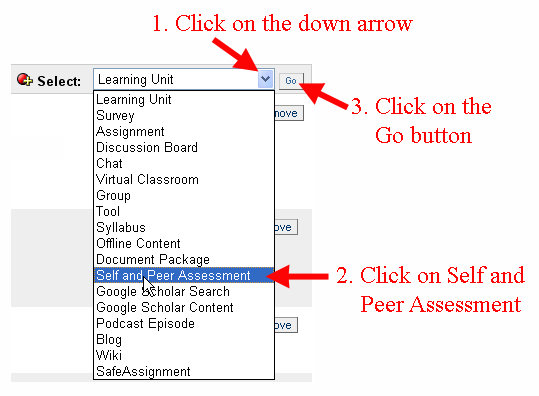
- To add the "Self and Peer Assessment" assignment, click on the down arrow in the Select area near the top-right of the page to drop down a menu, and click on "Self and Peer Assessmnet" in the list of items you can add to your course. Then click on the "Go" button to send your request to the server:
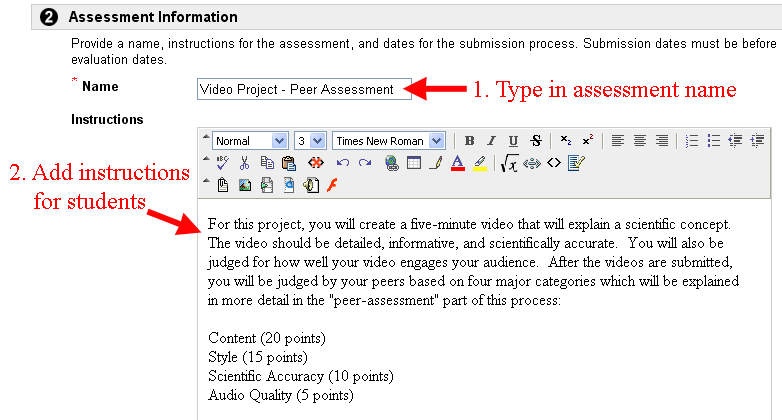
- We'll assume that this will be a new assessment, so you can leave New selected in Section 1, and type a Name and Instructions for what the students will be submitting to the course, to be reviewed by their peers:
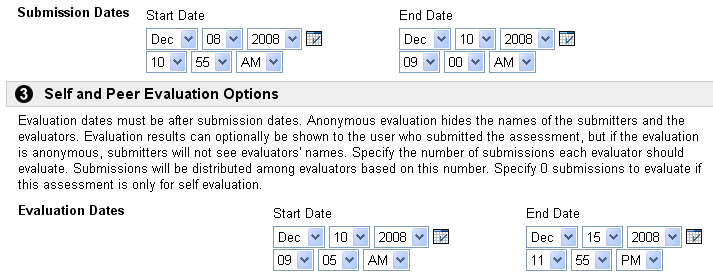
- Scroll down to the Submission Dates area just below the instructions box, and choose the Start Date and End Date for when students will be able to submit the work that will be evaluated by their peers. Usually, the Start Date can be the current date and time, so that students can see the assignment immediately. You should select the End Date with care, because once that date has passed, you won't be able to change it.
- Scroll down to Section 3, Self and Peer Evaluation Options. Choose a Start Date and End Date for the peer evaluation phase, when students will be assessing one another's work. The State Date needs to be after the submission period ends, and the End Date should give students enough time to submit their assessments of their fellow students' work. In the figure below, we show some fictitious dates, to indicate what these settings might look like:
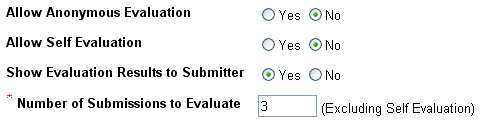
- In the remaining part of Section 2, there are three yes/no options, plus a text box to indicate how many submissions each student will review. In the figure and table below, we describe some suggested options, although the options you choose will depend on the circumstances of your course:
| Option |
Suggested Setting |
Explanation |
| Allow Anonymous Evaluation |
No (or Yes, under some circumstances) |
We can imagine circumstances in which you would want students to provide anonymous evaluations of their peers, so that they can provide honest feedback and scores without any fear of reprisal. We are suggesting "No" as the preferred option because this forces students to take responsibility for their comments. Faculty members would of course need to teach students how to provide constructive feedback on peer evaluations. |
| Allow Self Evaluation |
No |
Our scenario assumes that students are providing feedback and scores for video projects created by their peers. Unless there is some reason for students to rate themselves using the criteria you provide, you would choose "No" for this option. |
| Show Evaluation Results to Submitter |
Yes (most circumstances) |
Since this is a "peer evaluation" process, the purpose is to provide both scores and constructive feedback to the students. In this scenario, we want students to see what their peers have said. |
| Number of Submissions to Evaluate |
Instructor Choice |
The number you choose will determine how many peer evaluations each student will do. The number will also represent how many peer critiques each student submission will receive. |
- In Section 3, Options, we recommend that you retain the default settings. More specifically, you definitely want to keep the setting of "Yes" for "Make the assessment available," so that students can actually see the link and submit their work. "Track number of views" is optional; you'll know whether a student has submitted the assessment or not, so whether they actually accessed the page or not is less important. You don't want to set date restrictions, since you've already set the time frame for students to submit their assignments and to provide feedback.
- When you are done selecting the options appropriate for your course, scroll down to the bottom of the page, and click on the
 button to send your changes to the server. button to send your changes to the server.
- Blackboard will respond that your "assessment has been successfully added." Click on the
 button to return to the section of your course where you posted the "Self and Peer Assessment." button to return to the section of your course where you posted the "Self and Peer Assessment."
Adding the Review Criteria
Once you have added the "Self and Peer Assessment" to a course area, you need to modify it to create the question(s) that the students will be answering during the "Submission" phase, along with the review criteria students will use during the "Evaluation" phase.
To add the question to which students will be responding and the criteria peer reviewers will use to assess their fellow students' work:
- We're assuming that you are still in the area of the Control Panel where you added the "Self and Peer Assessment" to your course. If not, please follow Steps 1 and 2 in the Creating the Assessment section above to get to that content area from within the Control Panel.
- In the area where you posted the "Self and Peer Assessment,", to the right of its title, click on the Modify button:

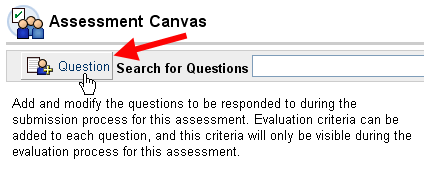
- On the page to modify the assessment, click on the Assessment Canvas link, which should be the first one on the page.
- You first need to add the "question(s)" to which students will respond, when they are submitting their work to be assessed by their peers. For this example (a student video project), the question is basically the mechanism that students will use to submit their video file for the peer review process. To add the "question," click on the "Add Question" button just under the Assessment Canvas title:
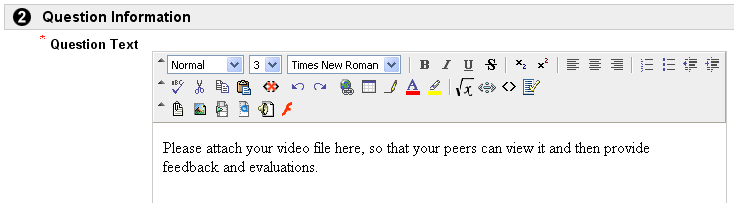
- Blackboard will take you to an Add Question page. Blackboard assumes that the "peer assessment" is almost like a student-graded exam, in which students submit a "short-essay" in response to a particular question, and then other students "grade" that submission and provide feedback, based on specific criteria given by the instructor. An instructor can provide a "Model Response," which peer evaluators could use as a guide to what an excellent response might look like. In our example, we are using this "Self and Peer Evaluation" feature as a way for students to evaluate one another's work, so we'll just use the question as a way to give students instructions on how to submit their work:
- After you have entered the question text, scroll down to the bottom of the page, and click on the button to send your changes to the server.
- Blackboard will confirm that "The question has been successfully added." Click on the button to return to the Asessment Canvas page.
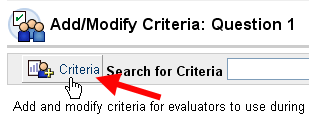
- On that Assessment Canvas page, you will see Question 1, with three buttons to the right: "Modify," "Criteria," and "Remove." Click on the "Criteria," button to add the assessment criteria students will use when evaluating their peers' work:

- You will be taken to an Add/Modify Criteria page. Just under that "Add/Modify Criteria" title is an Add Criteria button. (It's a bit hard to find.) Click on that button to add your first peer assessment criterion:
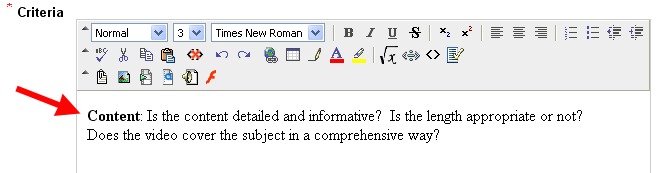
- On the Add Criteria page, provide a detailed description of the first criterion students will use when evaluating their peers' work:
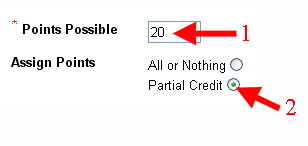
- Scroll down on the page, and click in the Points Possible box, then enter the maximum number of points students can receive for this criterion. In most instances, we assume that you will want to allow for partial credit, so that students can assign a number of points up to the maximum, rather than making an "all or nothing" decision for that criterion:
- In the Allow Feedback to User, we recommend that you click in the radio button for "Yes", so that the evaluator can explain why s/he assigned the point total s/he chose for this criterion.
- Scroll down on the page, and click on the button to send your changes to the server.
- Blackboard will respond with the grammatically challenged confirmation, "The criteria has been successfully added." Click on the button to return to the Add/Modify Criteria page.
- Repeat Steps 9 through 14 page for each of the additional criteria you want students to consider when reviewing their peers' work. In other words, click on the well-disguised Add Criteria button, explain the criterion, choose the appropriate settings, and submit your changes to the server. Then click on the OK button to return to the Add/Modify Criteria page.
- When you have finished adding all your criteria, click on the button three times (or use the "bread-crumb trail" at the top of the page) to return to the area where you added the Self and Peer Assessment assignment:

- Within that content area (the Assignments area in our example), you'll see a summary of all the information related to the Self and Peer Assessment: in other words, the instructions you provided, along with the submission and evaluation dates. If the peer assessment assignment looks fine, you can click on the button to return to the Control Panel for your course.
Last revised
February 3, 2009. Please send questions or comments to itec@bucknell.edu.
|