Adding a Syllabus to Your Course
The initial impetus for course management systems like Blackboard was to help faculty
"put their courses online" without knowing any HTML. Blackboard has expanded its funtionality over time, but
its most common use is still as a document repository: in other words, a central place to upload course-related documents
so that your students have access to those documents wherever and whenever they have Internet access. If you upload your
syllabus into your Blackboard course, for example, your students can no longer use the excuse "I lost my copy of the syllabus"
to explain why they didn't do the reading. Even if they truly did lose the printout of your syllabus, they can always access the
online version that you posted into your Blackboard course. This help sheet will show you how to upload your syllabus
(or, for that matter, any comparable document) into your Blackboard course. We're assuming that you've created your syllabus using a
word processing program (for example, Microsoft Word), and that you're ready to add it to your Blackboard course:
- Log in to Blackboard
(opens in new window), and click on your course among the list of "Courses you are teaching" in the My Courses
section of the opening page. Within that course, go to the Control Panel by clicking on the
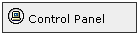 icon near the bottom of the left-hand navigation menu. icon near the bottom of the left-hand navigation menu.
- As part of our default course template, Blackboard's left navigation menu has "Announcements" as the first button, and
"Course Information" as the second button, and "Course Materials" as the fourth button. Although the distinction between
"Course Information" and "Course Materials" is sometimes a bit hard to explain, Blackboard assumes that the
Course Information section will contain general information about your course, including (in particular) your syllabus. The Course Materials
section will contain the various documents that you hand out after the first week of classes. If your syllabus is the only
document you'll upload into the Course Information section, you can actually change the name of that area (to something like
"Syllabus") by following
these directions
(directions open in new window). For this help sheet, we'll assume that you haven't changed the name of that Course Information section and
that you'll be uploading your syllabus there.
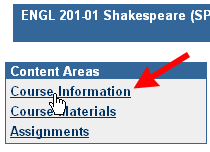
Within the "Content Areas" section of the Control Panel for your course (in the top-left quadrant of the screen), click on the
Course Information link, which should be the top link in that section:
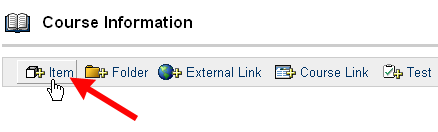
- To upload your syllabus into this section of the course, click on the Item button:
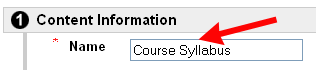
- In the Name window, type in Course Syllabus (or whatever you want to call the document):
- You don't really need to add a text description, so scroll down to the Content section of the page. Click on the
Browse button to find your syllabus on your hard drive:
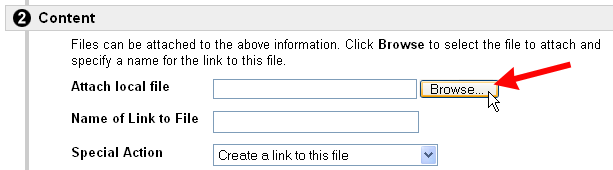
Navigate to your syllabus file on your hard drive, and double-click on the file name when you find it.
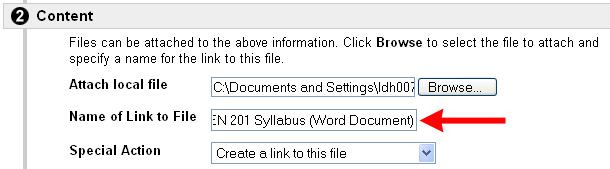
- Blackboard will enter the path to the local file in that Attach local file window. You now need to type a name for the
link to the file (in other words, what the students will see on the page, as a hyperlink) in the Name of Link
to File box. We recommend that you indicate in parentheses the type of file: for example, "(Word Document)," so your
students will know what kind of software they'll need to access the file. You'll want
the Special Action to remain "Create a link to this file", so you won't need to change that:
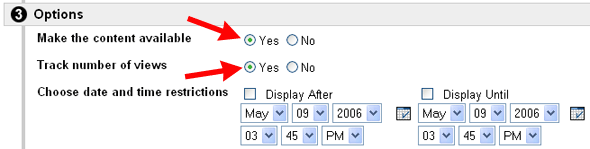
- In the Options area, we recommend that you select the "Yes" button to make the content available
and to track the number of views (in other words, to gather statistics about how often students view your syllabus through
Blackboard). If you want to limit the time frame when students can see the item, you can choose date restrictions by
clicking in the "Display After" and/or "Display Until" boxes and selecting the appropriate dates and times from the pull-down
menus. For the syllabus, though, it doesn't make sense to set such limits, unless (for example) you are uploading the syllabus into
your course well in advance of the semester, but you don't want any students to see the syllabus until after a certain date. In the figure
below, we choose the suggested settings of making the item available, tracking the number of times students view the item, but
not restricting the item's availability to students:
- Click the
 Button to send your changes to the server. Button to send your changes to the server.
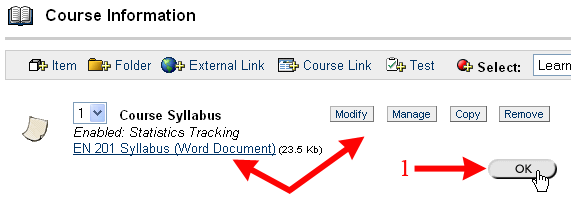
- Blackboard will confirm that the item has been successfully added to your course. Click the
 button to return to the Course Information page. button to return to the Course Information page.
- You should see your syllabus as part of that Course Information section, with the information you typed in the
"Name of Link to File" section now underlined, indicating a link to the file. Based on the selections you chose when you
added the item, you have the option to modify, track who has viewed the item (using the "Manage" button and the
"Statistics Tracking" link), copy, and remove the item as well. Those options are also available to you from
the Control Panel, when you return to the Course Information area of your course (or to the area where you added the syllabus). Click on the
OK button to return to the Control Panel for your course:
Last revised November 8, 2006. Please send questions or comments to
itec@bucknell.edu.
|