
Moving Readings from ERes to Blackboard
We are phasing out our Docutek ERes system, since that functionality can be provided more effectively in Blackboard. Using one system (Blackboard) rather than two is also much easier for students, since they'll be able to find their online course materials in one place only (their Blackboard course), a place that is password protected and limited to students enrolled in a particular course. The process of moving documents from ERes to Blackboard is not difficult, although it involves two distinct steps, which we will detail in separate Web pages:
Uploading PDF Readings into Your Blackboard Course
Once you have copied all the ERes files onto your hard drive, you are ready to add them to your Blackboard course(s). Unfortunately, that process needs to be done one file at a time, for each of your courses. Where you'll put the readings will depend on how you structure your Blackboard course. Below, we suggest creating an "Electronic Readings" folder in the "Course Materials" section of your course, but that is only a suggested location. This suggested process of uploading your electronic reserves into Blackboard has two steps:
Creating an Electronic Readings Folder
- Log in to Blackboard
(opens in new window), and click on your course among the list of Courses you are teaching in the My Courses section of the opening page. Within that course, go to the Control Panel by clicking on the
 icon near the bottom of the left-hand navigation menu. icon near the bottom of the left-hand navigation menu.
- We'll assume in this help sheet that you haven't changed the default structure of your Blackboard course and that you want to create the "Electronic Readings" folder in the Course Materials section of your course.
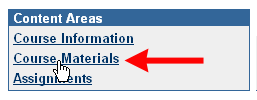
Within the "Content Areas" section of the Control Panel for your course (in the top-left quadrant of the screen), click on the
Course Materials link, which should be the second link in that section:
- To add a folder, click the Folder button:

- We recommend that you name the folder something like Electronic Readings, although of course you can choose a different name (Electronic Reserves, On-Line Readings, etc.) Type your chosen name for the folder in the Name box.
If you would like to color-code your folders to make them easier to identify, you can choose a color other than the default (black)
by clicking the  button and selecting the color you want from the
"Color Picker" window that opens up. button and selecting the color you want from the
"Color Picker" window that opens up.
Although the name of the folder will most likely make it obvious what materials are contained in it, we still recommend that you type a brief description of the folder in the Text box, so your students will have a sense of what they will find in the folder:
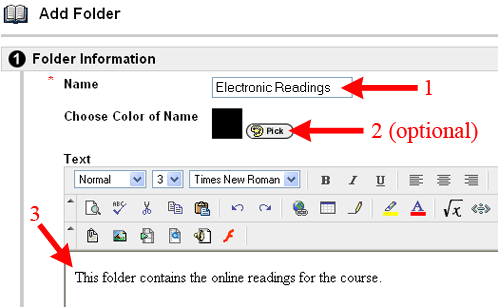
The figure just above shows how the screen will appear in Internet Explorer. If you want to add special formatting to your text,
we recommend that you type the text first without any formatting, then
click and drag with your mouse to select the specific words that will need special formatting. Once those words are highlighted, click
on the appropriate tool in the Formatting Toolbar (B or I, for example) to apply the chosen
formatting to the selected text.
Firefox users (for Blackboard version 6.3 and below) won't have the same WYSIWYG (What You See Is What You Get) text box with the special
formatting toolbars. Instead, make sure that Smart Text is the option chosen at the bottom of the message text window.
Smart Text automatically recognizes URLs as links, interprets returns as paragraph breaks, and accepts HTML code as well.
- Scroll down to the Options section of the page. We strongly recommend that you click in the Yes button to make
the content available. If you want to limit when students can see the folder (and therefore all the items contained in it as well),
you can use the Display After and Display Until settings to control that time frame. Since this is a folder and not a content
item, you don't really need to track how often students click on the folder, so you can leave the Track number of views
option in its default "No" setting:

- Click the
 button to send your changes to the server. button to send your changes to the server.
- Blackboard will confirm that the folder has been successfully added to your course. Click the
 button to return to the Course Materials section of your Blackboard course. button to return to the Course Materials section of your Blackboard course.
- You should see the new folder listed, with its description. The folder may not be the first item on your page. If you'd like
to re-order the items in this section of the course, you can click on the drop-down arrow (marked with a red arrow in the figure below)
to choose a different order number for your item - with 1 being the first item, and subsequent items displayed below that:
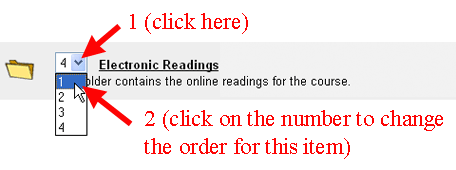
Blackboard will re-load the page, with your item in the order that you chose for it.
Uploading PDF Files into the Folder
Once you have created the "Electronic Readings" folder, you are ready to upload the actual PDF files that make up those readings into your course. (We're assuming that you have followed the directions above about creating an Electronic Readings folder in the Course Materials section of your Blackboard course, and that you are still in the Course Materials section of the Control Panel. If you are not there, then go to the Control Panel for your course, and click on the link for the Course Materials section in the top-left quadrant of the page.)
Please note that to determine how to name the document in Blackboard and to find the correct PDF file, you'll need to open the summary spreadsheet that lists all your former ERes readings, following
these instructions (instructions open in new window).
To add documents to the "Electronic Readings" folder:
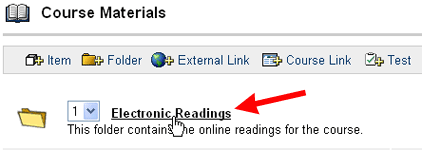
- On the Course Materials page (accessed via the Control Panel), click on the link for the folder that you just created; in our example, we've called it Electronic Readings:
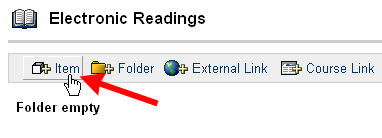
- To add your first reading to the folder, click the Item button:
- Type a name for the item in the Name box.
If you like to use different colors for particular items to indicate their type, you can choose a color other than the default (black)
by clicking the  button and selecting the color you want from the
"Color Picker" window that opens up. button and selecting the color you want from the
"Color Picker" window that opens up.
We recommend that you type a brief description of the item in the Text box, so your students will have a sense of what
article it is that they will be viewing:
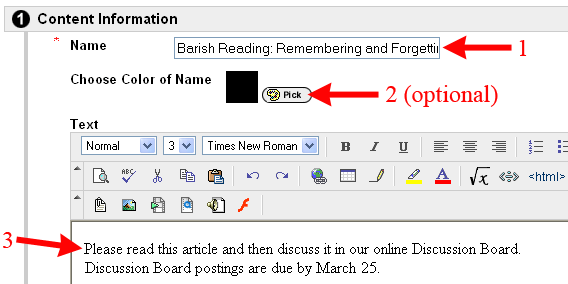
The figure just above shows how the screen will appear in Internet Explorer. If you want to add special formatting to your text, we recommend that you type the text first without any formatting, then
click and drag with your mouse to select the specific words that will need special formatting. Once those words are highlighted, click
on the appropriate tool in the Formatting Toolbar (B or I, for example) to apply the chosen
formatting to the selected text.
Firefox users (for Blackboard version 6.3 and below) won't have the same WYSIWYG (What You See Is What You Get) text box with the special formatting toolbars. Instead, make sure that Smart Text is the option chosen at the bottom of the message text window. Smart Text automatically recognizes URLs as links, interprets returns as paragraph breaks, and accepts HTML code as well.
- Scroll down to the Content section of the page, and click the Browse button next to the
Attach local file window:

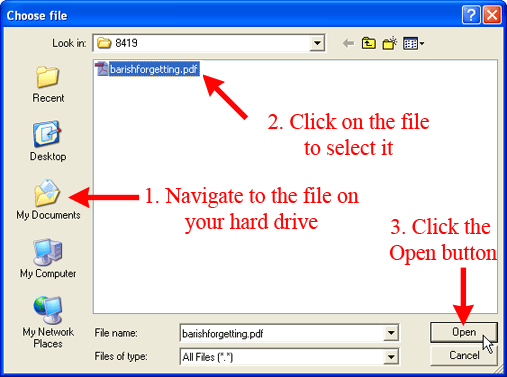
Navigate to the appropriate folder on your hard drive to find the file that you want to
upload into your Blackboard course. If you followed our
first set of instructions
(page opens in new window) for downloading files from ERes, then you'll most likely find your file in the ERes folder under your My Documents folder, in one of the numbered folders that you downloaded from the server. Once you find the appropriate PDF file,
click on the name of the file to select it, and then click on the Open button:
- In the Name of Link to File window, type in the name of the link that the students will see
when they view this section of your course. We recommend that you add in parentheses the type of file they will be viewing:
in this case, "(PDF file).
In general, you'll be uploading a file that students will get to by clicking on the link (whose name you just added), so
the Special Action generally remains as the default value: "Create a link to this file":

- In the Options section, we strongly recommend that you click in the Yes button to make the
content available. If you don't make the content available, your students won't be able to see it, and you'll need
to return to this area later on to change that setting to "Yes." If you want to limit when students can see the item,
the better approach is to select "Yes" for making the content available, but then to use the Display After and Display Until settings to control time frame when the item is visible to students. We also recommend that you select the "Yes" button to track the number of views,
if you want to get statistics at a later point about how often students have accessed this particular reading. In the figure below, we
choose the basic recommended settings of making the item visible, tracking the number of times students view the item, but not
restricting the item's availability to students:

- Click the
 button to send your changes to the server. button to send your changes to the server.
- Blackboard will respond that the item has been successfully added to your course. Click the
 button to return to the folder where you added the content. You should see the item you just added, with the
text entered into the "Name of link to file" window now underlined, indicating it is a hyperlink. You should also see your brief
description of the link. If you return to this area of your course (via the Control Panel), you'll see this same view, which will allow you
to modify, copy, remove, and track who has viewed the item (via the Manage button): button to return to the folder where you added the content. You should see the item you just added, with the
text entered into the "Name of link to file" window now underlined, indicating it is a hyperlink. You should also see your brief
description of the link. If you return to this area of your course (via the Control Panel), you'll see this same view, which will allow you
to modify, copy, remove, and track who has viewed the item (via the Manage button):

- You'll need to repeat Steps 2 through 8 above for each reading that you want to add to your Blackboard course.
- If you are using the same reading in more than one of your course, you can use the Copy button (see the figure just above) to copy the entry from this course to the other. However, you need to set up the Electronic Readings folder in the other course first, so that you can copy the item to the appropriate folder.
If you are using multiple
readings in more than one of your courses, you can actually copy the entire Electronic Readings folder from one course to another. To do that, you'll need to click on the  button to return to the Course Materials folder, then click on the Copy button for the Electronic Readings folder. You'll need to select a Destination Course and a Destination Folder in that course, which should be the Course Materials folder (so that the Electronic Readings folder will be just below that Course Materials folder): button to return to the Course Materials folder, then click on the Copy button for the Electronic Readings folder. You'll need to select a Destination Course and a Destination Folder in that course, which should be the Course Materials folder (so that the Electronic Readings folder will be just below that Course Materials folder):
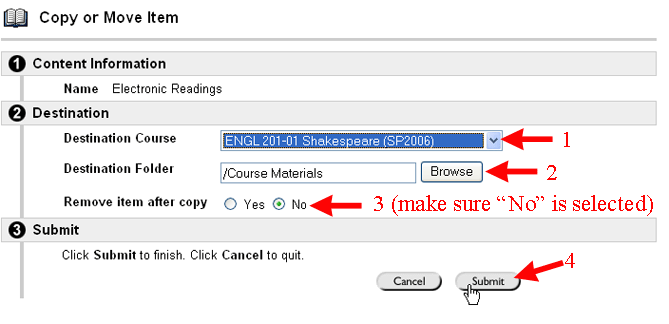
As we indicate in the figure above, please make sure that No is selected for "Remove item after copy." You want to keep the Electronic Readings folder in this course, as well as to copy it to the other course (if you indeed have several similar readings in that course).
- Once you have finished adding all of your online readings to this course, you'll most likely need to repeat these instructions for your other course(s) that have electronic readings that were part of our ERes system. To return to your list of courses in Blackboard, click on the
 Tab in the top-left corner of your screen, which returns you to the opening page in Blackboard. Tab in the top-left corner of your screen, which returns you to the opening page in Blackboard.
Last revised November 19, 2007. Please send questions or comments to
itec@bucknell.edu.
|

