
Creating a Sign-Up List
Traditionally, when a faculty member wants to allow students to sign-up for appointments, s/he puts a sign-up sheet on his/her office door, with spaces for students to write their name, reserving an appointment time. In Blackboard, we have a "building block" - in other words, a piece of software written to work within Blackboard, but not created by Blackboard itself - that allows you to create an online sign-up list that functions in the same way. You can create a group of appointment slots, and students can add their name to a slot to reserve a particular appointment time. You can also have multiple slots for a particular time, if multiple people can participate at the same time. Creating a Sign-Up List in Blackboard can actually involve three separate steps:
- Making the Tool Available in Your Course;
- Creating a Special Content Area for the List (optional); and
- Adding the Sign-Up List to Your Course
.
Making the Tool Available in Your Course
- You can access your Blackboard course by logging in to
myBucknell (opens in new window) and by clicking on the relevant course listing in the My Blackboard "gadget" on that page or by logging in directly to
Blackboard
(opens in new window).
- If you are on the main My Blackboard page in Blackboard, you can access your course by finding it in the Custom My Courses module in the middle column on that page and then clicking on the link for the course:

- To edit your course in Blackboard, you need to make sure that the Edit Mode switch at the top-right corner of the page is in the On position, which it should be by default:

If the Edit Mode is in the off position, you need to click on that switch to turn editing mode back on.
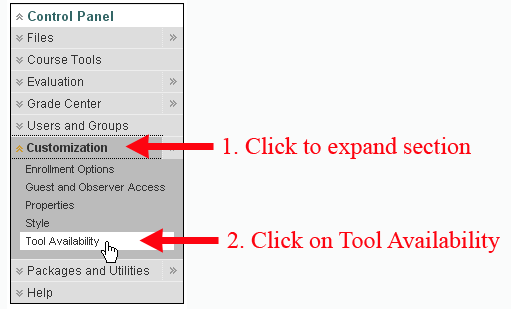
- Since the Sign-Up Tool is a non-standard feature, it is off by default. To use that tool, you first need to make it available to your course. In the Bb 9 Control Panel area at the bottom-left side of the page, click on the Custimization link in order to exapand the tools available to you, and then click on "Tool Availability" to go to that area:
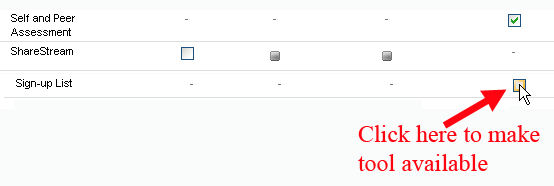
- The Tool Availability page contains an alphabetical list of all the tools that can be used within a Blackboard course. To make the Sign-Up List available to your course, scroll down on the page until you find the row for the Sign-Up List, and click in the box for the final column ("Available in Content Area"):
- Once you've selected that box, scroll down to the bottom of the page, and click on the
 button to send your change to the server. Blackboard will reload the Tool Availability page, indicating (via a green status bar at the top of the page) that the change has been successful: button to send your change to the server. Blackboard will reload the Tool Availability page, indicating (via a green status bar at the top of the page) that the change has been successful:

Creating a Special Content Area for the List
Now that you've made the tool available to a content area, you need to decide where you want to post the list in your course. One possibility is the Course Materials section, but another possibility would be to create a special content area for the list, so that students can find the list more easily. We've created a separate help sheet on
Adding a Content Area to Your Blackboard Course
(opens in new window). Those instructions describe how to create a "Student Journals" content area, and you can just type "Sign-up List" or "Appointment Sign-ups" (for example) as the name of the area, instead of "Student Journals". Don't forget to click in the "Available to Users" box when creating the new content area (if you choose to create a special area for the list), so that students can actually see the button as part of their navigation menu.
Adding the Sign-Up List to the Course
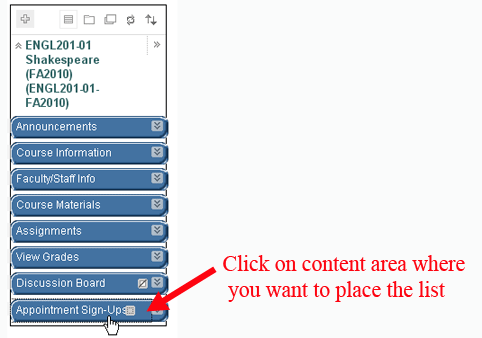
- Click on the button in the Course Navigation menu where you want to place the sign-up list within your course. In the screen capture below, we assume that you have created a special content area where you will place the list:
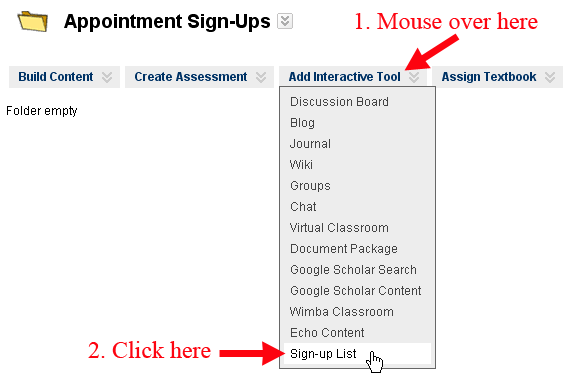
- Within that area, put your mouse over the Add Interactive Tool button, and click on "Sign-Up List"
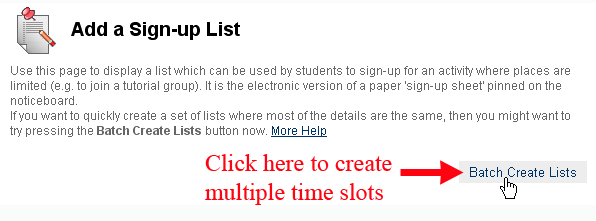
- In most instances (for example, sign-ups for advising appointments or for individual writing conferences), you'll want to use the Batch Create Lists tool, since it allows you to create a series of slots for appointments, all of which will have the same properties. For example, if you are creating advising appointments, you'll most likely want to create a group of appointments that allow only one student to sign up for each one. The "Batch Create Lists" tool will allow you to create all the appointment slots from one screen. To use that tool, click on the "Batch Create Lists" button on the right side of the page:
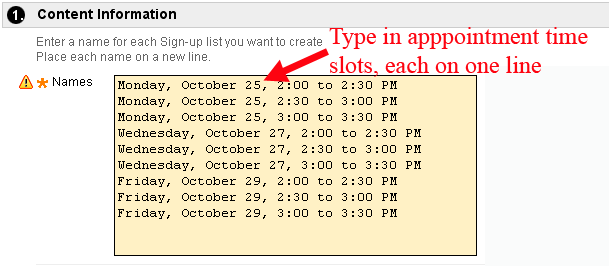
- In the Content Information box, type in a name for each list that you want to create, putting each separate appointment slot on its own line:
- In the Shared Settings box, you can add additional information about the list:

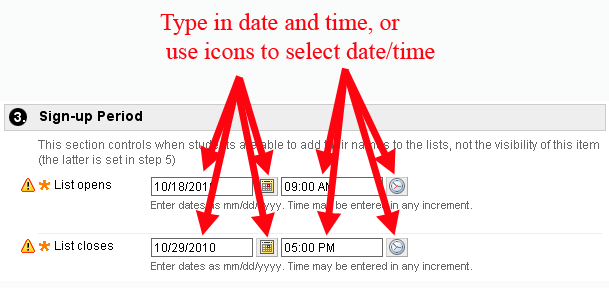
- Scroll down to Section 3, Sign-Up Period, and indicate when students can actually begin adding their names to a time slot and when they can no longer add their names to a list:
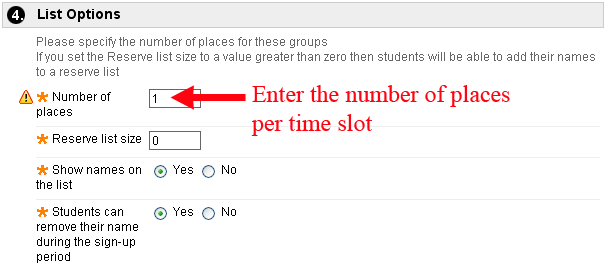
- In the List Options section, enter in the number of places for each list, along with how large a "Reserve list" you will allow. Students from the Reserve List are added to the slot if/when a student removes his/her name from the list. In the image below, we assume that only one student will be allowed to sign up for each time slot, and we won't have a reserve list. We also choose to allow students to remove their names from the list if they need to change their appointment time:
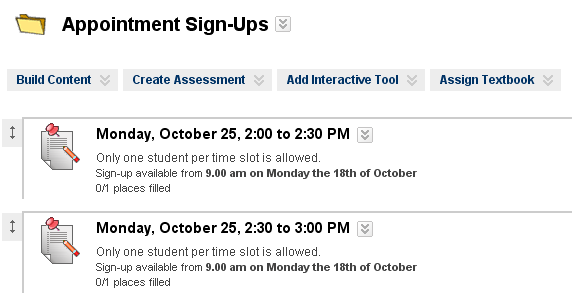
In the next section (Options), the default settings are all fine - you want users to be able to see the lists, you don't need to track the number of times students view the list, and you don't need to set any additional date and time restrictions when students can see the list of times. You can just scroll down to the bottom of the page, and click on the  to send your changes to the server. to send your changes to the server. - Blackboard will now return you to the content area where you began adding the lists, and all the time slots will appear on that page. As part of the description of each time slot, the server will indicate how many spaces have been filled, which at this point will be zero (out of the maximum slots available per appointment time):
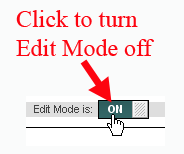
- You'll need to turn Edit Mode to the "Off" position in order to be able to click on time slots to see which students have signed up for each one. The Edit Mode switch is at the top-right corner of your screen:
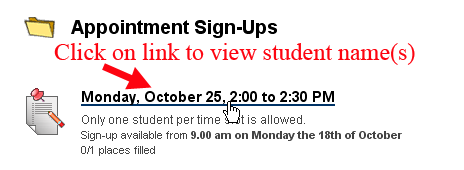
- When Edit Mode is in the Off position, you will see the screen the way students will see it, and each available time will become a link. You can click on the link to view the name(s) of students who have signed up for a particular slot:
- If you have clicked on one of the links to view the student name(s), you can use the "bread-crumb trail" at the top of the page to return to the list of times:

You can also scroll down to the bottom of the page to click on the  button to return to the list of times, but the bread-crumb trail is a bit easier to find. button to return to the list of times, but the bread-crumb trail is a bit easier to find.
Please note that you might want to click on the Edit Mode switch again to toggle Edit Mode back to "On," since Blackboard "remembers" the previous setting of that switch when you log back in.
Last revised November 15, 2010. Please send questions or comments to itec@bucknell.edu.
|


