Adding a Photo to Your Blackboard Profile
Blackboard 9 includes several new features, include a built-in blog and journal feature, along with the ability to upload a personal photograph that will appear in those blogs and journals. To upload your photograph into your Blackboard profile:
- If you don't have a relevant digital photo on your hard drive, you can go to the student
home page (opens in new window), click on the link for myBucknell, and log in to myBucknell.
- From there, you can click on the link for the online Directory among the myBucknell "Quick Links":

- Find your own entry in the Directory. When you can see your picture, you can right click on the picture (for PC users) or control-click on the picture (for Mac users). Click on "Save Image As . . ." or "Save Picture As", and save the file to your hard drive. Pay close attention to where you saved the file.
- Blackboard prefers to use square images that are 150 pixels wide by 150 pixels high. If you know how to use a photo or image editing program, you can crop your photo so that it fits that 150 x 150 size. If not, Blackboard will just resize the image when displaying it, which may cause some slight distortion.
- You need to log in to
Blackboard
(opens in new window) to upload your image.
- While you are in Blackboard, click on the My Places link at the top of your Blackboard window:

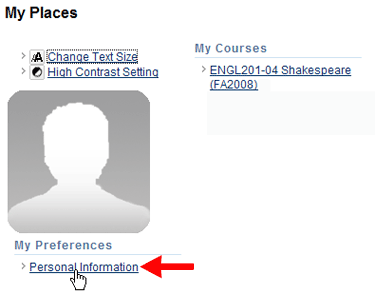
- Blackboard will load the My Places window. Within that window, click on the Personal Information link at the bottom-left corner of the window:
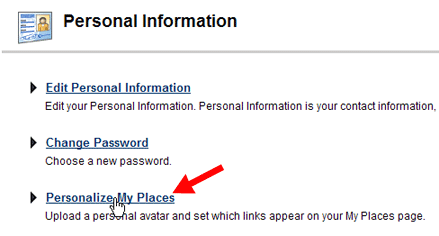
- On that Personal Information page, click on the Personalize My Places link, which should be the third link on the page:
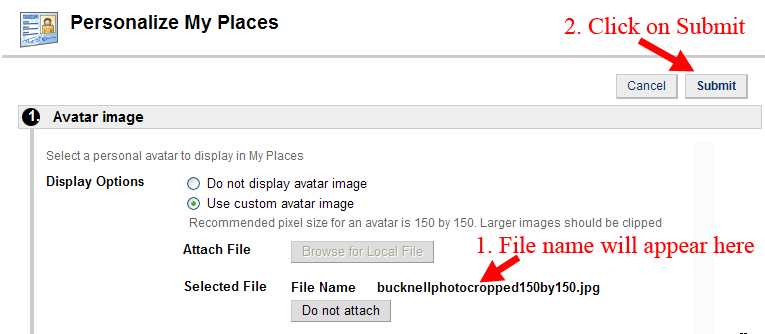
- In Section 1 on that page, click on "Use custom avatar image," and then click on the "Browse for Local File" button:

- Navigate to the place on your hard drive (or thumb drive, or other storage media) where you saved your digital photograph (or where the digital photograph already existed), and double-click on the file to select it.
- Blackboard will add the name of the file to the ""Selected File" area. Click on the Submit button to upload the file to the server:
- Near the top of the page, Blackboard will indicate with a green "success bar" that your personal settings have been updated:

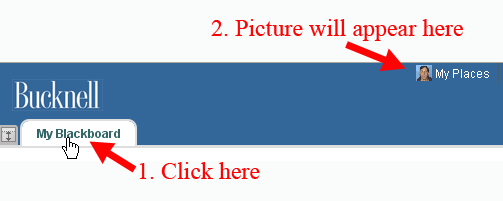
- To confirm the change, you can click on the My Blackboard tab to reload your page. You will see a very small version of your avatar image immediately to the left of the My Places link at the top of the page:
If your course is using the blog or journal feature in Blackboard, you will see the full version of your picture there.
Last revised January 26, 2010. Please send questions or comments to itec@bucknell.edu.
|

