Exporting a Learning Objects Blog/Journal Space
With version 9.0, Blackboard created its own blog/journal tool that is closely integrated into the full Blackboard learning management system. From Blackboard's perspective, a "blog" is a public piece of writing by an individual author (or such a space for the class as a whole), usually visible to all members of the course. A journal, on the other hand, is a private reflection shared only between the individual student and the course instructor.
Before Blackboard created its own blog/journal tool, we were using a blog tool created by Learning Objects as a "Blackboard building block" (in other words, a piece of software designed to work within Blackboard but not created by Blackboard itself). Since the Blackboard blog/journal tool is actually easier to use and to set up than the Learning Objects tool, we have actually turned off the building block by default, and we will soon no longer license that tool. To ensure that you don't lose any student blog or journal content created in the past, these instructions describe how to export existing blog or journal content as a standalone Web site that you can save or your hard drive for later viewing.
- You can access your Blackboard course by logging in to
myBucknell (opens in new window) and by clicking on the relevant course listing in the My Blackboard "gadget" on that page or by logging in directly to
Blackboard
(opens in new window).
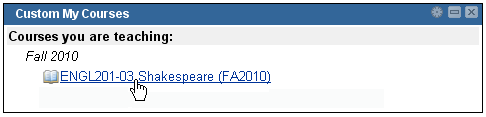
- If you are on the main My Blackboard page in Blackboard, you can access your course by finding it in the Custom My Courses module in the middle column on that page and then clicking on the link for the course:
- You'll first need to make sure that the Edit Mode switch at the top-right corner of the page is in the On position, which it should be by default. If the Edit Mode switch is in the "Off" position, you need to click on it to turn editing mode on:

- In the Course Navigation menu, click on the button for the area of the course where you added the blog or journal spaces for students. One of the disadvantages of the Learning Objects tool is that it most often involved creating a separate blog/journal space for each student in your course, and so your page will mostly display a list of blog/journal spaces - one for each student.
- Click on the link for the first student journal/blog that you want to export:
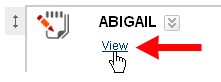
Please note that if the icon next to the entry looks like this ( ) or like this ( ) or like this ( ), then you are actually looking at the built-in Blackboard tools and not the Learning Objects blog/journal tool, and you won't need to export those blogs/journals to preserve their content. A Learning Objects blog/journal space will have the following icon - ), then you are actually looking at the built-in Blackboard tools and not the Learning Objects blog/journal tool, and you won't need to export those blogs/journals to preserve their content. A Learning Objects blog/journal space will have the following icon -  (as shown in the larger screen capture above, with the journal link for "ABIGAIL") - and only those spaces need to be exported to save their content to a Web page. (as shown in the larger screen capture above, with the journal link for "ABIGAIL") - and only those spaces need to be exported to save their content to a Web page.
- If you haven't visited the blog/journal recently, the Learning Objects software will need to update the blog content so that it can be read in our current version of the software. After a very brief (one- to two-minute, approximately) delay, you will see the student's blog/journal postings. At the top of the page, in the row of links to the right of the student's name. Click on the "Export" link to begin the process:

- You will see an Export Blog box in the middle of the page. Please note that Learning Objects just used one tool for (public) blogs and (private) journals. The difference between the two depended on the settings you chose when you created the blog/journal, in terms of who could read the entries (everyone in the class, or just the instructor). We recommend that you choose the simpler option of exporting the blog/journal to a single Web page. To do that, click on the downward-facing arrow for "Export as", and then click on "a single web page" as the chosen format:

- Scroll down to the bottom of the page, and click on the
 button to send your request to the server. button to send your request to the server.
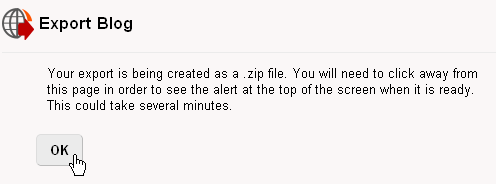
- You will see a confirmation message that the export of the blog/journal is being created. Click on the OK button to reload the page for that particular blog/journal:
- You'll need to click on the "Export" link at the top of the page again to get back to the place where you can download the exported file:
- Within that central "Export Blog" section will be a new "Exports Available for Download" area. Click on the link to download the export file for this particular blog:

- Depending on the browser you are using (and your operating system), you may be given a choice to open the *.zip file (using WinZip for Windows XP computers) or save the file to your hard drive. Since you are downloading the file for backup purposes, you can just save the *.zip file to your hard drive, so that you have a backup copy of all the pages in the blog site. If you chose the "single web page" option for the export, the zip file will actually contain a single "index.html" file that represents the content of the blog. The zip file will be named based on a number ID for the blog, plus the date and time that you downloaded it. You could extract (or unzip) the file and then rename "index.html" to something that makes it clear whose blog you have exported - for example, abigailblog.html. That HTML file can be viewed within a browser, if you want to re-read the entries.
- You'll need to export each of the blogs/journals for the course, so you can use the "bread-crumb trail" at the top of the page to return to the section with links to all the blogs/journals:

- You'll need to repeat Steps 5 through 12 above for each of the blogs/journals in your course.
Last revised
February 28, 2011. Please send questions or comments to itec@bucknell.edu.
|