Creating Groups in Your Course
You can think of the collection of students enrolled in your Blackboard course as one large group. Blackboard provides a series of tools to that large group: a discussion board, a virtual classroom space for synchronous online chats, a digital drop box in which to upload files (now superseded by the Assignment Manager feature - at least for the class as a whole), and a "send email" function that allows users to send e-mail to other participants in the course. When you create groups in your course using Blackboard's Manage Groups feature, you can provide those groups with the same suite of tools. For example, students working collaboratively on an assignment can use a Group File Exchange to share drafts of the assignment. They can hold asynchronous discussions about their work using a Group Discussion Board. They can even hold real-time meetings online using Blackboard's chat (i.e., "Collaboration") feature. You can also use groups as a way to send e-mail to particular sub-sets of students in your course.
In this help sheet, we explain how to create groups and to assign the appropriate tools to those groups. Please note that Blackboard has divided this process into two distinct steps:
- Creating Groups
- Adding Students into Groups
In addition, if you want your students to use the Discussion Board feature in their group, you'll need to include a third step:
- Creating a Discussion Board Forum
Creating Groups
- Log in to Blackboard
(opens in new window), and click on your course among the list of "Courses you are teaching" in the My Courses
section of the opening page. Within that course, go to the Control Panel by clicking on the
 icon near the bottom of the left-hand navigation menu. icon near the bottom of the left-hand navigation menu.
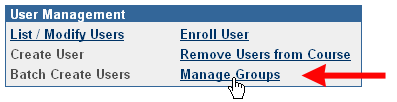
- Within the User Management section of the Control Panel (in the top-right quadrant of your browser window), click on the Manage Groups link:
- Click the
 button. button.
- Type a name for the group in the Name field and, if desired, type in a description of the group in the appropriatge text box.
- Scroll down to the Group Options section, and select the features you want to make available to the group by clicking in the appropriate check boxes:
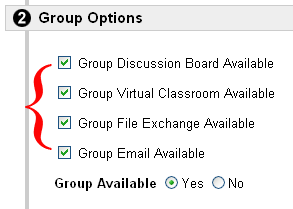
You'll want to retain the default setting of "Yes" for making the Group Available.
- When you are finished, click the
 button to send the changes to the server. button to send the changes to the server.
- Blackboard will respond with a confirmation that the "attempted action was successful." Click on the OK button to return to the Manage Groups page, on which you'll see the group you created along with a list of the tools that you provided to the group.
- Repeat steps 3 through 7 above to create all the groups for your course.
Adding Students into Groups
- Once you have created the groups for your course, you need to modify them in order to add specific students to each group. To add students to your first group, click on the Modify button to the right of that group title:

- Click on the link to Add Users to Group; it should be the second one from the top.
- A Search window will appear, allowing you to list the students in your course. To add multiple users at the same time, leave the search window blank, and click on the Search button:
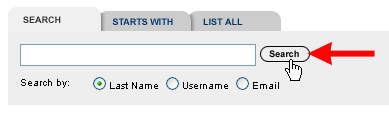
- Blackboard will list all the users in your course, presenting 25 users per page. In the Add column, click inside the boxes next to the name of the students you wish to add to the group, and click on the button at the bottom of the page to send your selections to the server:
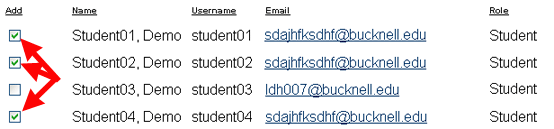
Please note that if you have more than 25 students in your course, you'll need to add the students one output page at a time. You'll thus need to start by adding only those students whose name appears in the first output page. (We'll explain just below how you get to subsequent pages to add more students to the group.)
- After you add the students (or the first set of students) to the group, Blackboard will confirm that the "attempted action was successful." Click on the
 button to return to the Manage Group page. button to return to the Manage Group page.
- If you need to add more users to the group (in instances where you have more than 25 students in the course, and all the names weren't listed on the first output page), click again on the Add Users to Group link, click on the Search button again (with the search window blank), and use the navigation tool at the bottom of the page to reach the list of other students in the course:
 . .
Please be aware that once a student has been added to the group, his/her name doesn't appear in the list of possible students to add to the group. In other words, it's possible that a student who didn't appear on the first output page the first time you listed students will appear on the first output page the second time around.
If your first group has all its members, click on the button again to return to the Manage Groups page.
- Repeat Steps 1 through 6 above for each of the groups you have created, until you've added students to all of your groups.
- If you want your group(s) to use the Group Discussion Board feature, you need to continue with Creating a Discussion Board Forum (below) for all of your created groups. Otherwise, click on the button to return to the Control Panel for your course.
Once the groups are created, students access their groups by clicking on the  tool on the left-hand side of the browser window, in the Tools box, and then clicking on the tool on the left-hand side of the browser window, in the Tools box, and then clicking on the  link. All groups for the course will be listed, but only the groups in which the student is a member will appear as actual links. The student clicks on the link for his/her group(s) to find the pages for that group. link. All groups for the course will be listed, but only the groups in which the student is a member will appear as actual links. The student clicks on the link for his/her group(s) to find the pages for that group.
Creating a Discussion Board Forum
Although this is a bit counter-intuitive, if you want the students in a group to be able actually to use the discussion board tool that you provided for them, you need to create a forum in which they can post their messages. Students have sufficient rights to add topics to a forum, but they do not have the ability to create a forum in the first place. To create that forum:
- Assuming you are still within the "Manage Groups" section of your course (or elsewhere in the course), you can click on the "bread-crumb trail" at the top of the page to return to the opening page for your course:

- Click on the tool on the left-hand side of the browser window, in the Tools box, and then click on the link to get to the Group pages for your course.
- You will see a list of the groups in your course. Since you are the instructor for the course, all the group names will be actual hyperlinks, since you have access to all the group areas. Click on the link for the first group for which you want to add a discussion forum:

- Click on the link for the Group Discussion Board, which should be the first link on the page.
- Click on the
 button to add a forum for the group. button to add a forum for the group.
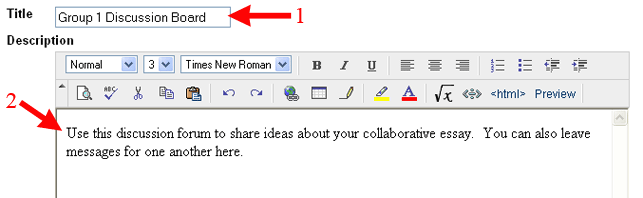
- Enter a title and (if you wish) a description for the forum in the appropriate fields on the page:
- Scroll down to the Forum Settings section, and choose the settings that you consider most appropriate for the group forum. In the figure below, we display the most common settings for such a forum:
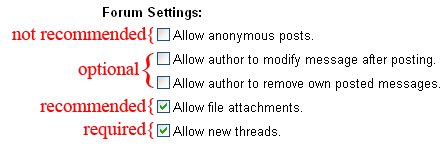
In the above figure, we have chosen not to allow anonymous posts, because we want the students to take responsibility for their comments, and because one of the many purposes of a group is to promote more interaction among the students. In some instances - for example, a discussion on how the group is functioning as a group -
you might want to consider creating a special forum for such a topic and allowing anonymous posts. We have also chosen not
to allow authors to remove or to change their messages after posting, although for a more private forum such as one for a group, you could choose to allow such flexibility. We recommend that you allow file attachments, since group members could use the forum as a way to exchange drafts of their work, rather than the group file exchange area. It's very important that you choose to allow new threads, so students can initiate discussions on their own.
- The Forum User Settings section allows you to assign special privileges to group members or to block a student from posting to the forum. In most instances - especially for a group forum - you won't need to use that section, so you can scroll down to the bottom of the page and click on the button to send your changes to the Blackboard server.
- You will now return to the Group Discussion Board area. If you have more than one group in your course, you'll need to use the "bread-crumb trail" at the top of the page to return to the list of groups in your course:

Repeat Steps 3 through 9 above to create an initial forum for each of the groups in your course.
Last revised November 8, 2006. Please send questions or comments to itec@bucknell.edu.
|