Changing the Order of Buttons in the Course Navigation Menu
With version 9, Blackoard got rid of the separate Control Panel, along with the Manage Course Menu command that used to be part of the Control Panel. Now, to change the order of buttons in the Course Navigation Menu, you can use the drag-and-drop reordering, or you can use a keyboard-controlled mechanism.
Drag and Drop Reordering
- You can access your Blackboard course by logging in to
myBucknell (opens in new window) and by clicking on the relevant course listing in the My Blackboard "gadget" on that page or by logging in directly to
Blackboard
(opens in new window).
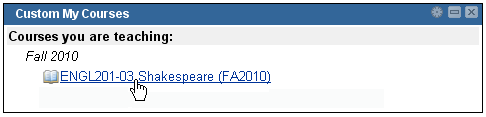
- If you are on the main My Blackboard page in Blackboard, you can access your course by finding it in the Custom My Courses module in the middle column on that page and then clicking on the link for the course:
- You'll first need to make sure that the Edit Mode switch at the top-right corner of the page is in the On position, which it should be by default. If the Edit Mode switch is in the "Off" position, you need to click on it to turn editing mode on:

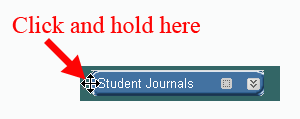
- To change the order of one of the buttons, move the mouse so that it is just to the left of the button that you want to move.
- The cursor will change to a four-way arrow:
Click and hold on the left mouse button, and (while holding the mouse key down), drag the course navigation button to where you want it to be in the course menu, then release the mouse button. The button will "slide into place" when you let go of the mouse button.
Keyboard-Controlled Reordering
- You can access your Blackboard course by logging in to
myBucknell (opens in new window) and by clicking on the relevant course listing in the My Blackboard "gadget" on that page or by logging in directly to
Blackboard
(opens in new window).
- If you are on the main My Blackboard page in Blackboard, you can access your course by finding it in the Custom My Courses module in the middle column on that page and then clicking on the link for the course:
- You'll first need to make sure that the Edit Mode switch at the top-right corner of the page is in the On position, which it should be by default. If the Edit Mode switch is in the "Off" position, you need to click on it to turn editing mode on:
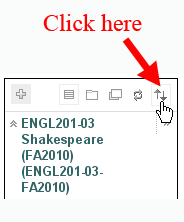
- To change the order of one of the buttons using the keyboard control (and arrows), click on the re-order icon at the top-right corner of the course navigation menu:
- A Reorder: Menu Items dialog box will appear. Click on the name of the area you want to move, and click on the up arrow (if you want it higher in the menu) or down arrow (if you want it lower in the menu). In the figure below, we assume that you've added a new content area that you want higher in the menu:
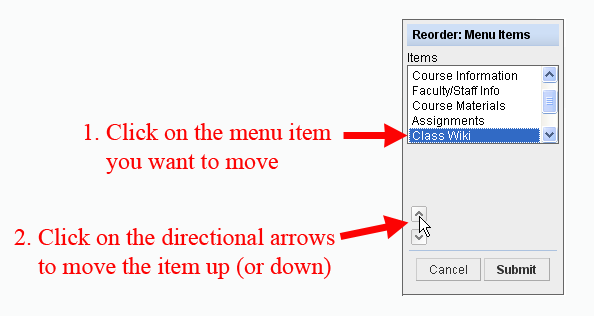
- Continue to click on the up (or down) arrow, until the menu item is in the location you want, then click on the
 button to send your new order to the server. button to send your new order to the server.
- Blackboard will confirm that the menu items have been reordered. Click on the OK button to clear out the alert.
Last revised July 21, 2010. Please send questions or comments to
itec@bucknell.edu.
|