Adding a Blog to Your Course
Both the Blog and the Discussion Board provide public "pre-writing" spaces for your students, where students can reflect in writing on the course materials and perhaps receive feedback about their entries from their peers. The Discussion Board might be considered the more formal medium of the two, since it consists of chronologically and hierarchically arranged discussions by the students. The postings are grouped together by topics (also known as "threads"), and replies to the original post (launching the "thread") are listed in nested, indented fashion grouped with that initial post. While also public and chronological, the Blog is arranged by author, with posts listed in reverse chronological order - in other words, with newest postings coming first. A blog can feel (to its author) like a personal writing space, where his/her reflections are grouped together. Since comments by other students are appended to each blog entry, those comments don't tend to have the same equality of status as postings and replies in the discussion board. If you want students to post blog entries and comments, you'll most likely need to require both types of contributions as part of the overall assignment. As with the journal, the blog entries are time-stamped, so you can be sure that students are indeed contributing entries with the frequency you require. To add a Blog to your course:
- You can access your Blackboard course by logging in to
myBucknell (opens in new window) and by clicking on the relevant course listing in the My Blackboard "gadget" on that page or by logging in directly to
Blackboard
(opens in new window).
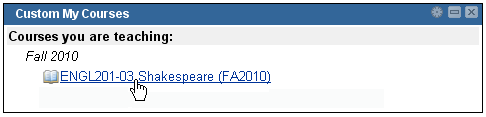
- If you are on the main My Blackboard page in Blackboard, you can access your course by finding it in the Custom My Courses module in the middle column on that page and then clicking on the link for the course:
- The process of adding a Blog to your course can be divided into two separate steps:
Adding a Special Content Area to Your Course
You can place the link to the student blog spaces into any content area of your Blackboard course. However, we recommend that you create a special content area for the blog and include that content area as part of the course navigation menu. Since there are many reasons why you'd want to create a new content area within Blackboard, we have created a separate help sheet that will explain that part of the process:
Adding a Content Area to Your Blackboard Course (opens in new window).
Adding the Blog Space to Your Content Area
We are assuming that you've either created a new content area for the course Blog or are adding the Blog to an existing area (such as Assignments). You'll first need to make sure that the Edit Mode switch at the top-right corner of the page is in the On position, which it should be by default. If the Edit Mode switch is in the "Off" position, you need to click on it to turn editing mode on:

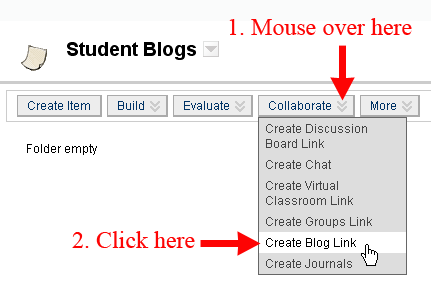
- Click on the button (in the course navigation menu) for the content area where you want to create the Blog for your students. In our example, we will assume that you created a special "Student Blogs" area for your course.
- Blackboard groups the command to create the Blog among the "Collaborate" options, so move your mouse over the double down-arrow on the Collaborate button, and click on the link for "Create Blog Link":
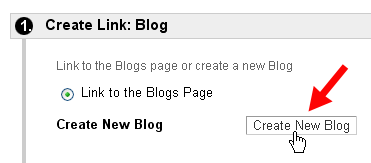
- At this point, you'll need to create the blog to which you will link from this section of the course. To start, click on the Create New Blog button:
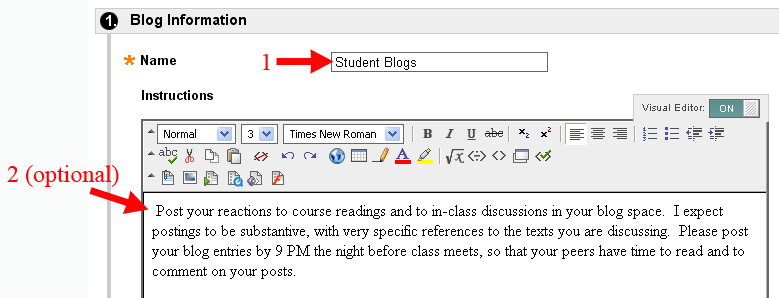
- On the Create Blog page, type in a name for the blog, along with (optional but recommended) instructions on your expectations for student blog entries:
- Below the Instructions text box is a series of options you can set for the blog. Most of the default options are appropriate for a typical course blog space. For example, you'll definitely want the blog to be available, so you want to keep the option of "Yes" for Blog Availability. If you want to limit the time window when students can see and contribute to their blog entries, you can choose particular values for the Display After and Display Until fields. To set those values, make sure that you click in the square selection box just next to "Display After" and "Display Until", and then set dates and times using the appropriate boxes.
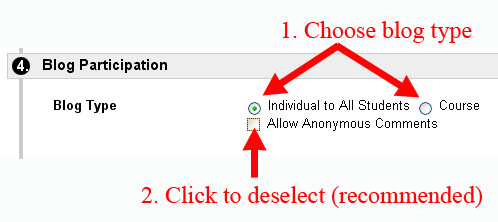
- In the Blog Participation area, you'll need to choose the type of blog. The distinction between "Individual to All Students" and "Course" blog is a bit hard to make and not so clear as the two terms suggest. With the "Course Blog," all student writers share one "blog space", and posts are listed in reverse chronological order. However, you can sort the posts by student author, which is basically the same as the "Individual blog" interface. If you choose "Individual to All Students" (the more common choice), then each student will have his/her own personal blog space, although there will be links to the blogs of all the other students on the right-hand side of the page. Below is our "recommended" settings: individual blogs, with no anonymous comments:
- The rest of the default Blog Settings should be fine, so you can scroll down to the bottom of the page and click on the
 button to send your changes to the server. button to send your changes to the server.
- Blackboard will take you to a Create Link: Blog page, with the blog you just created highlighted. Click on the
 to link to that blog. to link to that blog.
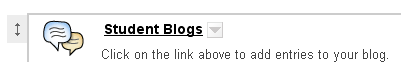
- Although this will feel a bit redundant, you will now be taken to another Create Link: Blog page with an additional text field. Any text you enter into that text box will appear under the link for the blog. If the title of the blog is clear enough, you can just leave the Text box blank, or you can add very brief instructions, such as "Click on the link above to add entries to your blog."
- You can keep the default values for the Options section ("Yes" for Available, "No" for Track Number of views, and no additional date restrictions). Scroll down to the bottom of the page, and click on the button to finish the process of creating and linking to the student blog space.
- Blackboard will return you to the course content area where you began linking to the blog. You should now see a link to the blogs in that area:
Last revised November 17, 2009. Please send questions or comments to
itec@bucknell.edu.
|