Posting an Announcement in Your Course
You often make announcements to your students at the beginning (or end) of class, reminding them of upcoming campus events or of course-related deadlines. Blackboard has an Announcements feature that serves the same purpose - and that also provides a way to post announcements that you forgot to mention in class. When a student clicks on your course in Blackboard, s/he will see the Announcements first, so those announcements tend to attract attention - assuming that you have gotten your students into the habit of checking your Blackboard course frequently. You can also tell Blackboard to email students as soon as you post the announcement, giving a bit more prominence to the announcement (assuming that your students check their Bucknell email, that is).
To create an announcement in Blackboard:
- Log in to Blackboard
(opens in new window), and click on your course among the list of "Courses you are teaching" in the My Courses
section of the opening page. Within that course, go to the Control Panel by clicking on the
 icon near the bottom of the left-hand navigation menu. icon near the bottom of the left-hand navigation menu.
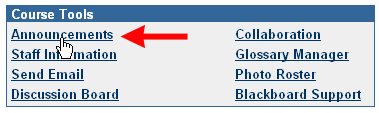
- Within the Course Tools section of the Control Panel (on the left-hand side of your browser window, in the middle), click on the Announcements link:
- Blackboard will take you to an Announcements page. Click on the
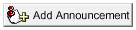 button near the top of the page. button near the top of the page.
- In the Announcement Information section, add a subject for your announcement, and type in the announcement text in the Message field:
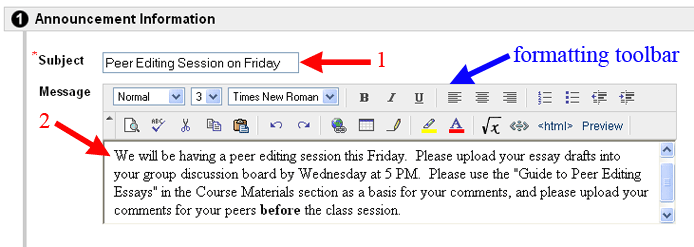
In the figure above, you'll notice that the word "before" (on the last line) is in bold text. To change the formatting of your text, you can use the "formatting toolbar" - indicated with a blue arrow in the figure above. To apply a special formatting (for example, bold text), we recommend that you type the full text first without any special formatting. Then, when you are done, highlight the word(s) to which you want to apply special formatting by clicking and dragging the mouse over that word (or those words). Then choose the tool you want (for example, B for bold) to apply that formatting to the chosen text.
- Once you've typed in your subject and announcment text, scroll down to the Options section of the page. We recommend that you leave the default settings as they are. In other words, we recommend that you do not make the announcement a "permanent" one - something that students will always see when they go to your course. In general, people learn to ignore permanent announcements, and permanent announcements make it harder to find the most significant, new announcements that you have made. Also, we recommend that you don't place date restrictions on the announcement, since Blackboard will automatically remove the announcement from view after the announcement is more than seven days old.
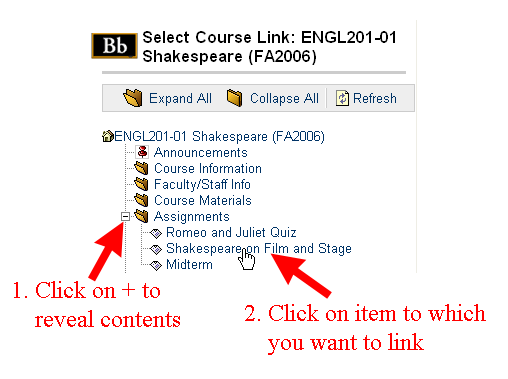
- In the Course Link section, you can choose to make a link to another part of your course. For example, if you are posting an announcement about a test or about a new assignment, you can provide a link directly to that test or assignment. To make that "Course Link", click on the
 button to reveal a folder hierarchy for your course. Content areas with folders and items within them will have a plus sign next to them, and you'll need to click on the plus sign to reveal the contents. The items themselves will be hyperlinks, so click on the name of the item (or area) to which you'd like to link in order to establish the link: button to reveal a folder hierarchy for your course. Content areas with folders and items within them will have a plus sign next to them, and you'll need to click on the plus sign to reveal the contents. The items themselves will be hyperlinks, so click on the name of the item (or area) to which you'd like to link in order to establish the link:
- If you don't need a course link (or if you've already created that link), you can scroll down to section 4, Email Announcement. If you click in the box next to "Email this announcement to all course users,", the subject and text of the announcement will be sent to all people involved in the course.
Please note that if you set a "Display After" date for the announcement because you don't want students to see the announcement right away, the email will still be sent to those students as soon as you submit the announcement, which is a bit confusing. We recommend that you create announcements only when you actually want students to see them, rather than creating them in advance.
- Scroll down to the bottom of the page, and click on the
 button to send your announcement to the server. button to send your announcement to the server.
- Blackboard will confirm that your announcement has been added. Click on the
 button two times to return to the Control Panel for your course. You can also use the "Bread-Crumb Trail" to return to the student view of your course, which will allow you to see your most recently posted announcement: button two times to return to the Control Panel for your course. You can also use the "Bread-Crumb Trail" to return to the student view of your course, which will allow you to see your most recently posted announcement: 
Last revised October 31, 2008. Please send questions or comments to itec@bucknell.edu.
|