
Adding a Folder's Worth of Documents into Your Blackboard Course
With version 9.1, Blackboard added a new "Course Files" area that serves as a kind of virtual storage locker for all of the materials that you upload into your Blackboard course. One advantage of that Course Files area is that you can upload multiple files into it all at the same time, and you can even upload a folder worth of documents there as a single entity, making it much easier to build your course. This help sheet assumes that you have a bunch of related documents that you want to upload into your Blackboard course, and you don't need to provide much more information about the documents beyond what is conveyed by the file names. For example, you might want to upload a batch of images into your course or a batch of PDF files, and you'd prefer not to have to upload those files one at a time. Here's how you would add that folder to the Course Files area and then link to the folder from within a content area in your course:
- It's possible that you will already have all your files in a folder on your hard drive. If so, you'll mostly want to make sure that the file names are clear, so that students will understand what they are clicking on when they see the various files in the folder. If you don't have a folder already, you'll need to create one using the appropriate procedure for your operating system. For Windows XP and Windows 7, you can go to the "My Documents" or "Documents" folder, right-click in the folder window, move your mouse down to "New", and click on Folder. You'll need to type in a name for the folder and hit the Enter key on your keyboard to finalize the name. For the Mac OS, you can create the folder on your desktop (for example) by clicking on the File menu in the Finder and then clicking on "New Folder". You can type in a name for the folder and hit the return key.
- Once you have the folder created (assuming it is emtpy), you'll want to double-click on the folder (to "open" it) and then drag all the documents into the folder so that they can then be uploaded into your Blackboard course. You'll need to remember the location of your folder on your hard drive, in order to pull it into your Blackboard course.
- You can access your Blackboard course by logging in to
myBucknell (opens in new window) and by clicking on the relevant course listing in the My Blackboard "gadget" on that page or by logging in directly to
Blackboard
(opens in new window).
- If you are on the main My Blackboard page in Blackboard, you can access your course by finding it in the Custom My Courses module in the middle column on that page and then clicking on the link for the course:

- You should make sure that the Edit Mode switch at the top-right corner of the page is in the On position (which it should be by default), to allow you to edit your course:

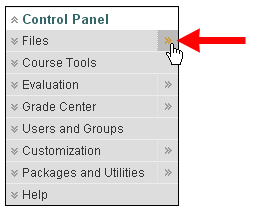
- In the Control Panel in the bottom-left corner of the page, underneath the course navigation menu, click on the two right-facing arrows on the far right side of the "Files" section:
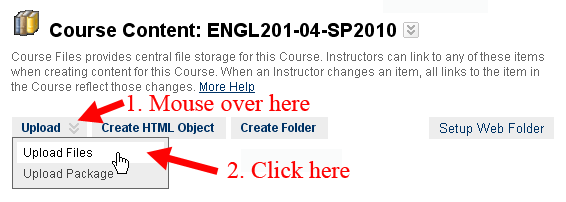
- The Course Content area will have a list of all the files that you have already added to the course. In order to upload the folder you created above, you need to put your mouse over the Upload button, and click on "Upload Files" in the menu that drops down:
- A java window will appear, into which you can drag files - or, in this instance, the folder containing the files - from your "My Computer" or "Computer" or Finder window into the Course Files area. Alternatively, you can click on the Browse button to select the folder to upload into the Course Files area:
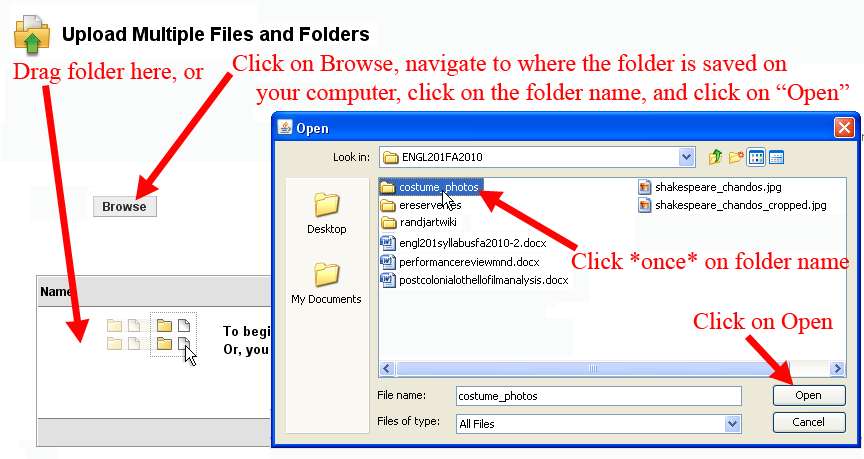
If you are using the "drag-and-drop" method, you can imagine that the "Open" dialog box in the figure above is a My Documents or Documents window. You would then drag the "costume_photos" folder to the Name area in the java window marked by the left-most arrow above. Otherwise, if you click on the "Browse" button, you would navigate to where the folder is saved on your hard drive, click once on the folder to select it, and then click on the Open button. You want to make sure that you click only once on the folder (and that you don't double-click), so that you are selecting the entire folder as a single entity, rather than the individual documents from within the folder.
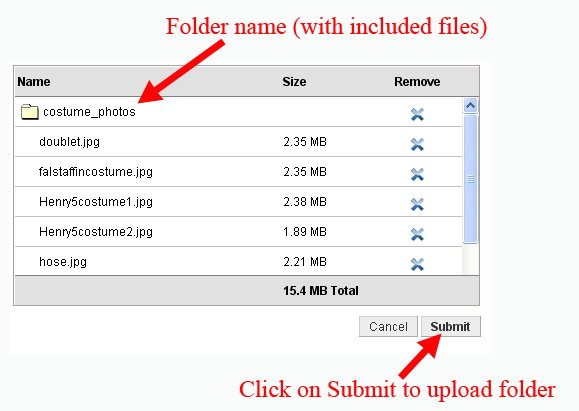
- Blackboard will list the folder, as well as all the files that are contained within the folder. Click on the Submit button to begin the process of uploading the files into the Course Files area:
Blackboard will display the progress as it uploads individual files (as part of the overall folder). When it is done, it will return you to the Course Content page, and you should see your folder listed among the documents on that page You now need to decide where in your course you want to place the link to the folder, so that students can access all the documents within that folder. Click on the button in the course navigation menu for the content area where the link to the folder will reside. In this example, we will choose the Course Materials area:
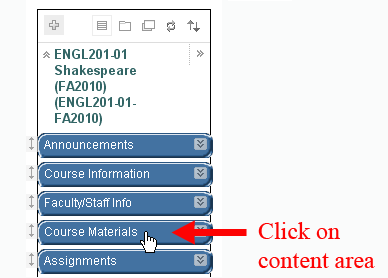
- Within the content area you have chosen, place your mouse over the Build Content button, and click on "File" in the Create column:
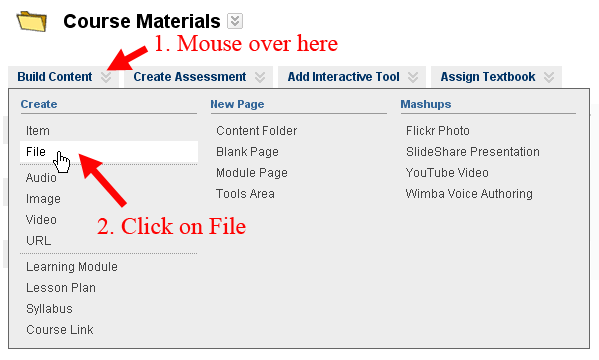
- Because you're actually linking to a folder that you added to the Course Files area, you want to make sure to click on the "Browse Course" button:
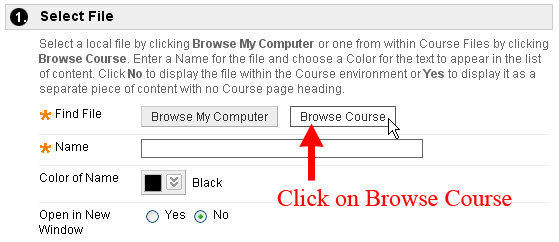
- Blackboard will return you to the Course Files area (within a pop-up window). Click on the radio button next to the folder you uploaded, and then scroll down on the page to click on the Submit button:
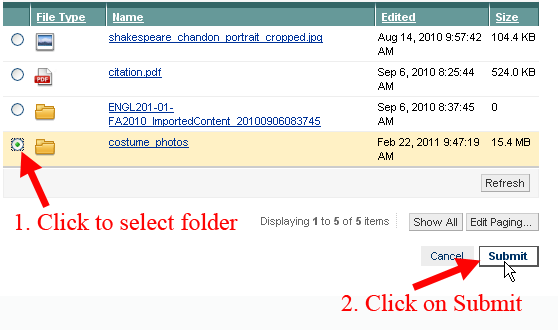
- The pop-up window will close, and you will return to the Create File page. Within the Name field, Blackboard will enter the name of the folder. You can accept that name, or you can type in a more appropriate name.
- Within the Standard Options section, you could set Display After and Display Until dates if you want to control when students can view the content. In general, though, the default options are sufficient - "Yes" for "Permit Users to View this Content", "No" for "Track Number of Views", and no date or time restrictions - so you can just scroll down on the page and click on the
 to send your changes to the server. to send your changes to the server.
- The folder will appear in the content area you chose, although it will have a floppy disk (
 ) icon next to it, more typical of an individual file. If you click on the link for the folder, you will be taken to the course files area (after a very brief delay), which is also how your students will be able to access the individual files: ) icon next to it, more typical of an individual file. If you click on the link for the folder, you will be taken to the course files area (after a very brief delay), which is also how your students will be able to access the individual files:
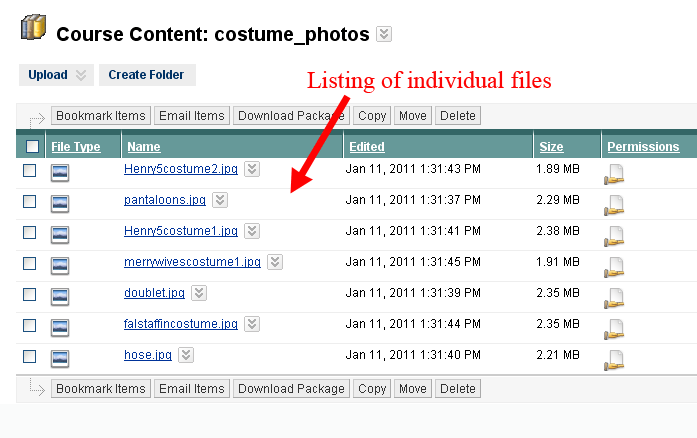
Students can click on the link for each file to view the files within the program associated with that file type.
Last revised February 22, 2011. Please send questions or comments to
itec@bucknell.edu.
|


