Making a Test Available
Blackboard separated the processes of creating and deploying a test into two distinct stages. You create the test
first using the Test Manager, and then you decide as a totally separate step where you will post the link to your test
in your course. To make things even more confusing, Blackboard also allows the reverse process: you can find the place in your course
where you want the test and then create it there, but we'll be explaining the former process in this help sheet, since that process
is a bit more logical.
For instructions on how to create a test or quiz, see the help sheet Creating a Test. In order
to make a test you've already created available to your students:
- Log in to Blackboard
(opens in new window), and click on the course in which you created the test, listed among the "Courses you are teaching" in the My Courses
section of the opening page. Within that course, go to the Control Panel by clicking on the
 icon near the bottom of the left-hand navigation menu. icon near the bottom of the left-hand navigation menu.
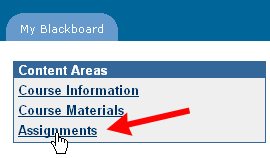
- Click on the link for the particular Content Area where you want to post your test. In this example, we will show how to
add a test to the Assignments section of your course, but the test can be added to any content section:
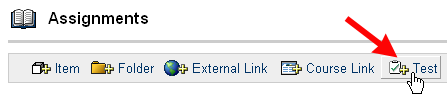
- Within the area of your course that you've chosen, click the Test button to deploy the test within that section
of the course:
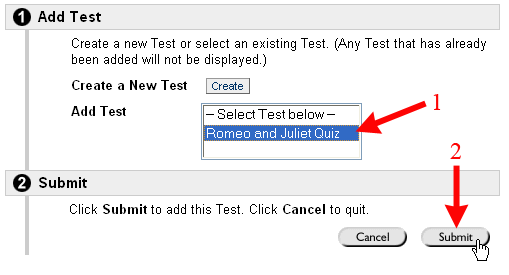
- On the Add Test page, in the Add Test window, you'll see a list showing the test (or tests) that you've created
but not yet deployed in your course. Click on the test that you want to add to the chosen content area, and click the Submit button
to send your request to the server:
- Blackboard will confirm that your test has been added successfully. Click on the
 Button to clear the confirmation page. Button to clear the confirmation page.
- At this point, you'll need to select options for how the test is displayed to students. Click on the Modify the Test options
link to specify the Availability, Feedback, and Presentation options for the test. Below, we'll display some recommended options for each
section, along with a more detailed description of why we recommend those options. Please note that in the table below, we use screen captures of just the most significant information in each section. In the example below, we are assuming that you are adding a timed test, to be available only during a specified time period as well. Those options might not apply to the test that you are adding to your course:
| Section |
Suggested Options |
| 1. Test Information |
 |
| 2. Test Availability |
 |
| 3. Self-Assessment Options |
 |
| 4. Test Feedback |
 |
| 5. Test Presentation |
 |
| Section |
Prompt(s) |
Suggested Setting |
Explanation |
| 1. Test Information |
Name, Color of Name, and Description |
Keep information as desired |
Blackboard copies over the name and description of the test to this "Test Options" page, but not the
instructions for the test. If you like the name and description that you entered when creating the test, you don't need to change them
here. If you want the link for the test to be in a special color, you can click on the  button and click on a color in the resulting "Color Picker" window. button and click on a color in the resulting "Color Picker" window. |
| |
Open Test in new window |
No |
Although you can choose either Yes or No for this option, we recommend having the test open in the same window to
avoid potential confusion on the part of students. |
| 2. Test Availability |
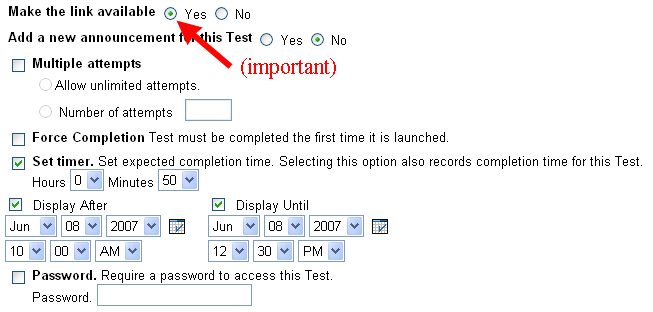
Make the link available |
Yes |
It's important that you select Yes here; otherwise, you'll need to return to these settings at a
later date and select Yes then. In our experience, faculty members who don't select "Yes" at this point often
forget about this setting, and then students actually never see the link for the test and can't take it. If you don't want students
to be able to see the test right away, you can use the "Display After" setting to determine when the link will actually be
available to students. |
| |
Add a new announcement for this Test |
No |
Unless you're are ready for students to take the test right away, we recommend that you not add an
announcement at this point. You can use the Announcements feature in Blackboard to add an announcement later, or you can
just let your students know when the test will be available, and where you've posted it. |
| |
Multiple attempts |
Unchecked |
Unless this is a practice test that you want students to be able to take multiple times, you'll
obviously leave this option unchecked, and you won't specify how many attempts to allow. Please note that with version 7 of Blackboard, you can now determine which score the server uses when calculating grades: the first attempt, last attempt, highest grade, lowest grade, or average of all attempts by a particular student. |
| |
Force Completion |
Unchecked |
"Force Completion" means that a student can't start a test, save his/her answers, and then return to the
test at a later time. This normally would be a good setting, if Blackboard tests were more reliable. However, students
can do various things to lock themselves out of a test in Blackboard: for example, resize the test window, use the browser navigation
buttons rather than the test navigation controls, mistakenly close out the browser window containing the test, etc. If you check
"Force Completion," then your students will truly be locked out of the test if they make one of those mistakes. The server
won't allow them to return to the test to complete their work. They'll need to get in touch with you, explain what happened, and ask you
to clear their attempt, which forces them to take the entire test over again. We strongly recommend that you leave
"Force Completion" unchecked. If you want to limit a student's ability to view your test, save it, look up the answers, and
then return to the test, you can provide a time limit for the test, and you can also reduce the time window when the test is available. |
| |
Set timer |
Checked or unchecked |
You can set a timer as a way to force students to complete a test in one sitting, and also as a way to
limit the time that students can spend trying to look up answers. However, Blackboard doesn't automatically submit the test when
the time period elapses; it just records in the Gradebook the time that elapsed between when the student opened the test and when
s/he submitted all the answers. If you want to set a time limit for your tests, you'll need to articulate very specifically
(perhaps in the instructions for the test) what the penalty will be if a student exceeds the time limit. |
| |
Display After and Display Until |
Checked or unchecked |
You can use the "Display After" and "Display Until" settings to establish a certain window
of time when your test is available to students. You need to click in those boxes to indicate to Blackboard that you want to limit
the availability of the test, in addition to setting the date and time for both (or either) field. You can use the "Display After"
field alone if you want to set the particular date and time when students first see the link to the test, but you're not worried about
limiting the time frame when students can actually take the test. If you use the
"Display Until" setting alone, your test will become available as soon as you submit the Test Options to the server, and it will
(in effect) disappear from view once the "Display Until" limit is reached. |
| |
Password |
Unchecked, except for special circumstances |
In general, only students who are enrolled in your course can see your course content, and students can take
the tests you make available through Blackboard only when you decide to make those tests available. If you want
additional control over when students can take a test, you can set a password for the test, but that means that you'll have to
find a way to communicate the password to your students. You can also change the password by setting the password once,
then returning to the area where you posted the test (Assignments, in our example here) and modifying the test options once again to
set a new password. You might want to do that (for example) if you have a Blackboard course that combines multiple sections
into a single course, and you want to let different groups take the test at different times. Since setting a password involves
an additional complication, though, we recommend that you use other means (such as the Display After and Display Until settings,
described above) to limit access to your test, if desired. |
| 3. Self-Assessment Options |
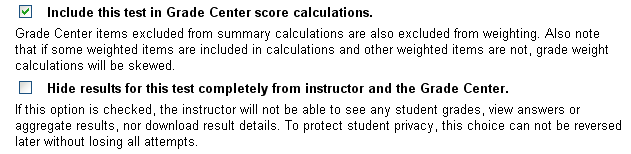
Include this test in Grade Center score calculations |
Checked (most cases) |
Blackboard does allow you to create "practice" tests or "self-assessments" - in other words, tests that do not contribute to a student's final grade, but help a student assess how well s/he understands the course materials. If this test is a self-assessment, then you'd uncheck this option. If this test counts towards a student's course grade, then you would leave this option checked.
|
| |
Hide results for this test completely from instructor and the Grade Center |
Unchecked (most cases) |
We strongly encourage you not to check this box (so that the score is hidden from the Grade Center and from you). Blackboard created this option under the assumption that if a student knows that the faculty member can see the results of the self-assessment, the student will be reluctant to take the self-assessment. If you think that your students mistrust you and would feel more comfortable taking self-assessments whose grades you can't see, then check this option. Otherwise, we strongly recommend that you leave this un-checked.
|
| 4. Test Feedback |
Select which feedback should be displayed upon completion |
Score, Submitted answers, Correct Answers, and Feedback (most cases) |
One of the main advantages of creating tests in Blackboard - if you choose question types, such as multiple
choice, matching, ordering, etc., that can be graded by the server - is that the server grades those questions for you,
and the server can also provide immediate feedback to the students about how they did on the test. We recommend that you
select all the options presented to you because detailed, timely feedback is so important to student learning. However, if you want
students to take the test more than once (for example, as a practice test), you could select "Score" and "Submitted answers", which tells the
students which questions they got wrong or right, without revealing the correct answers. If you are worried about cheating (one student
taking the test and then giving the answers to other students), you could select just the "Score" box, and then you could return to this area later (once all students have taken the test) to allow for the most detailed feedback at that point.
|
| 5. Test Presentation |
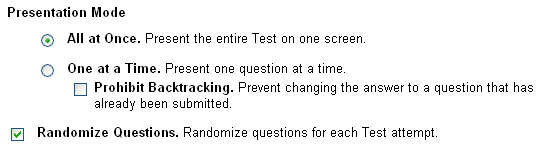
Presentation Mode: All at Once or One at a Time |
All at Once (most instances) |
This issue tends to divide Blackboard users, but. . . . We recommend that you present your test questions
all at once, unless you have a very long test with questions that will take students a long time to complete. When questions
are presented all at once, the students see the test as a single Web page, and they scroll down on that page to answer all the questions, then
submit the test as a whole. When questions are presented one at a time, the student has to submit each question, and Blackboard also
asks the student to confirm the submission each time, which can quickly become annoying. Also, when students have to move from one question
to the next (on different pages), they are more likely to use the browser navigation buttons rather than the test navigation controls, which
can cause errors and lock the students out of the test. The main problem with presenting the test all at once is that if the test is a very long
one, there is no apparent activity (from an Internet Service Provider's point of view), since there has been no exchange of data between
the student's computer and the Blackboard server. Some Internet Service Providers will close out the connection if they think it has
been idle for too long, which will basically wipe out the student's test attempt. To prevent this from happening - and to safeguard against other possible problems - we
recommend that you urge your students either to use the  button for individual questions or to scroll down to the end
of the test at various points and click on the button for individual questions or to scroll down to the end
of the test at various points and click on the  button
to save the answers they have entered already. For that reason, it is also important that you not check the
"Force Completion" button, so that if a student does get bumped out of a test, s/he can at least begin the
test again from the last point where s/he saved it, rather than having to start from the beginning, after you clear the attempt. If
your test includes many answers that require reflection and time to complete, you can also recommend that students open a second
browser window with a site that automatically refreshes itself, such as the
Keep Alive
Web site (opens in new window), which refreshes the Web page at a chosen interval, keeping the Internet connection active. Students
can also compose (and save) long answers
using a word processing program, and then paste the answer into the test when they have completed each one. button
to save the answers they have entered already. For that reason, it is also important that you not check the
"Force Completion" button, so that if a student does get bumped out of a test, s/he can at least begin the
test again from the last point where s/he saved it, rather than having to start from the beginning, after you clear the attempt. If
your test includes many answers that require reflection and time to complete, you can also recommend that students open a second
browser window with a site that automatically refreshes itself, such as the
Keep Alive
Web site (opens in new window), which refreshes the Web page at a chosen interval, keeping the Internet connection active. Students
can also compose (and save) long answers
using a word processing program, and then paste the answer into the test when they have completed each one. |
| |
Randomize Questions |
Checked or unchecked, based on preference |
If you randomize the questions, then the order of questions for one student will be different from that of
other students sitting besides him or her (assuming your test is given in a proctored setting). In unproctored settings, students
will find it more difficult to exchange answers, since the questions will be in a different order. You can choose to leave this checked or
unchecked, depending on how much security you desire for the test. |
- When you have finished selecting the options for your test, click the
 button to send your choices to the server. button to send your choices to the server.
- Blackboard will confirm that the test options were "modified successfully." Click on the
button twice to return to the section where you added the test. In our
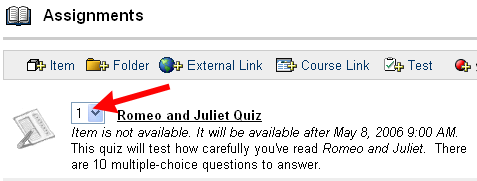
example below, the "Romeo and Juliet Quiz" has been added to the Assignments section, and it is the first item in that
section. (The test might not be the first item in your area.) If you want to change the order of the items in the area of
your course you have chosen, you can use the drop-down arrow (marked in the figure below) to select a different position for your test. In the figure just
below, the test icon is greyed out, because the test is not yet available to students:
- Click on the button to return to the Control Panel for your
course.
Last revised November 10, 2008. Please send questions or comments to itec@bucknell.edu.
|